How CAVAL uses MediaSilo to effectively manage their media
When you are the creative director of a rapidly growing retail startup with a worldwide presence, relying on Slack or, even worse, email as your primary asset management tool is a recipe for chaos.
But, this was the reality that Benoit Habfast, the creative director of the French sneaker brand CAVAL, was experiencing when the company began a highly successful Indiegogo campaign to raise capital in 2019.
At any given time, Habfast was managing dozens of campaigns and a variety of products, including CAVAL’s innovative, handcrafted line of “mismatched sneakers.” CAVAL’s meteoric success has meant an increased need for marketing campaigns, online storefronts, and social media presence, with massive amounts of photo content being created for all of these different outlets.
Scalable asset management is essential to successful growth.
High demand for photos across all departments at CAVAL has created thousands of assets that need to be organized and managed on a daily basis. An image library of this size can easily get disorganized, making it difficult to ensure everyone on the team can quickly find the assets they need for a project.
Habfast and his team struggled to find media management software that solved all of their problems. As a stopgap, they were storing files on their desktops and external hard drives. “They were half on my computer, half on some hard drives, and a bit on Google Drive too,” he said. “We would share by sending through Slack or email, but it was a big pain.”
In order to keep pace with the company’s growth, Habfast needed to centralize the image library so the entire Caval team could easily search and find exactly what they needed. MediaSilo helped CAVAL create an effective asset management strategy. That’s when the brand turned to MediaSilo and its organization workflows. Habfast found MediaSilo’s project and folder-based structure, tagging features, and robust search functionality to be the exact media management solution the brand needed.
Tagging streamlines file organization.
CAVAL’s creative team started by moving all of the existing files off of their desktops and hard drives and uploading their vast library of content into the cloud-based MediaSilo platform. Although organizing the files into projects and folders was a good jumping-off point, Habfast found that using tags was the real key to unlocking the full potential of the system.
As new content was continually added to their MediaSilo account, the team established a system for uploading where tagging assets was an integral and routine part of the process. Using MediaSilo’s bulk-tagging feature, the team easily added relevant tags as new content was uploaded into their projects. After dragging and dropping batches of related content into the system, the team selected all of the new assets and labeled them with relevant tags in one easy step.
Structured tagging eliminates redundancy.
The CAVAL team was looking for a system that would eliminate overlaps while requiring as few tags as possible. Using the MECE Principle to structure image tags and guide his tagging in MediaSilo, Habfast settled on four essential tags that would effectively organize every image in their account.
“E-commerce” and “Creative” are the first tags to be added to every asset, differentiating between images intended for the online storefront and images that will be used for a creative marketing campaign. “Model” and “Packshot” are the second layer of tags, indicating whether the image has a person or model wearing the sneakers or features the sneakers alone.
With this simplified tagging strategy, Habfast’s team built an organizational structure within MediaSilo that breaks down their entire content library into those four target image categories. Supplemental tags for product name, reference number, and special campaigns such as “Valentine’s Day” are added on top of the four primary categories to further distinguish individual images and create a more robust search experience.
Intuitive, tag-driven search makes it easy to find content.
“Now, we don’t ask on email or Slack anymore, ‘Hey can you send me that file.’ We know where to find that file—there’s just one place to find everything.”
With this new, more organized tagging structure, CAVAL’s MediaSilo users can easily and intuitively search for assets in their account. Using MediaSilo’s advanced global search, users can select one or more tags from a picklist; apply additional filters, such as who uploaded the assets and when they were added; and narrow thousands of assets to a select few by searching for a handful of relevant keywords.
MediaSilo’s cloud-based media management software has enabled CAVAL to get images off of a hard drive and into a feature-rich, easy-to-navigate platform. By centralizing its asset workflow, MediaSilo allows the entire CAVAL team to securely share and access the files they need when they need them. As Habfast explained, “Now, we don’t ask on email or Slack anymore, ‘Hey can you send me that file.’ We know where to find that file—there’s just one place to find everything.”
MediaSilo empowered CAVAL to scale its asset management processes so employees are free to focus on their high-level creative projects, new campaigns, and marketing strategies.
In this journey stage, we will explore the concept of ‘editing in the cloud’. Here editors connect to cloud virtual workstations to perform post-production work with their video content management systems.
What is a Virtual Workstation?
Conceptually, a virtual workstation is simple.
The editing suite and assets don’t run on a high-powered local computer. Instead, the same software runs on a virtual machine in a cloud data center.
This virtual machine provides cost savings since you only pay for the time you use it.
You also don’t have to:
Maintain the server
Apply security patches
Deal with broken hardware
Have all of the other headaches associated with that workstation in your office
Virtual workstations in the world
Similar to workstations in the physical world, virtual workstations come in all configurations suitable for different workloads.
One can pick from hundreds of combinations of CPUs, RAM, storage, network interfaces and other features.
For video editing, workstations configured with GPUs are generally required. This allows the software configuration to run optimally for this video-processing-heavy software stack.
Virtual workstations and non-linear editing
Virtual workstations are considered headless systems. Like all cloud servers, they don’t have a monitor, keyboard or mouse.
Running a database is easy, but running a graphics-heavy program like a non-linear editing suite is more challenging.
To make this workstation useful, it is necessary to be able to attach a monitor. To do this, we rely on a remote desktop client.
Remote desktop software such as Remote Desktop for Windows or VNC Connect permits a remote user to log into a workstation. They allow the desktop window, keyboard and mouse controls to become remotely accessible, much like they are being accessed locally.
However, many of these general-purpose remote software desktop packages don’t cut it for video editing. They were not designed for the high-resolution and high-refresh rates required to project an editing interface remotely.
Fortunately, there are solutions to meet those challenges.
Virtual workstations for media
Teradici Cloud Access Plus and Nice DCV are software packages that address these video-intensive needs.
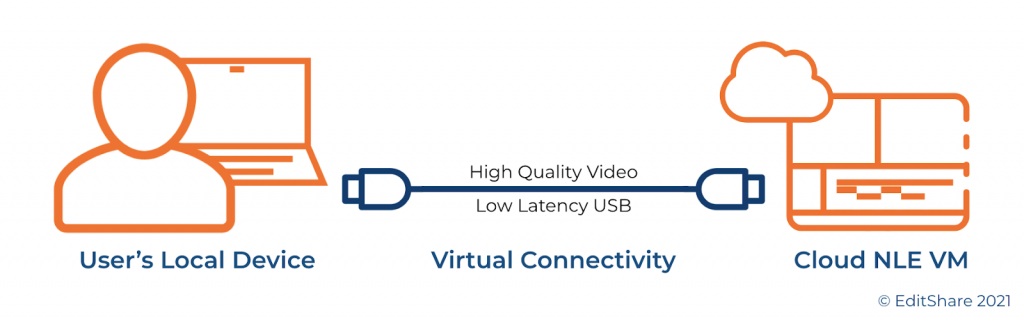
These applications are installed on virtual workstations. The workstation’s GPU encodes and sends video, keyboard, mouse, and USB data to a remote client. It’s as though you are running a very long HDMI and USB cable from the cloud data center to your local computer.
Additionally, these solutions can support two monitors for many environments, giving you a larger work area.
While these high-performance applications make it feel like a remote computer sits on your desktop, there are practical limits. The primary limitations are physics, the internet, and WiFi.
Even over the best network, the further the physical distance between the virtual workstation and your local computer, the more perceptible the lag will be.
For that reason, when deploying a cloud editing solution, it’s essential to choose a cloud data center physically close to your local office or home.
The internet routing itself will have an impact. Aside from distance, ensure IP connectivity, typically measured using ping times and throughput, is considered.
Lastly, it’s a well-known fact that the WiFi network most computers connect to is the biggest culprit.
For that reason, hardwiring your local computer to a router can help eliminate many sources of headaches. In addition, EditShare recommends a broadband download speed of at least 10-15 Mb/s per workstation monitor for best performance.
Workstation Instances and Software Images
Virtual workstations comprise server hardware and software, so let’s look closely.
Compute Instances
All major cloud vendors offer a family of GPU-enabled compute instances suitable for video editing. Like buying a PC or Mac, you can choose how powerful a system you want and how much you’re willing to pay.
You’ll want to choose the appropriate compute instance depending on your typical workload:
What codec bit rates are being edited?
How many concurrent streams are being accessed and edited?
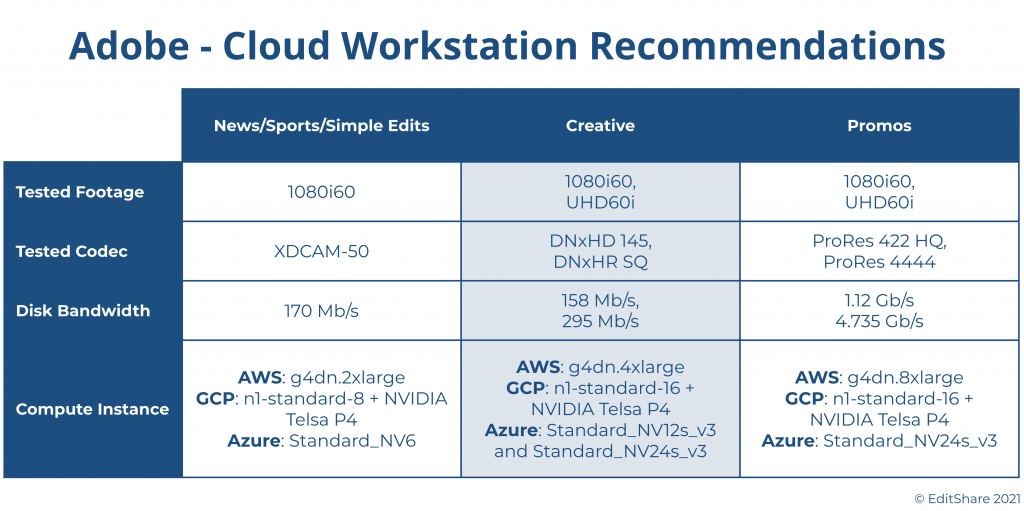
Adobe has done a great job of publishing guidelines for selecting the appropriate workstations for different personas of video editors.
Here’s a table summarizing their choices for AWS, GCP and Azure:
The beauty of the cloud is your choice is never final.
If you choose the right cloud production solution, you can easily migrate from a low-end workstation to a high-end workstation and back again. Moreover, you can do this while preserving your editing process, environment and projects.
Software Images
In a virtualized environment, software images can easily be deployed to a machine. They can operate for a while and then spin back down when not in use.
Software images are pre-baked into a golden image to make this process efficient. This means they are pre-configured and ready to go when they are deployed to a virtual machine.
AWS calls these Amazon Machine Instances, GCP refers to them as an Image, and Azure names them Virtual Disk Image. The concept is the same. An image is created with the operating system, applications and optimizations. This image can then be quickly deployed to a system, and no further software installations are necessary.
In our example, this software image will include the remote desktop software, editing applications, and other supporting software. It provides a fully-function environment to start working right away.
Once deployed, users can then make changes to their specific environment – customizing their environment, updating software, and adding plug-ins.
Then, using persistent storage such as block storage, each individual workstation can be shut down while preserving that software image. This frees up the expensive compute instance. It also saves the image at a reasonable cost, ready to be used by the user at a later point on-demand.
As virtual workstations are equipped with GPUs, the editing applications often require the use of Microsoft Windows. Therefore, the cost of running a virtual workstation 24×7 can get pricey.
Saving the software environment to persistent storage allows users to only use workstations when they are active. Since a 40 hour work week is about 24% of the total hours in a week, the savings can be fairly substantial.
Cloud-based video editing
For the most part, the major non-linear application vendors are embracing cloud-based video editors.
Adobe Premiere Pro can operate in virtual environments. Adobe has done a great job documenting its best practices for Virtual Desktop Infrastructures on the prominent three cloud vendors.
DaVinci Resolve can operate in virtual environments. You can read about DaVinci on AWS here.
With the other non-linear editor vendors, we expect to see a progression towards cloud-based video editing tools as well.
Final Cut Pro is limited by MacOS not being available in cloud environments for editing use cases. (Macs have recently been supported in AWS specifically for the development of software applications and at this moment, don’t support FCP).
Avid Media Composer is also offered in the cloud via an add-on VM license. There are restrictions Avid applies to the use of their software.
Who can help me create virtual workstations for cloud video editing?
The EditShare team can help you create your virtual workstation for cloud video editing.
The ability to support multiple workstations and scale editing bandwidth to meet the challenge of production teams is dramatically more flexible in FLEX. Servers and storage can be scaled up and down to accommodate the needs of any budget or project.
Multiple editing stations, with any mix of horsepower, non-linear editing applications, and workflow requirements, can be instantly provisioned to meet a workgroup’s demands.
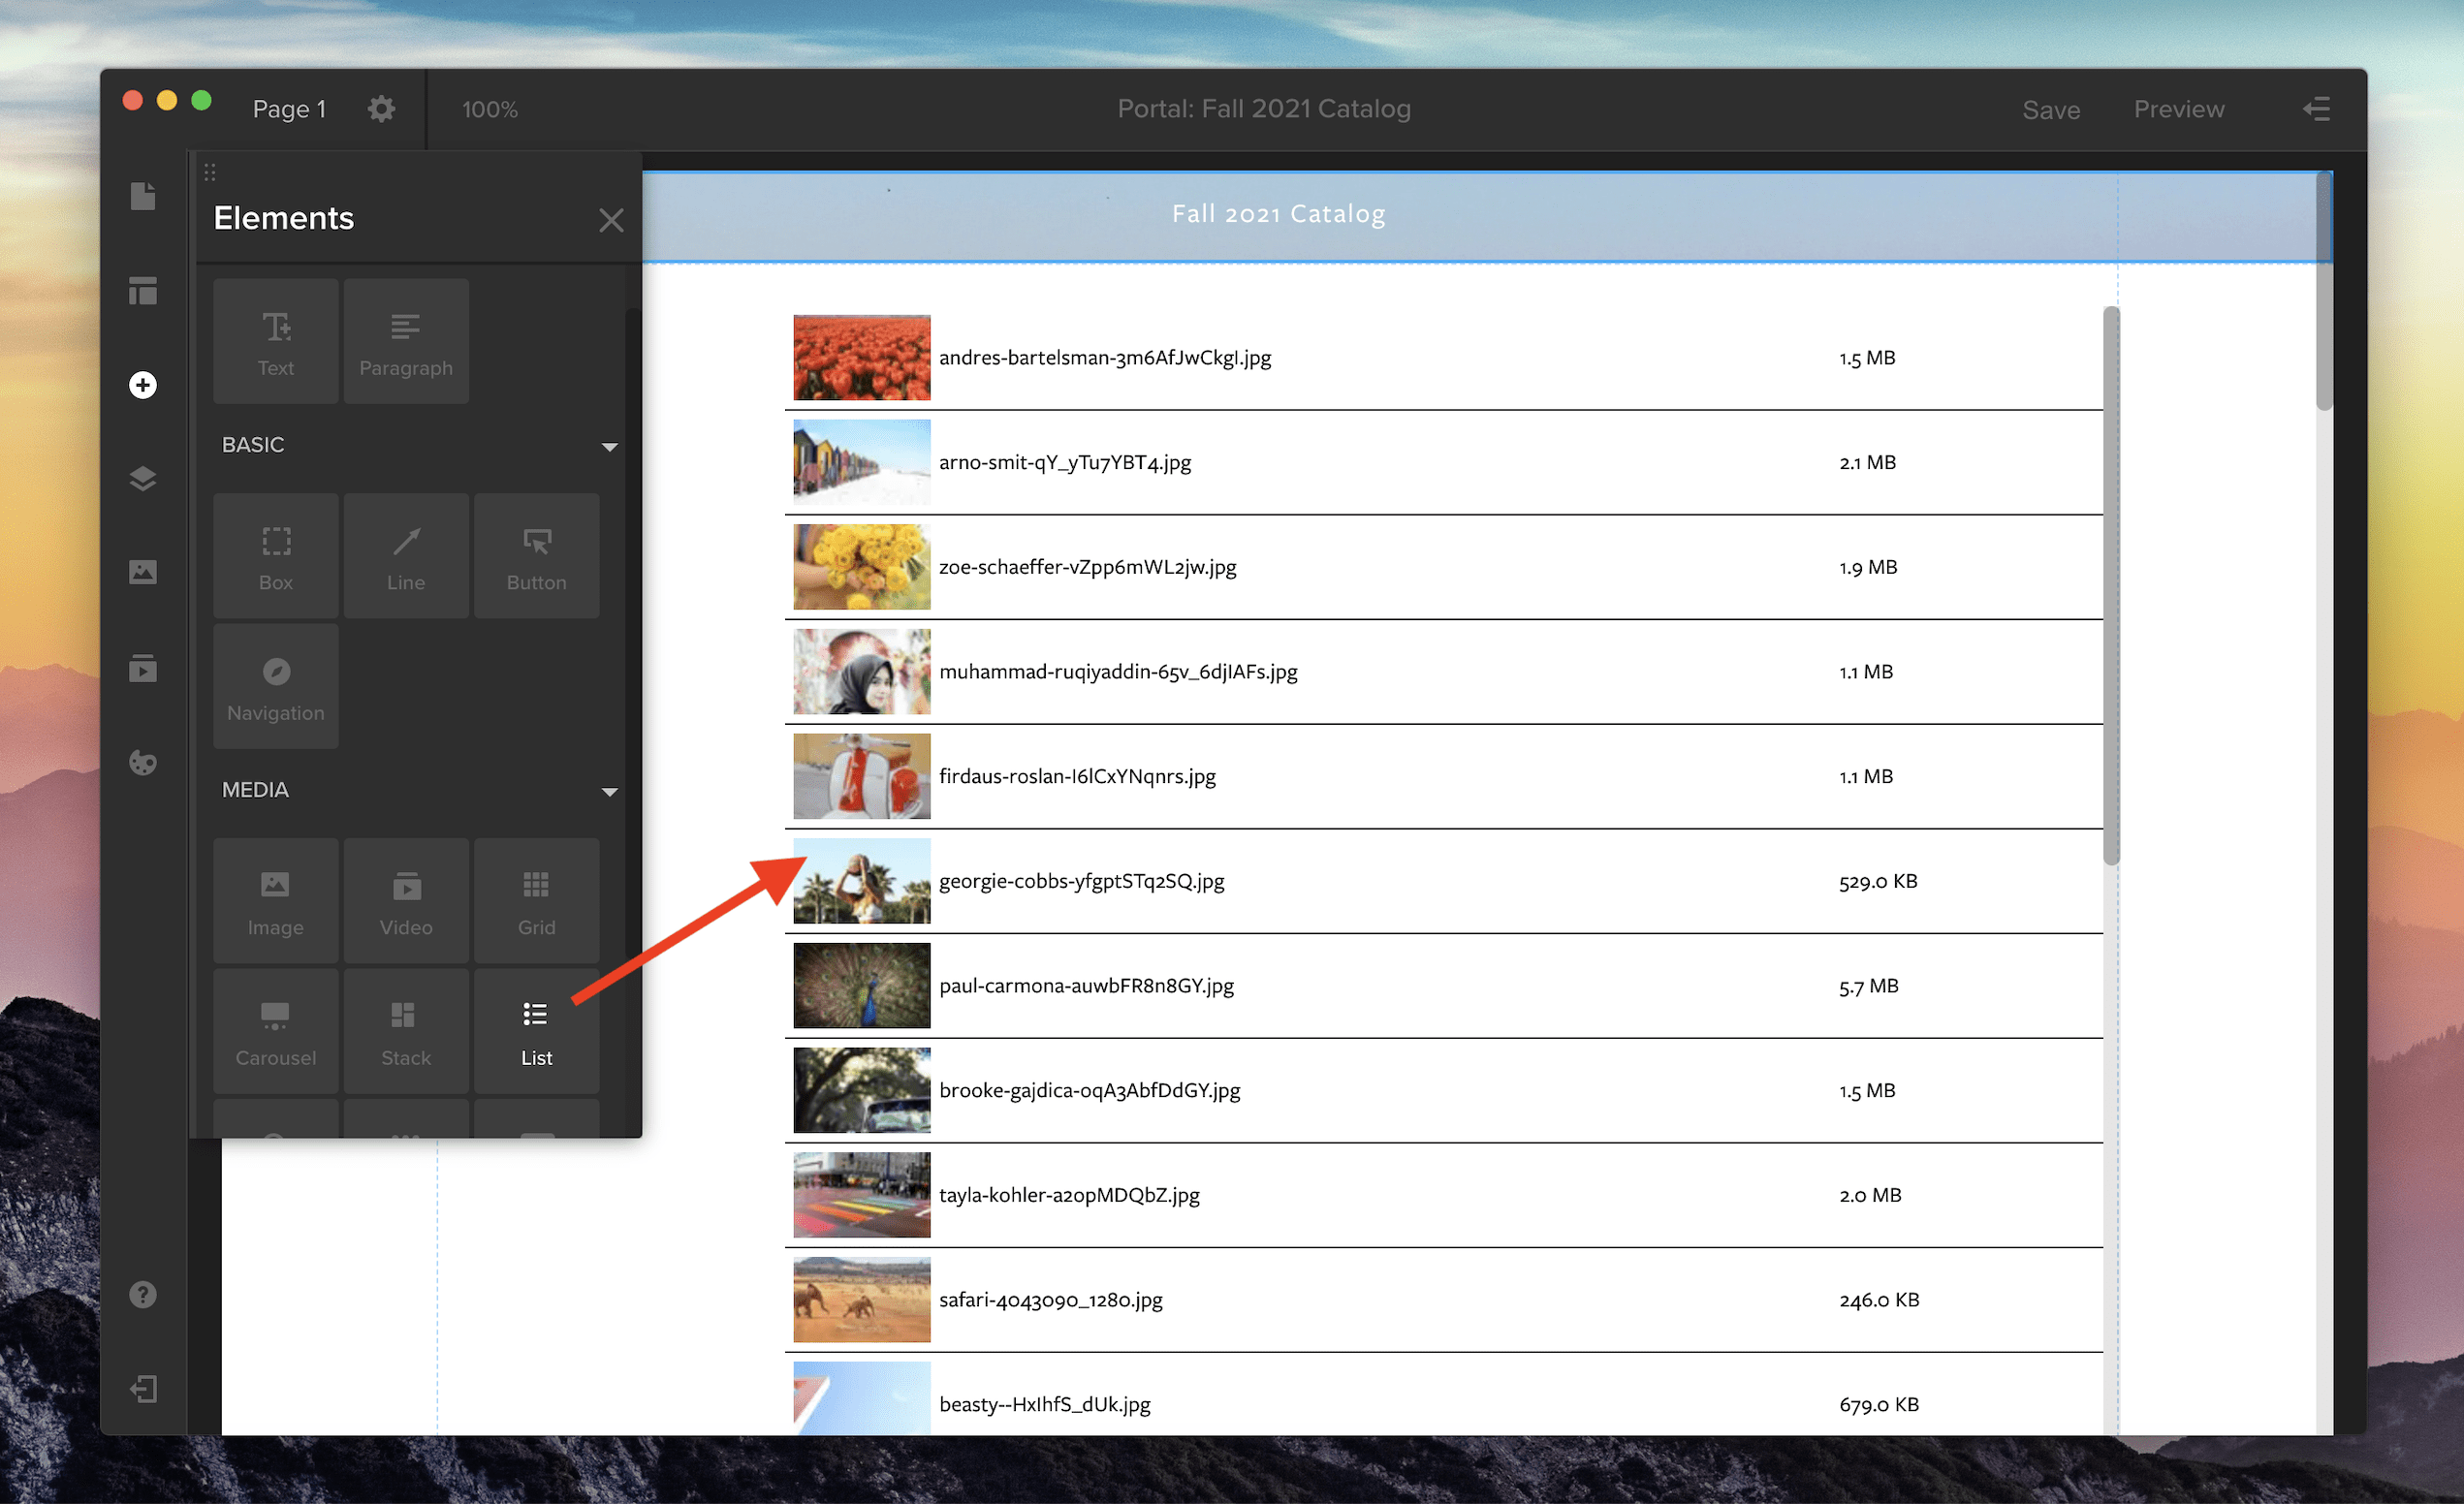
List view is now supported in Spotlight for your media galleries. To add a gallery with list view to your Spotlight template, open the Elements panel by clicking the plus icon along the left-side toolbar. Then, in the Media section, choose the List option or pick from three other media gallery views: Grid, Carousel, or Stack. Click and drag the gallery icon onto the main screen to add it to your Spotlight template.
To customize your gallery, open the properties panel in the right-side drawer. Here, you can adjust the spacing and thumbnail size in your list by changing the width and height. You can also customize the font, background color, and the divider line between each row.
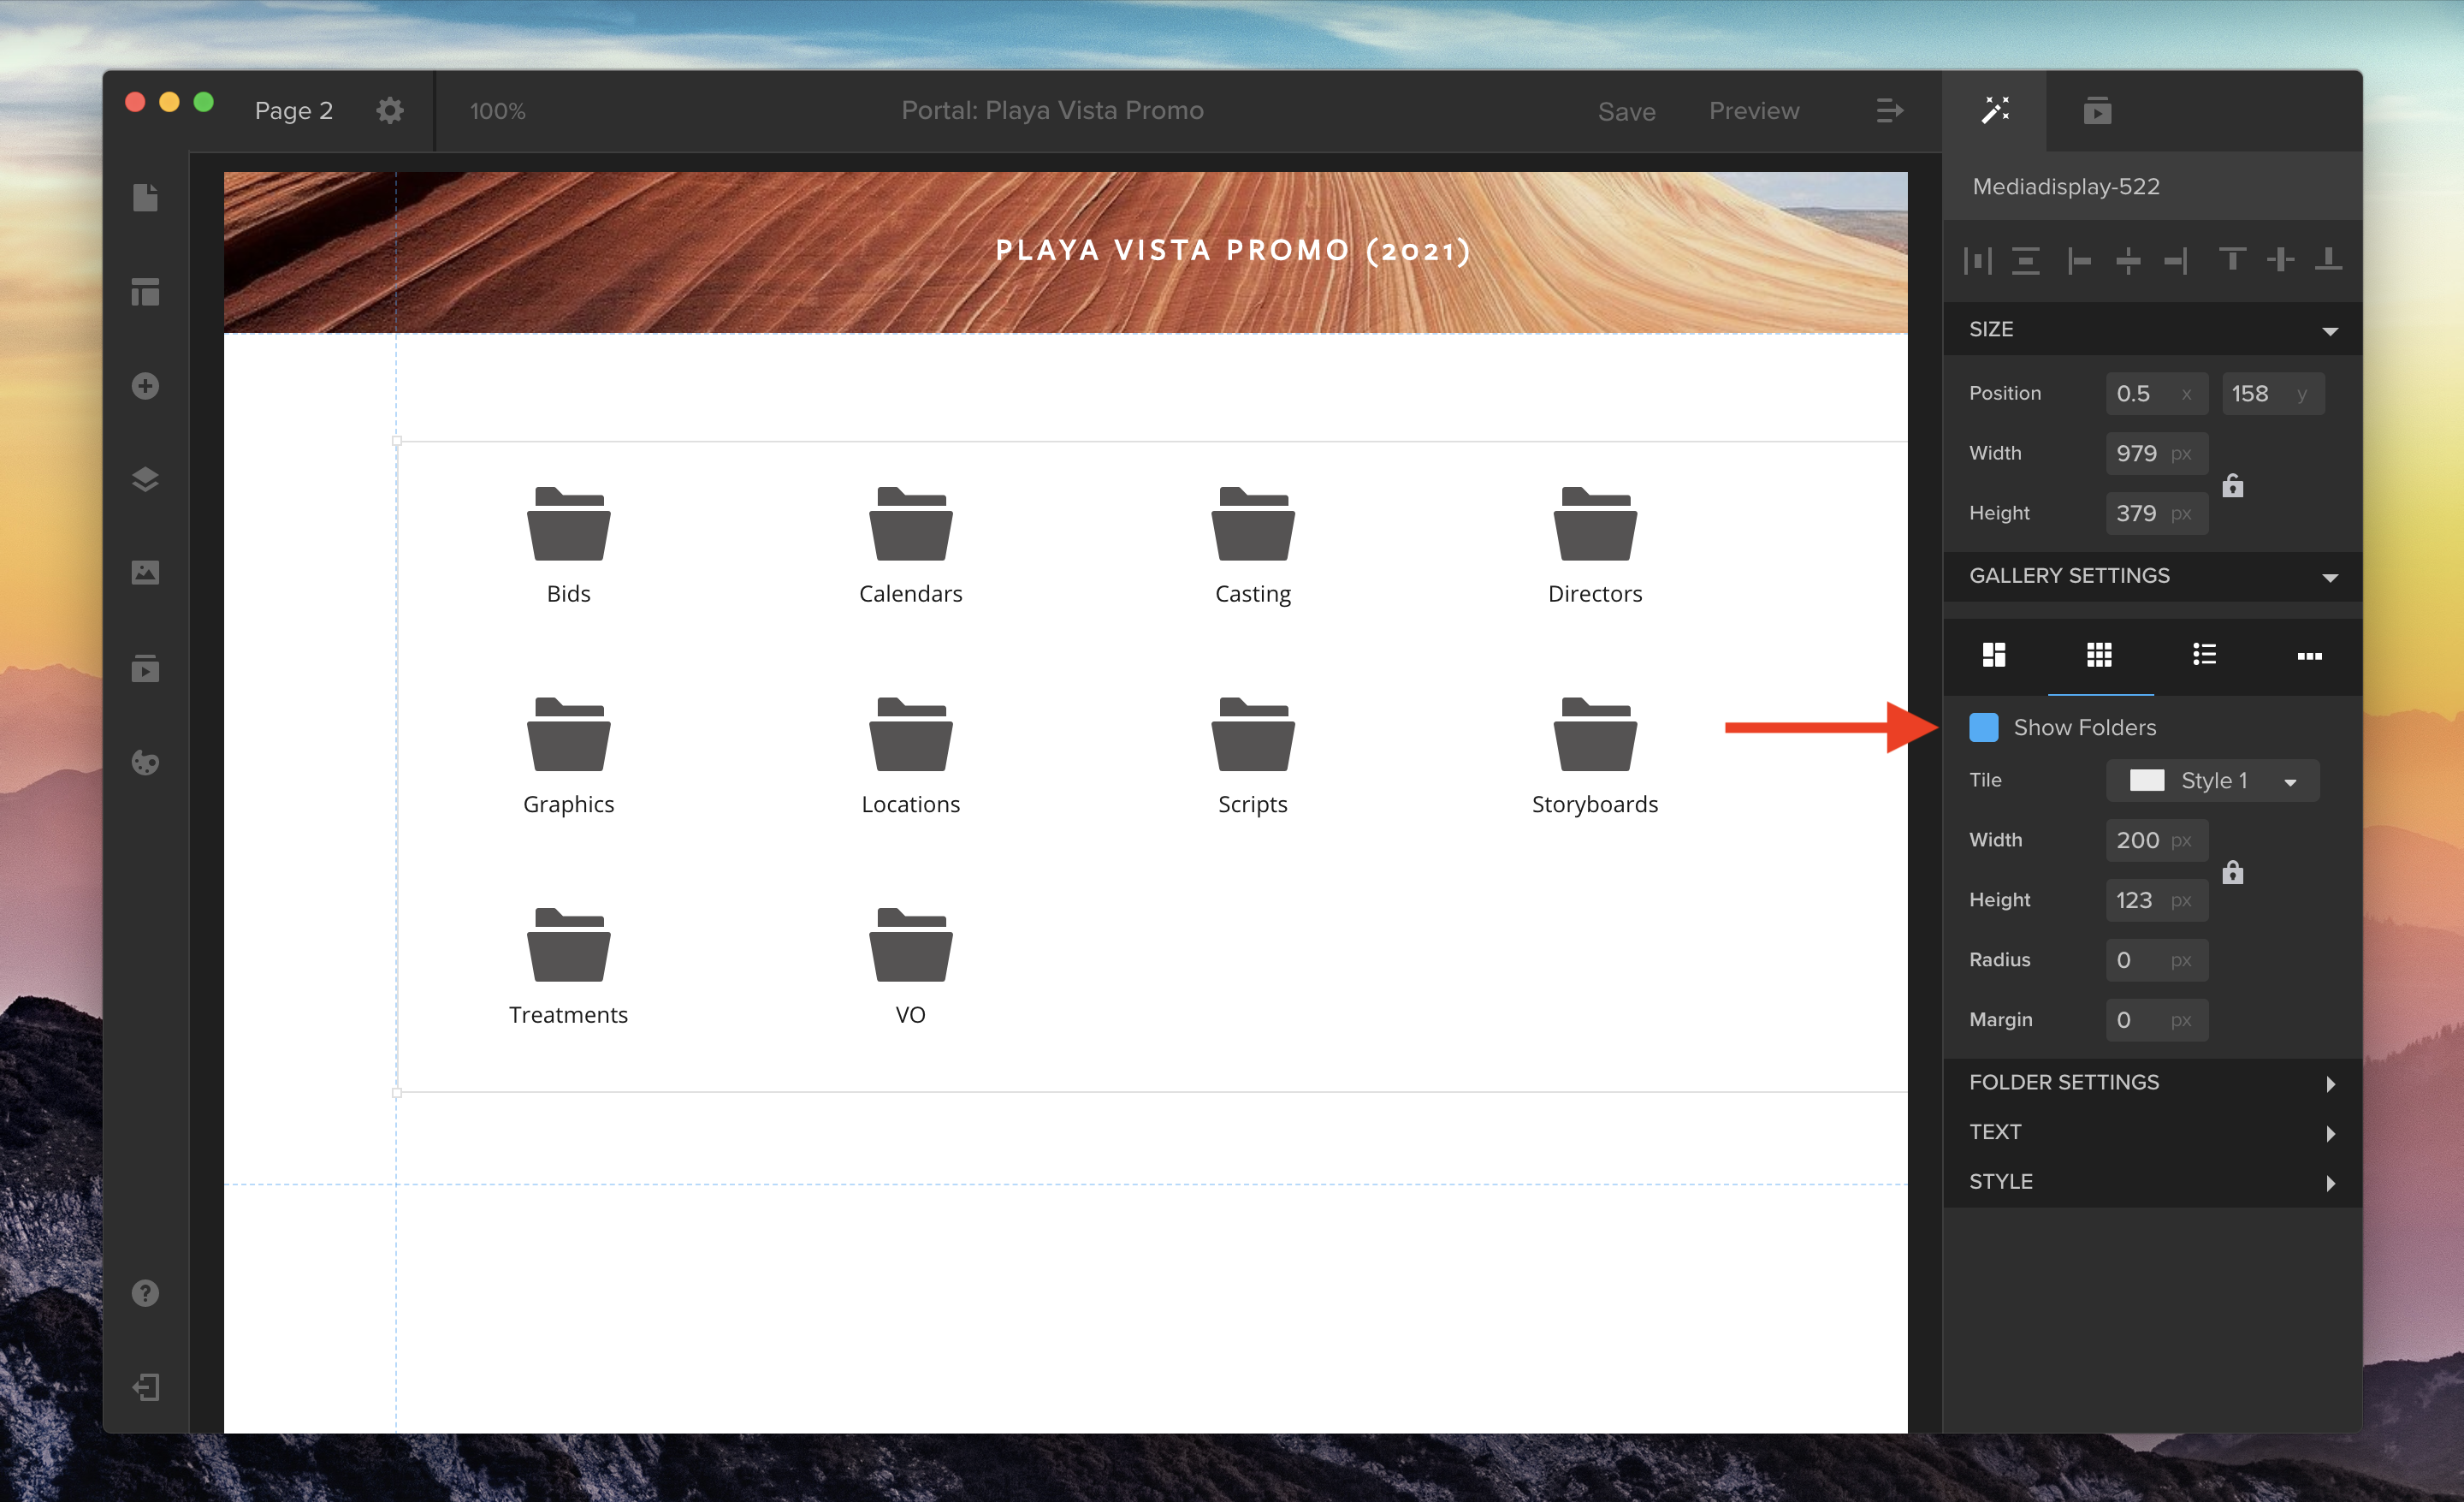
You can also now choose whether or not you’d like to hide or show playlist folders in your media galleries. Use the “Show Folders” checkbox in the properties panel to toggle this option on or off for Grid or List view.
In our previous article in the Journey to the Cloud series, we looked at migrating backup and archives of media content to the cloud. The primary intent being to move off of legacy on-premise archive solutions and provide a higher degree of resiliency and flexibility in the storage and access of media libraries. Once those high-resolution media files are stored in a public cloud, they are much more accessible for a variety of use cases.
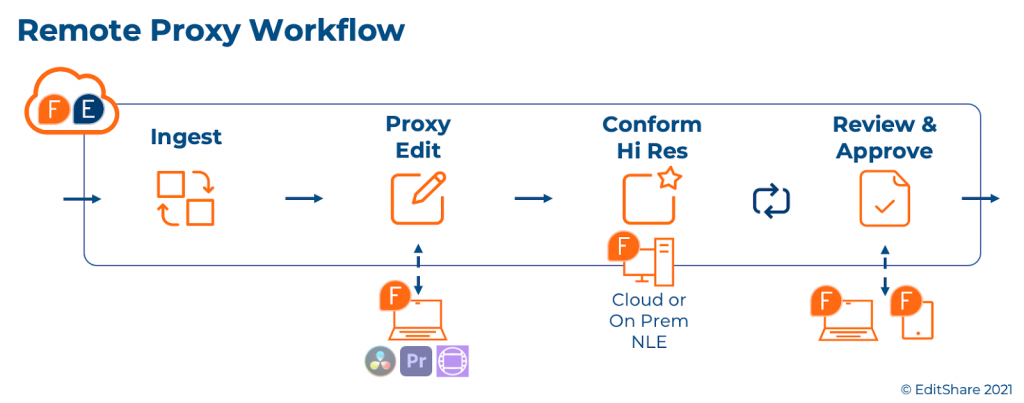
In this article we’ll cover cloud-based, remote proxy editing which extends the usefulness of those cloud media backups to make them accessible for video editing. We’ll also cover one other benefit within this stage of the Journey, and that is a proxy-based browsable content library accessible to non-editors.
Video Proxies in the Cloud This stage in our journey builds upon the high resolution content stored in the cloud from on-premise backups. While this content is accessible for restoring to on-premise solutions, it’s not necessarily useful for editing from these cloud-based libraries. Large file size, object based stores, and latencies all make remote editing of these files impractical at this point in time. To address these hurdles we can turn to video proxy files.
Video proxy files are lower bit-rate and lower quality versions of the original high resolution source. Instead of working with source content which can be 100’s of Mb/s, we can generate proxies of these files which can be on the order of 1 Mb/s. This much smaller proxy file can then be used for editing. Upon playback that file may not be as high-quality and pristine as the original, but it can be good enough to edit against. The important thing to note is that the proxy file is frame aligned to the high resolution, so that whatever you see in the proxy at a particular timecode will match the high resolution at that timecode. This means you can create a sequence using mixes of several different video and audio tracks, edit them in a tool such as Adobe Premiere Pro, and then take the resulting EDL (Edit Decision List) back to the original high-resolution content where it can be conformed against the original high-resolution content. Most editing tools have the ability to easily re-link the proxy files to the high resolution (using rules to match files) and some also have the ability to link the high resolution and proxy together so you can toggle at any time.
Generating Proxies in the Cloud Now that we know proxy files are lighter weight facsimiles of high-resolution content we can focus on how they can be created. Several tools exist that can generate proxy-based content from original sources. EditShare FLOW is a media asset management solution that includes built in proxy generation capabilities. FLOW can be set up to automatically scan an object store and generate proxies of all this stored material. In addition, as a media asset manager, it takes care of managing the links between the two files, correlating those files for conforming and other workflows. In addition to FLOW, other 3rd party transcoders, such as AWS Elemental, can be configured to perform the same function.
The beauty of proxy files is the size. While the proxy bit-rates can be configured to suit one’s needs, the important thing is that they are significantly smaller in size than high resolution. For example, one may have high resolution content stored in DNX145 codecs (145 Mb/s) but the corresponding proxy can be 1 Mb/s – in other words, less than 1% of the original file. The result is that proxies are almost inconsequential in terms of overall storage costs.
Editing Proxies from the Cloud We have our high-resolution content in the cloud and we have created their corresponding proxies, now what? As with everything in video workflows, there are choices.
Remote Proxy Editing For many users, the attractiveness of using a local computer for editing is compelling. Home or office based computers can be set up to work against cloud video storage quite easily. Depending on the tool, proxies can be either downloaded or streamed down to the local computer for easy editing. This process of working with proxy material is referred to as off-line editing. Originally this workflow was useful because most computers could not meet the processing or storage requirements necessary for high-resolution editing. While this may still be the case with the demands of some codec’s, this well established workflow is perfectly suitable for remote-editing proxy editing.
Setting up access to your cloud environment is quite straightforward and will allow editors to quickly become productive. In establishing connectivity to your cloud environment, it is worth noting, access to proxies should be controlled through a secure protocol such as HTTPS or via a VPN to ensure security of your environment. The FLEX solution comes bundled with standard security features enabled by a range of cloud services. When it comes to rendering/conforming a sequence, high-resolution files can be accessed via similar secure protocols, however it may be faster and more cost effective to remotely render projects on a workstation within the cloud environment.
Leveraging the FLOW system can further allow video editors to become more productive through the use of the FLOW Panel for Adobe Premiere Pro and the FLOW Window for DaVinci Resolve. These ‘plug-ins’ provide the ability to map both the proxies and high-resolution content so editors can have the ability to edit against the proxies while providing the ability to view specific scenes by toggling over to the original content directly within the NLE tool set. Note that this high-resolution playback may be practical for viewing a specific frame or a media clip, if bandwidth is sufficient. However, this is not the best method for reviewing a sequence of high-resolution clips as the user experience will likely run into playback issues. Still, it serves as a very convenient spot-check for editors.
The Journey to Cloud Based Proxy Editing Once you’ve made the decision to backup your content to a public cloud provider, the steps to cloud based proxy editing are rather straightforward. This is simply a matter of creating the content proxies, and with the assistance of a media management solution such as EditShare FLOW, one can simply point their editing tool at the proxy and get started.
For many customers, there’s an additional benefit to building out proxy environments in the cloud, and that is content browsing and access. EditShare is seeing an increased interest in using a cloud environment to serve as the universal content library for organizations looking to unlock their media libraries from private vaults.
Once content is loaded into a cloud, FLOW can surface a browsable repository that’s managed, controlled and viewable by not just editors but other creative individuals who may be interested in looking at finished and raw footage previously stored in proprietary vaults. In doing so FLOW provides a user-friendly method for content re-use within organizations, and enable workflows that can reduce infrastructure spend.
Your Cloud Journey EditShare continues to provide its customers with solutions that make the most sense for them. If that’s on-premise, EditShare has you covered. And if you recognize that a migration to cloud services will offer benefits to your organization over time, EditShare can provide you with that pathway that makes sense for your business. If that’s simple backup and archives, we can help. If it’s extending that investment to allow for remote proxy editing or perhaps a browsable content library we can help there too. And if you are looking at perhaps moving your entire video production environment to a cloud environment we can help with that as well. In upcoming articles in the series, we’ll dive into additional aspects of the Journey to the Cloud.
As organizations embrace cloud technologies for video production, often the first area of focus is the use of a public cloud for media backup. The economics and practicality make sense now more than ever, different price points and capabilities can support a variety of needs. For many teams, it’s now a matter of if, how, and when.
Deciding if it’s time to move media from on-premise storage to the cloud begins with a review of costs and benefits. Traditionally, archives have meant tape – it’s density and costs are quite compelling but they have limitations such as accessibility, obsolescence, and missing tapes. More recently, object-based on-premise storage has become an attractive option. Solutions can use low cost, commodity hardware managed by software (referred to as Software-Defined Storage), and they offer performance and scalability across servers as needed.
Tape based systems, such as LT0, and on-premise object storage can be attractive to many organizations looking to build scalable content libraries. Increasingly though, the benefits of cloud based storage have emerged, and along with it the use of this methodology. To begin, cloud video storage offers data durability levels far beyond any on-premise storage, often keeping multiple data copies across multiple geographic zones. And of course, the pay-as-you-grow economics, lack of IT overhead, zero footprint and robust security features can all factor into one’s decision making process.
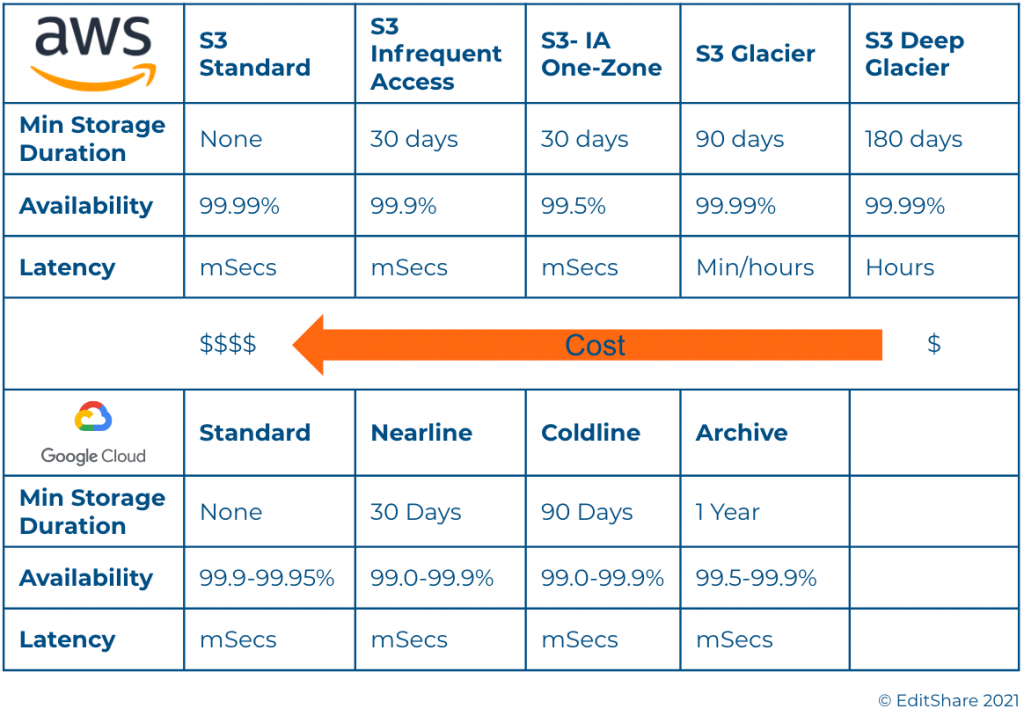
Navigating the Strata of Cloud Offerings Much like traditional storage systems, many public cloud providers offer a hierarchy of options when it comes to cloud storage. For media storage archives, object-based storage provides the scale that’s appropriate. Generally these tiers vary in cost, durability, availability, accessibility and other metrics. Below is a quick snapshot of AWS and GCP based tiers:
This chart is not inclusive of all features/costs but provides a quick overview of two public cloud vendors’ object storage options.
The obvious attraction to cloud object storage is the ability to select a tier based on expected access needs and archive duration – the options are plentiful. One point of note, users are generally charged for access to these storage tiers, whether egress fees for pulling the content off of the cloud or access fees for retrieving files stored in deeper tiers. These fees should be considered in any archival economic analysis. If archival is your single cloud consideration there are also cloud providers such as Wasabi that provide competitive storage pricing without any additional access & egress charges.
Okay, you’re pulling the trigger on cloud archival – now what? Migrating a media catalog of a substantial size will take some time to transfer. Due to this fact of physics, you may want to consider the brute force method. An AWS Snowball, GCP Transfer Appliance and other similar solutions provide a hardware device that allows you to copy your data locally and ship the device to the cloud provider for upload. For catalogs of TB or PB’s of media, this is often the most practical option.
Alternatively, one can always simply copy content up to an object store. This may be practical for smaller catalogs or incremental updates where upload catalog sizes are reasonable and bandwidth is suitable. Beware though, a standard HTTP or FTP transfer will be slow for even the largest of pipes – TCP/IP was designed for reliability, and not for raw speed. In many cases it is recommended that a user implements a file transfer acceleration solution from such companies as Data Expedition or Signiant. These applications allow for data to be moved up to 10x faster than a traditional protocol will allow.
Managing your Archive Library Intelligently managing your content library pays off in storage cost savings and reduces headaches due to aggravation caused by – “where’s that file”, “did I delete it”, and other similar maladies. A proper media asset management platform will integrate seamlessly into existing workflows and allow for content producers to focus on storytelling. The best solutions give administrators the ability to easily and quickly set up configurations and infrastructure to automate the backup and archival of raw content, finished sequences, and final productions to the proper locations with minimal overhead.
EditShare’s FLOW solution was designed as a skinny MAM to accommodate these workgroup demands, in conjunction with FLEX storage. FLOW and FLEX make it easy to set up these media spaces for raw content and projects and design and apply robust automations. This enables seamless workflows that backup content to near-line archives, cloud object stores, or deeper cloud archives with no tax on production teams activities.
Disaster Recovery Historically fires and other catastrophes drove companies to build out their disaster recovery plans – last year we added pandemics to the list. The increasing need to ensure business continuity in the face of future office closures is forcing many video production teams to look to cloud backups as an anchor point for DR plans.
As backup content libraries get stored to cloud platforms for resiliency purposes, cloud production solutions can also offer an on-demand DR solution in times of crisis. EditShare offers the ability to instantly use these backup cloud libraries as a source of editable content. In the event on-premise systems can’t be accessed, EditShare’s FLEX and FLOW systems can be instantly spun up, allowing virtual workstations to access and edit content with no downtime. By backing up the FLOW database to the cloud, we can also ensure project continuity between on-premise and cloud workflows. Editor’s may also choose to use their home workstations to connect into FLEX to allow for proxy editing remotely.
This ability to re-purpose media archives instantly and provide a video production environment allows organizations to manage their risks and costs while being prepared for future uncertainties. A compelling insurance investment for most organizations.
The EditShare Advantage EditShare continues to be singularly focused on helping video production teams increase their efficiencies and manage their costs. Media production teams come to us for help assessing the scale and scope of their backup, archival, and disaster recovery needs because we can tailor a cost effective solution that meets their requirements. With FLOW and FLEX, we make it easy to get media into and out of the cloud.
Your Cloud Journey Our ability to offer on-premise, cloud, and hybrid solutions enables the transition to cloud for existing environments and balanced approaches that optimize return on investment. One of the first ways organizations leverage the cloud is for media backup, and they find the most success today focusing on object based storage and carefully considering their needs and the fees of a variety of solutions and providers. After you choose a service, the next hurdle is selecting how to get their content into the cloud. Solutions are optimized to the various transfer sizes and speeds required. Once media is in the cloud, asset management plays a key role, aiding in the organization of media assets, as well as automation of changes and retrieval, integrating seamlessly with production workflows on-prem, in the cloud, or in between. Finally, implementing a robust disaster recovery plan for media back up in the cloud adds risk mitigation for minimal investment.
This approach to cloud adoption is a journey, undertaken by teams looking for flexibility and capability without significant investment. Key to their success is finding the most valuable ways to leverage the cloud, and adopting them gradually as their needs require.
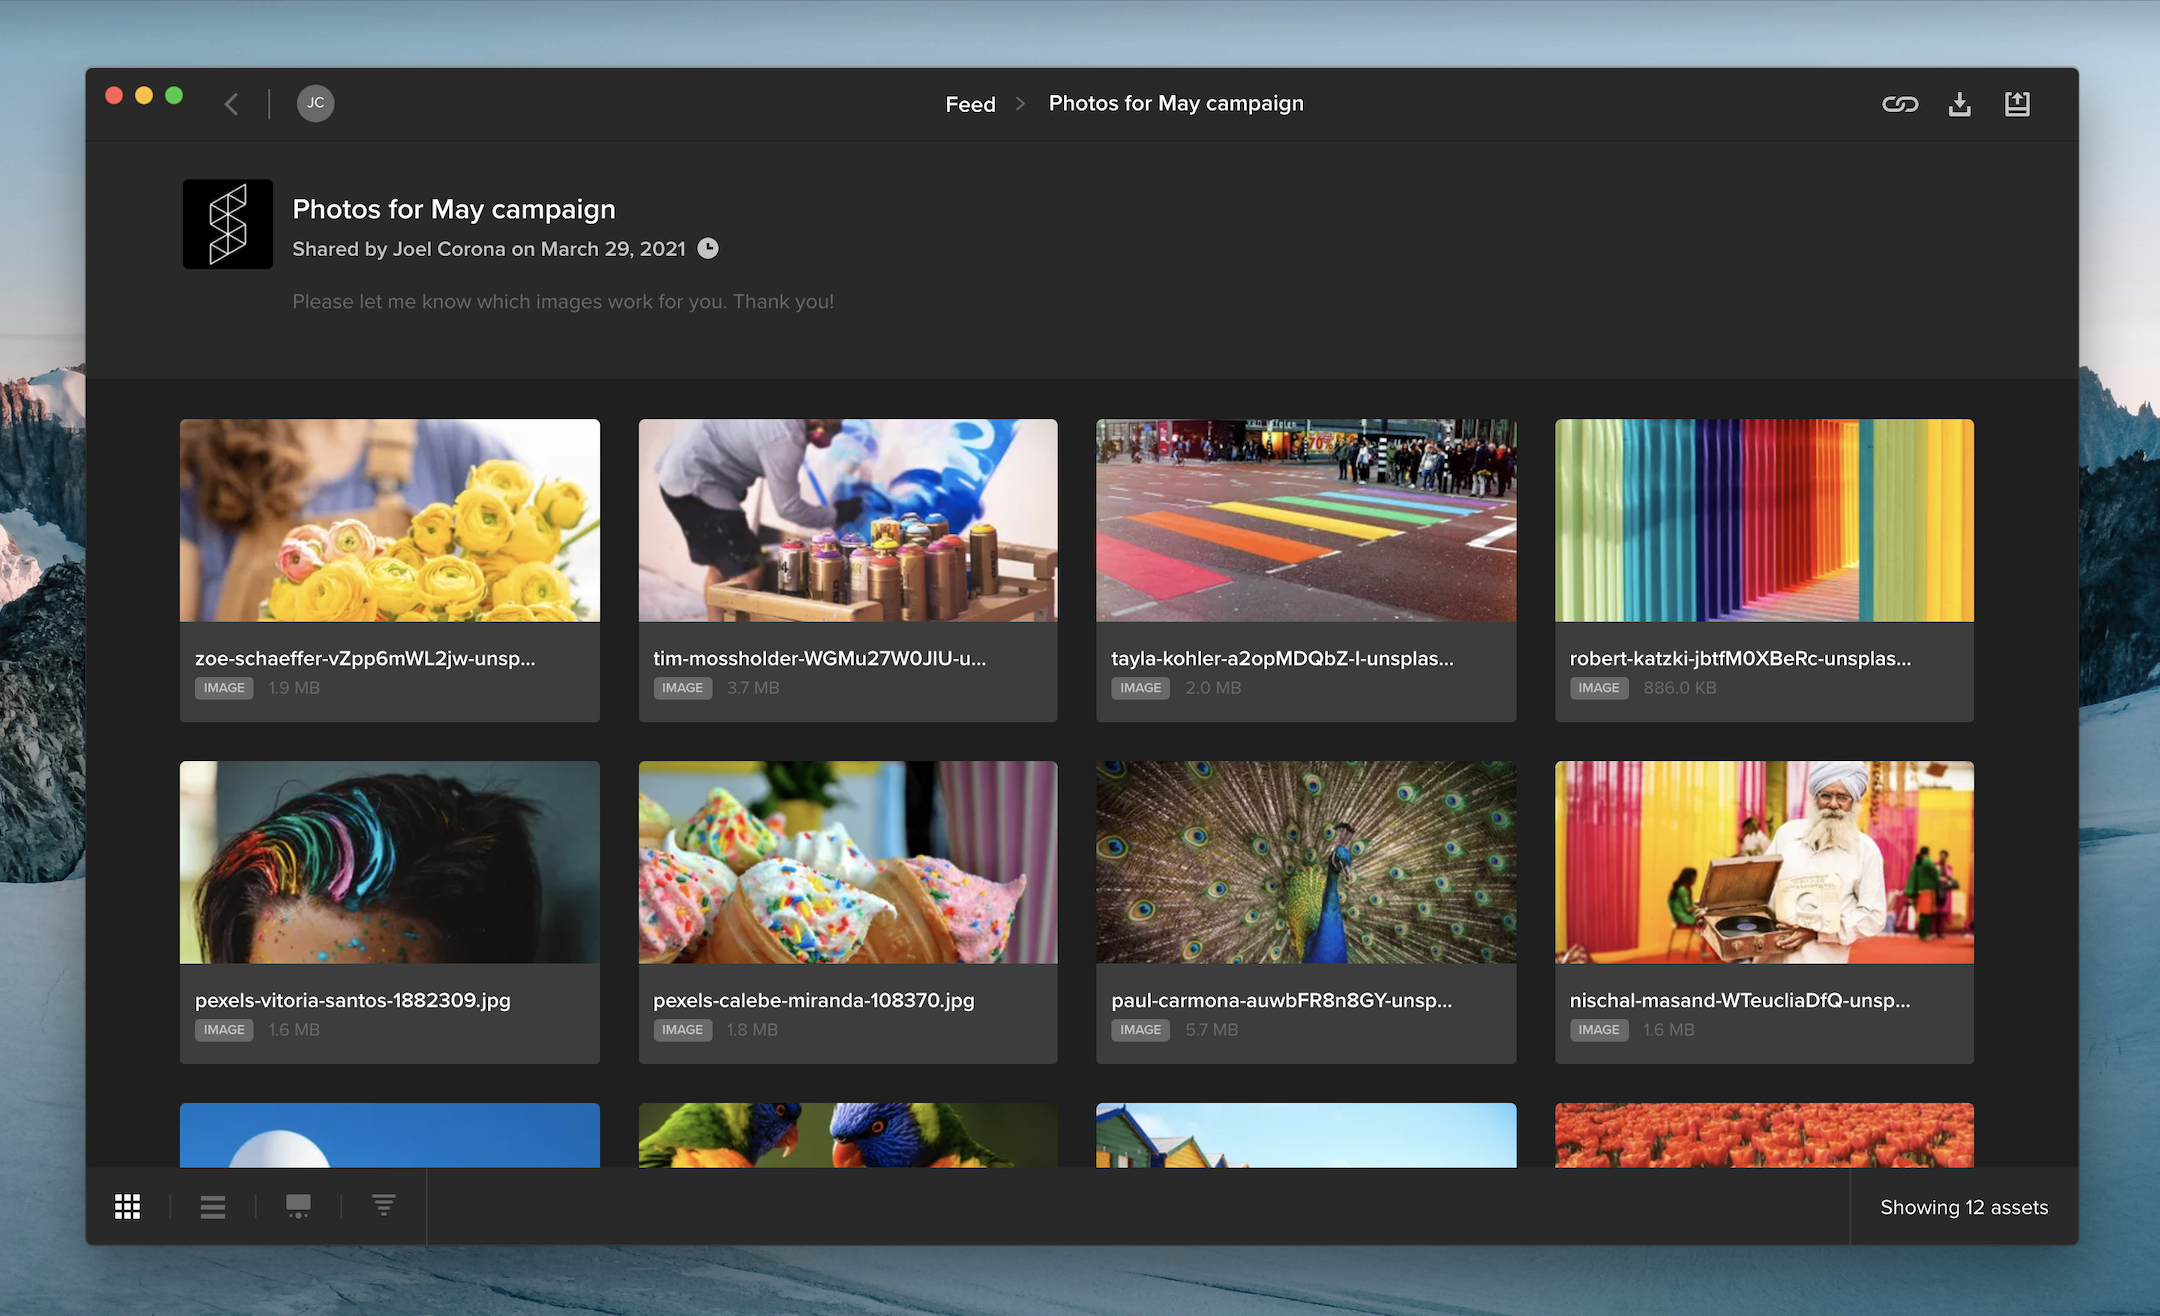
When you share multiple files in a review link, your audience can now access the files in a gallery that supports batch approval and downloading.
If you requested feedback on a review link, your audience can hover over an asset tile and click the thumbs-up icon to approve it. Viewers can also select multiple files and click the thumbs-up along the top of the page to approve multiple files at once.
When downloading is enabled on a review link, viewers can select one or more files and click the download button at the top of the page to download them. Clicking the download button without selecting any assets will download all of the files included in the review link.
In the bottom left corner of the screen, you can choose between gallery or list view, change the sort order, or open the review page with commenting and annotation tools for videos, images, and documents.
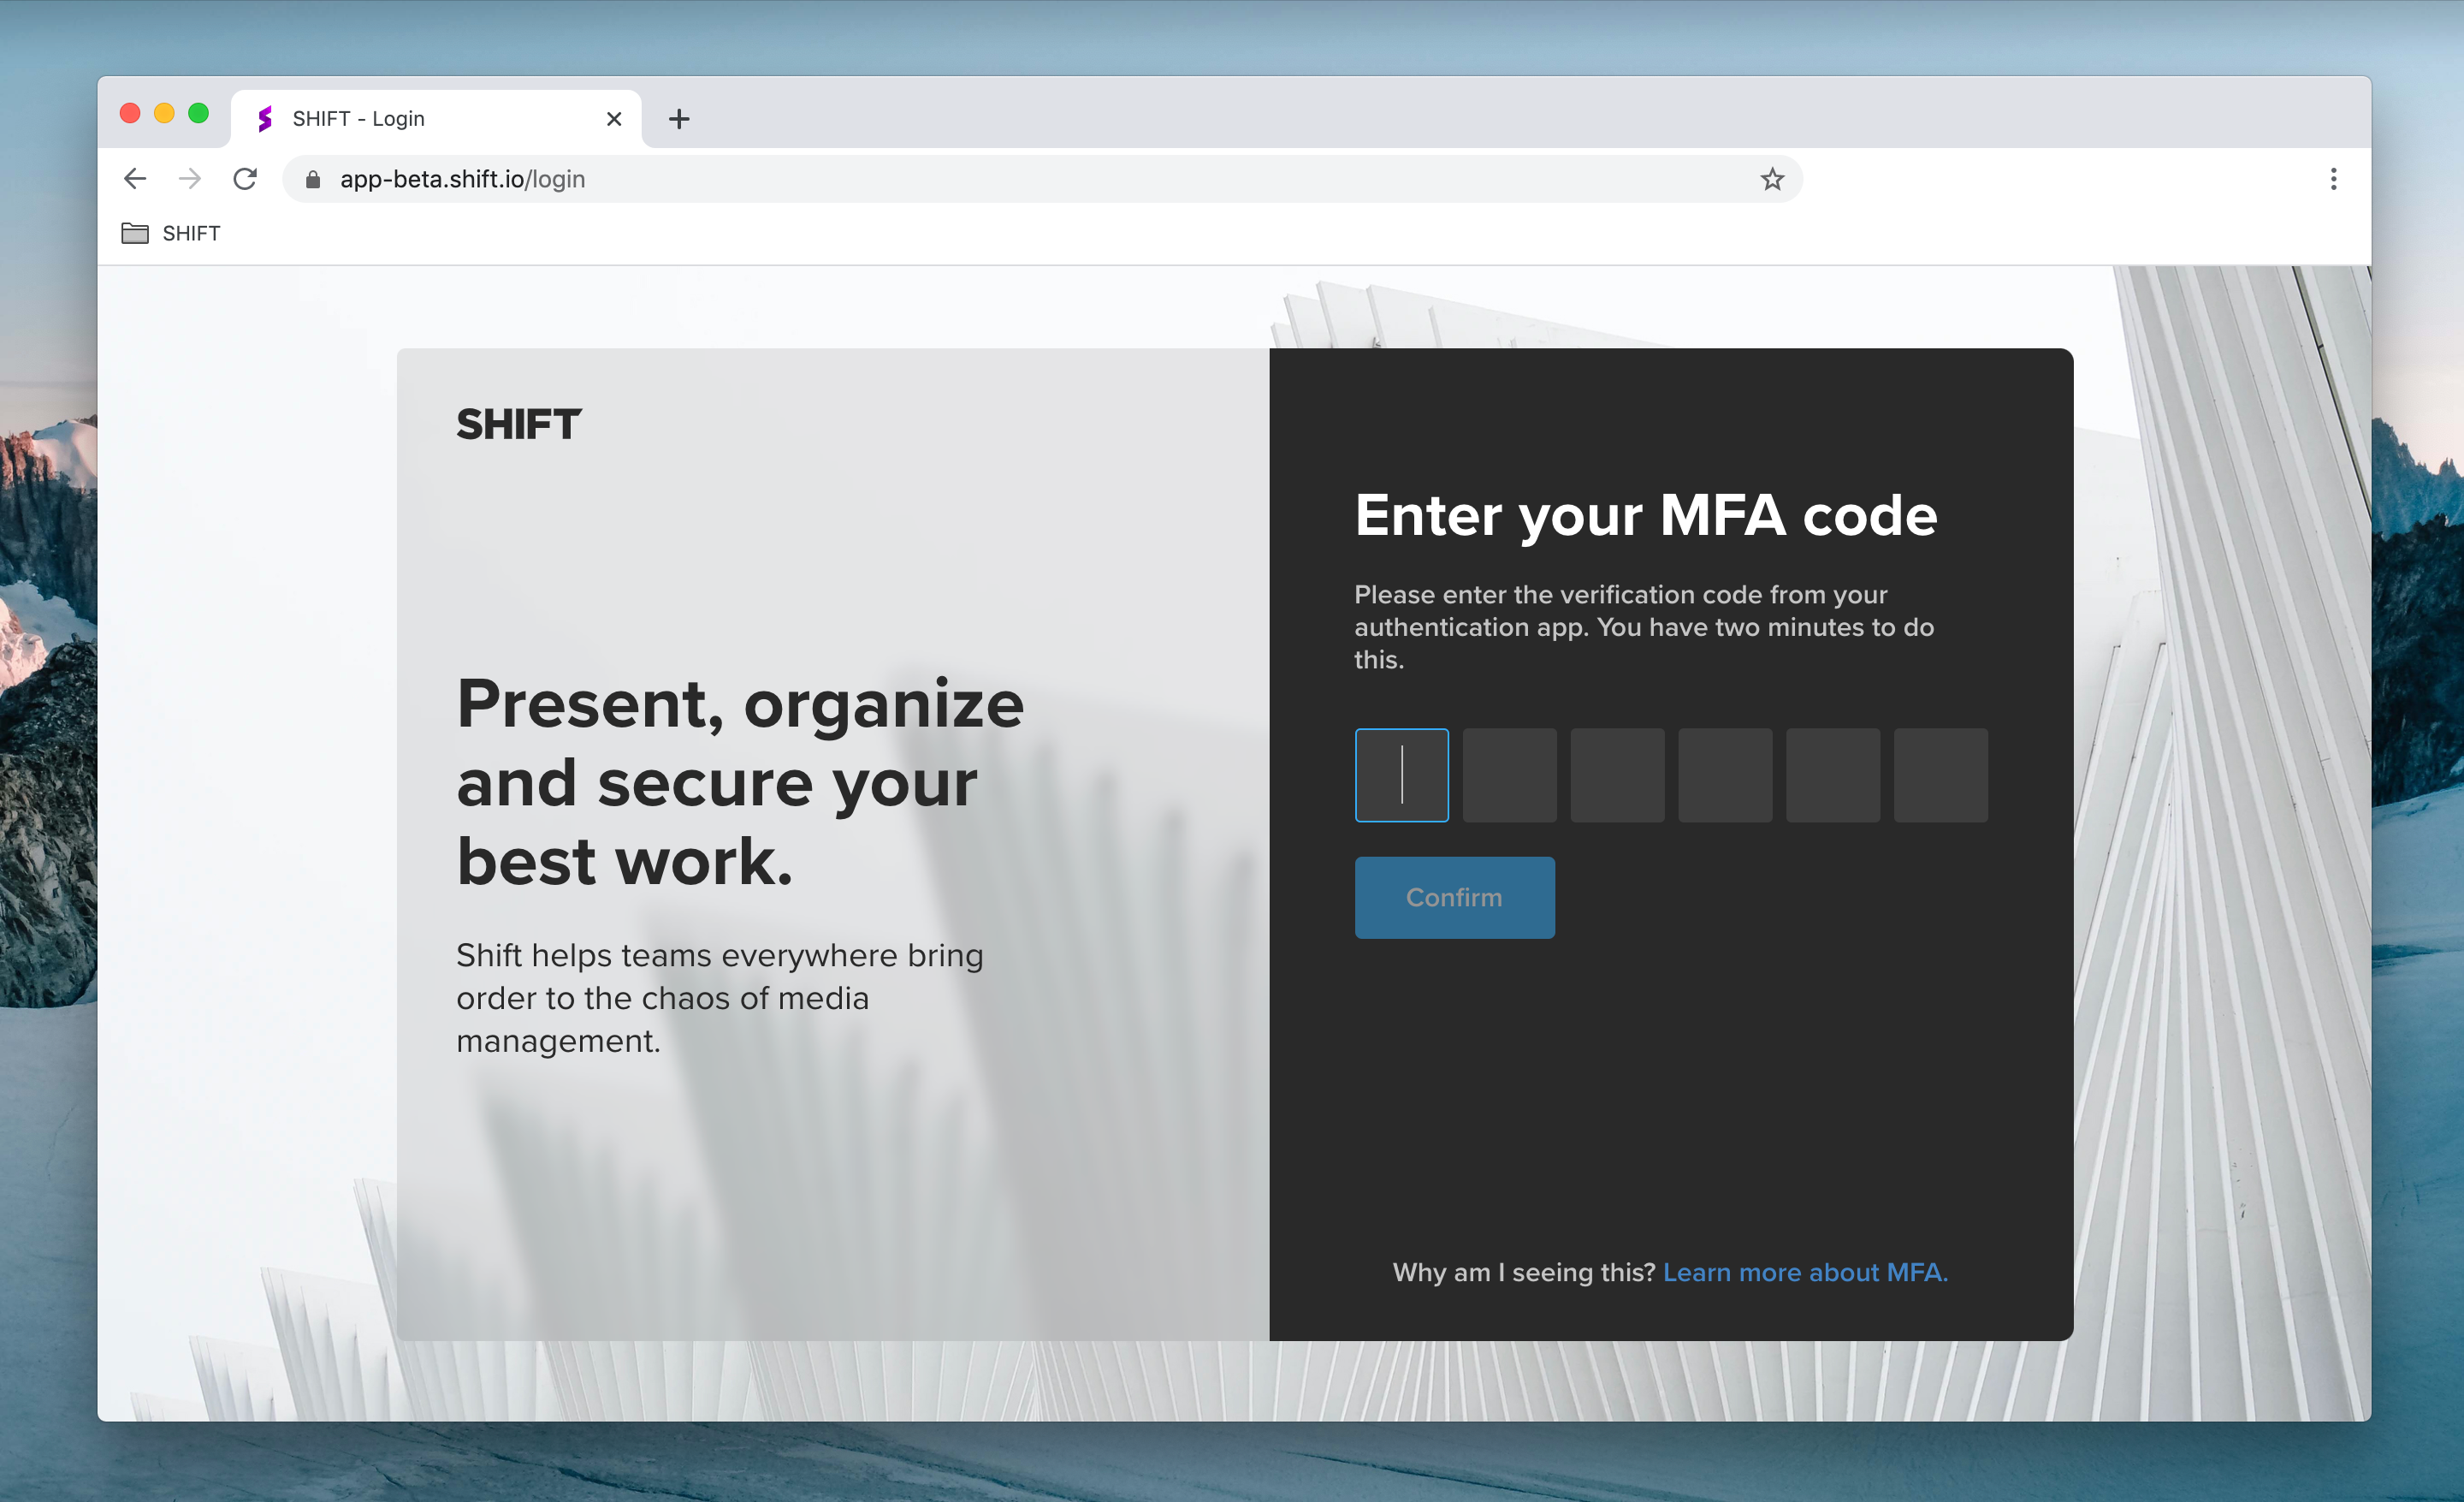
For added security, administrators can now require workspace users to log in using Multi-Factor Authentication (MFA).
To set up MFA, users link their Shift account to their phone or tablet by installing an authentication app, such as Authy or Google Authenticator. When they log into Shift, they will be prompted to enter a six-digit code provided by the authentication app.
As an administrator, you can enable MFA on your workspace by visiting the Security Settings tab in the Administration section.
Note: Shift uses the same MFA code as Screeners.com. If you already use MFA to access Screeners.com, Shift will use the same MFA code to log you in.
You now have more ways to log into your Shift account. Enter your email address to receive a login link in your inbox, or click any of the icons below the email field to log in with your Google, Slack, Apple or Microsoft account.
Additional login options are also available when you access a Review Link. To comment on a public review link, simply click “Add Comment” on the review page and log in to start leaving feedback.
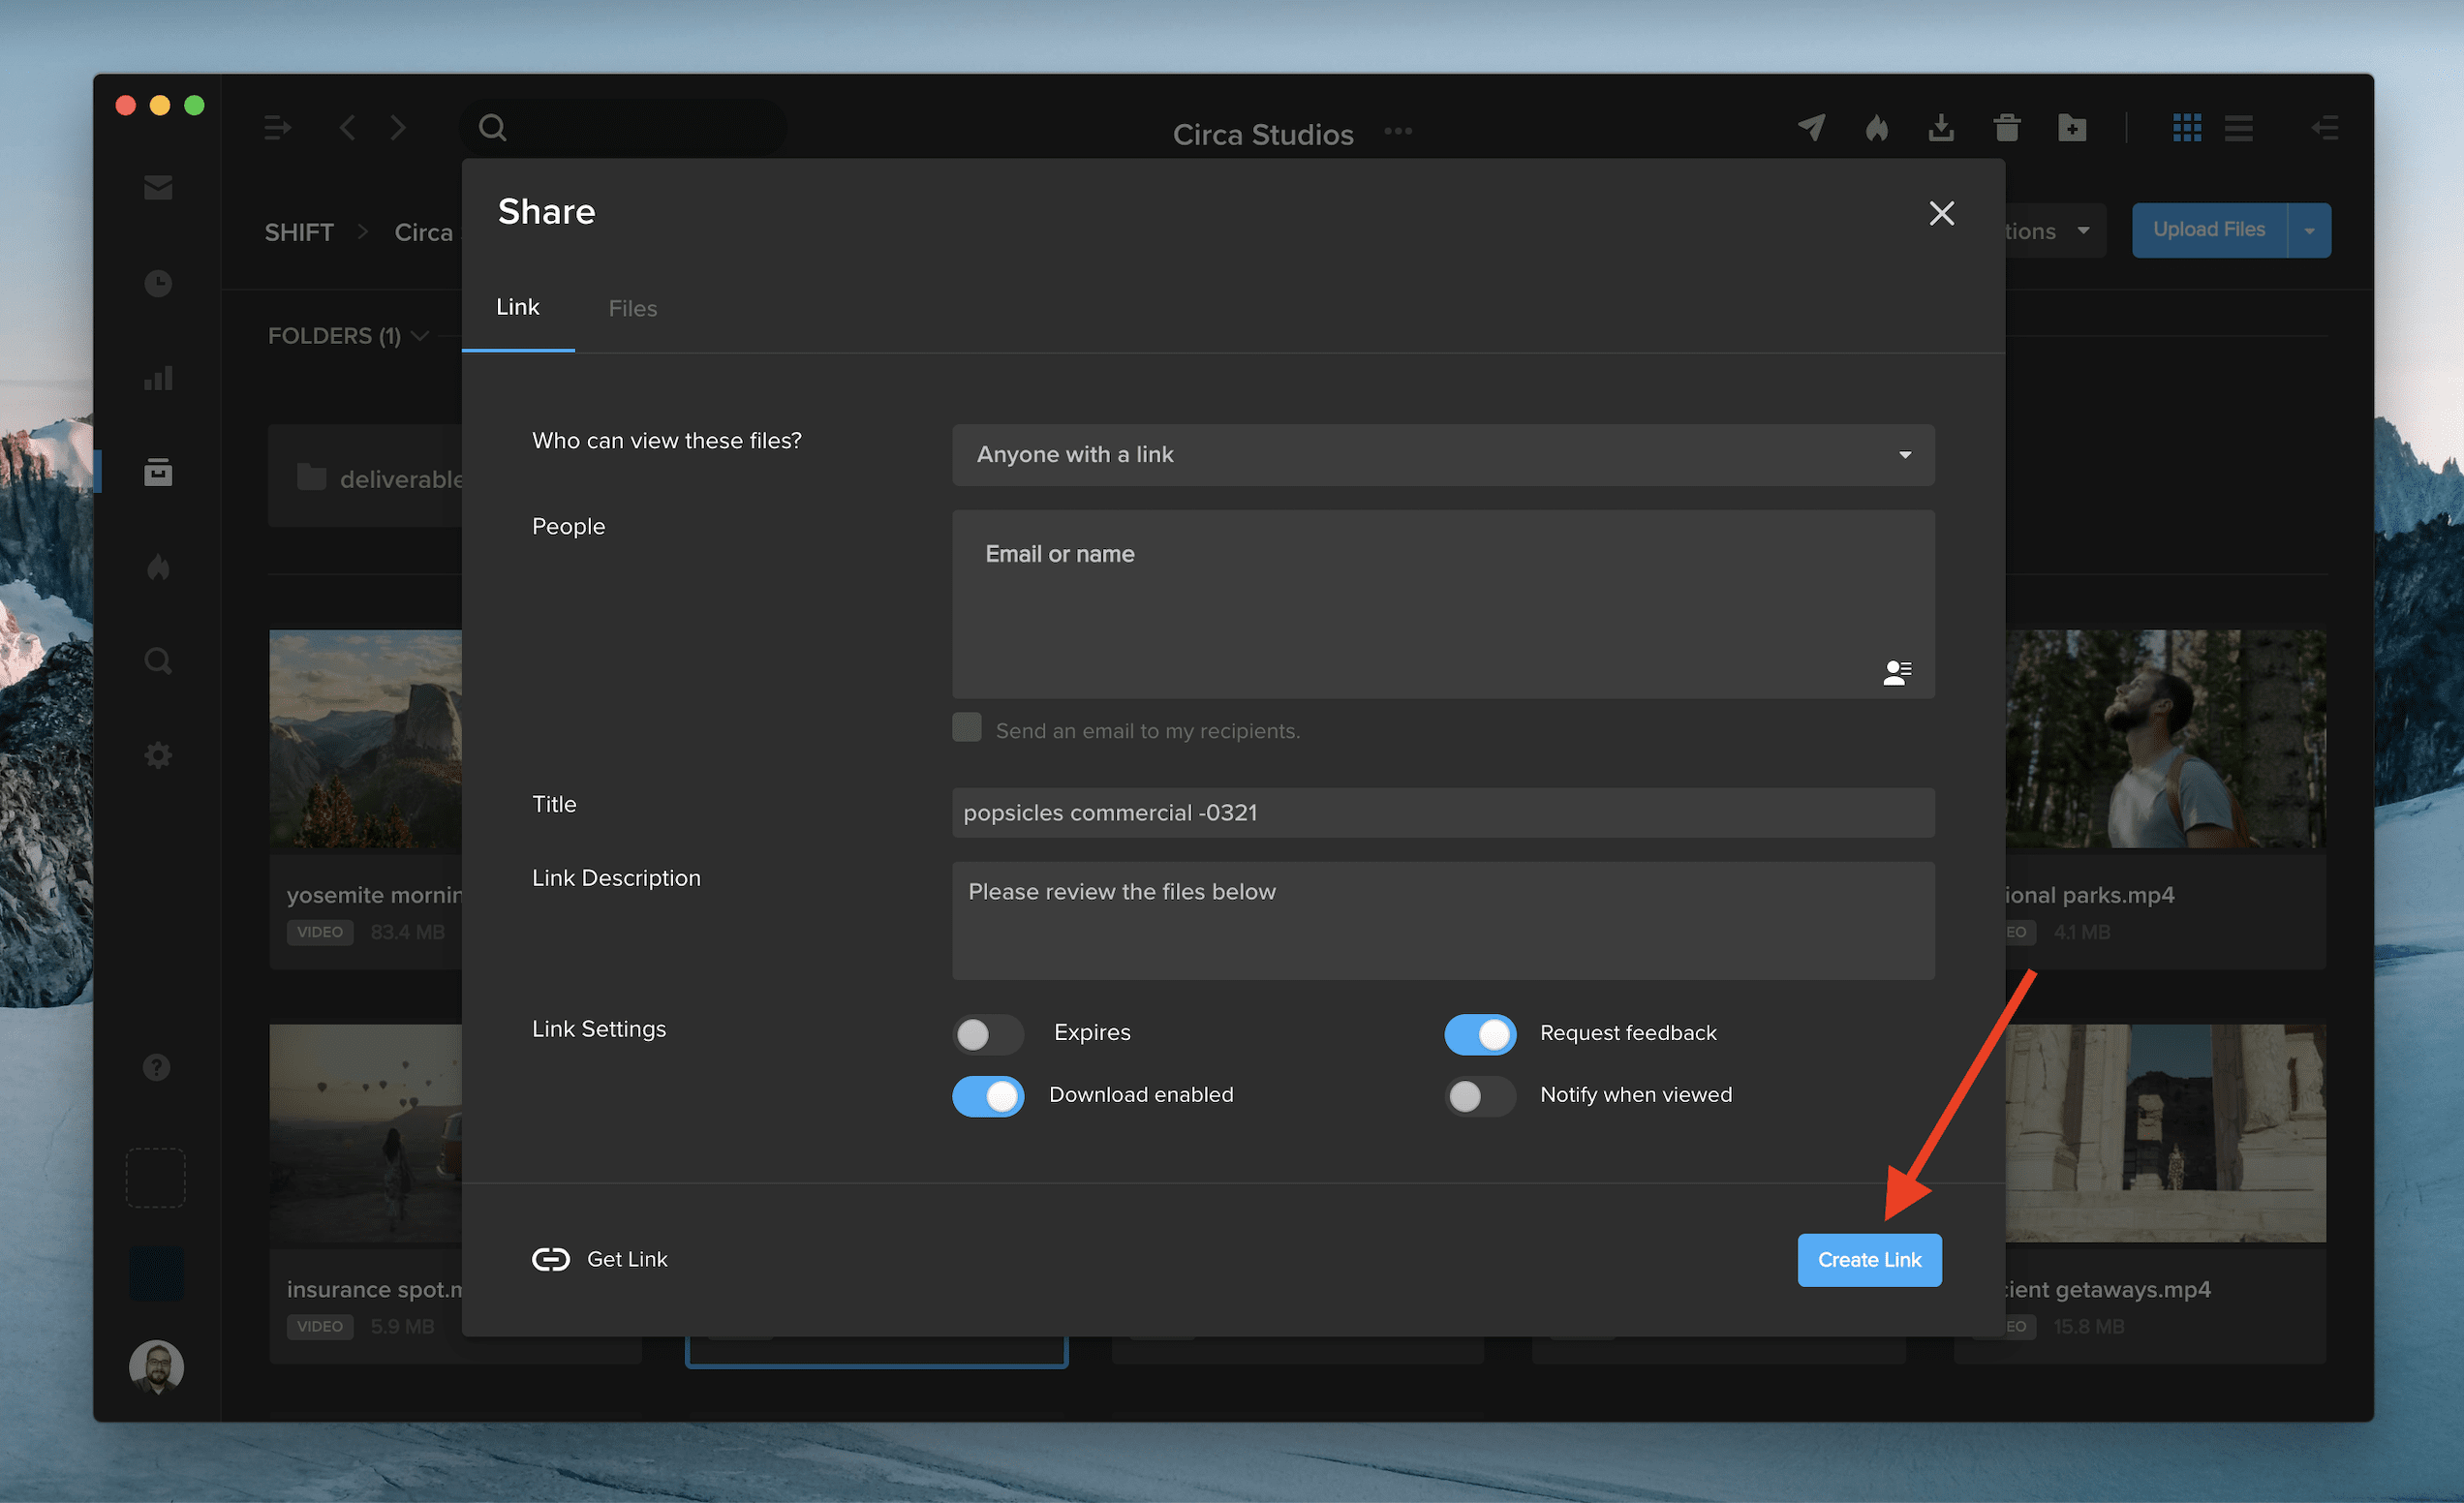
After you create a new Review Link or Spotlight Presentation link, the URL will automatically copy to your clipboard for instant sharing.
See the feature in action by right-clicking on a file in one of your projects, selecting “Share,” and picking either of the two options. Once you choose your link settings and click “Create Link,” the URL will be ready to paste elsewhere without any extra clicks.
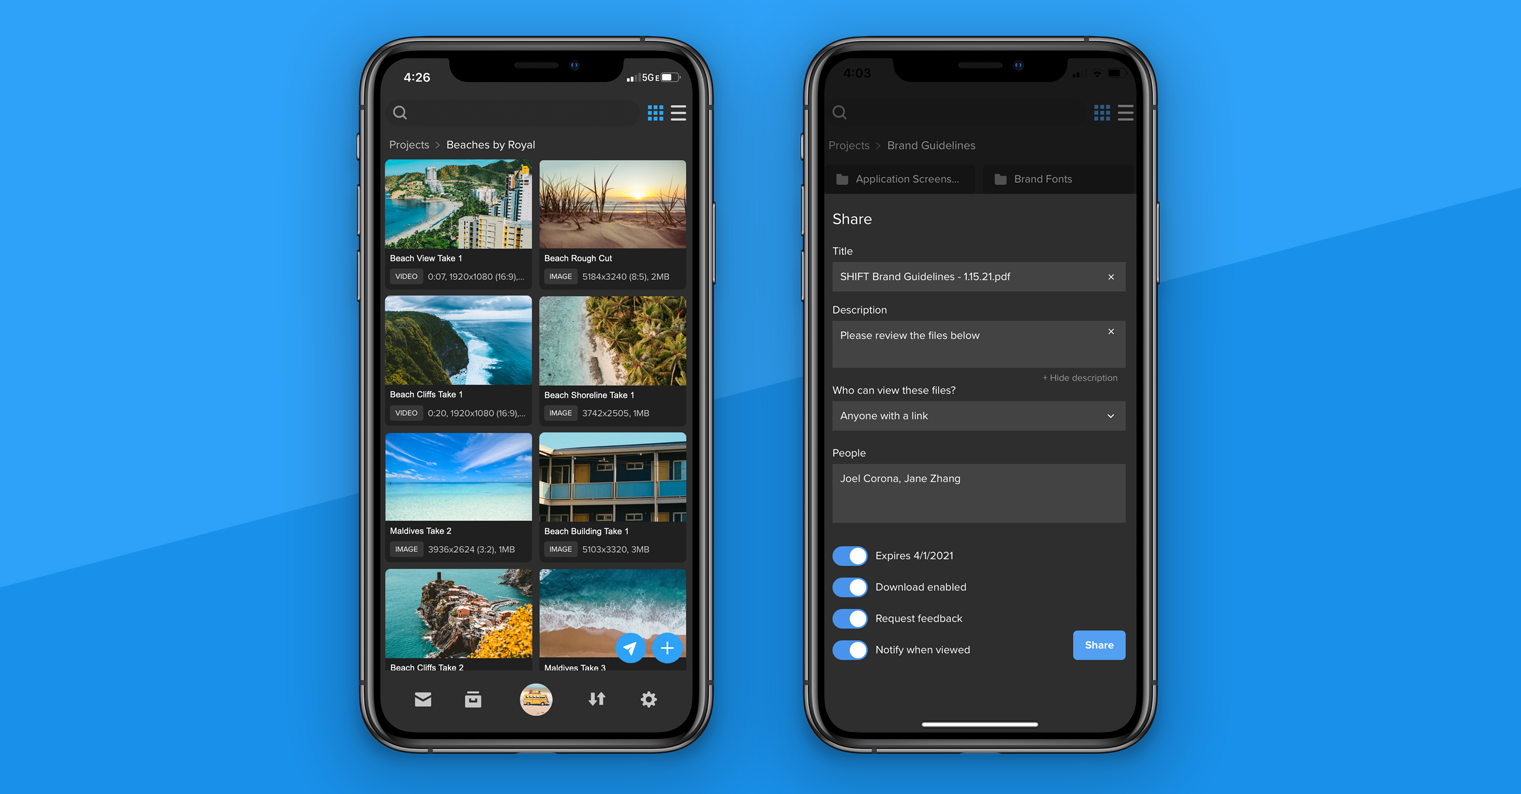
You can now share files directly from the SHIFT GO mobile app for iOS and Android devices.
When you open a project or folder, tap the blue airplane icon in the bottom right corner.
Select the assets you want to share. A blue checkmark appears on the assets you’ve selected.
Once you’ve made your selection, tap the Share button again to view your review link settings. Enter your title and description, add your recipients, set an expiration date, and choose additional link settings.
Tap Share when you are ready to send your review link.
To simply create a review link without entering recipients, leave the “People” section blank, and tap Share. Then, tap the Share Link button to send the review link using email, text, or other apps on your device.
To download SHIFT GO, navigate to get.shift.io/mobile on your mobile device.