While it is definitely a hot topic at the moment, at EditShare we have been helping users create and operate successful cloud solutions for many years.
Those early adopters, and the many who have followed, tend to be organizations who are reasonably cloud-savvy. They are comfortable using EditShare FLEX Cloud Edit software, alongside tools like the Adobe® Creative Cloud suite and Teradici for remote desktop control.
To make the best use of the cloud for post-production, you have to be able to manage the processes and optimize post-production storage. The much-lauded advantage of the cloud is that you only pay for the computing power you use, so you have to be able to rapidly spin up instances as you need them, and equally quickly release them when you are finished.
Some organizations will have the detailed cloud knowledge to be able to implement their own management layer. For teams without this knowledge, we now offer FLEX Cloud Edit+. Essentially, Edit+ takes over the detail of the cloud management so you don’t have to get into its depths.
FLEX Cloud Edit has been around for a number of years, and gives post facilities the ability to edit in the cloud using their preferred software, including Adobe, Apple, Avid, Autodesk, DaVinci and more. What FLEX Cloud Edit+ adds is workstation management capabilities, and integrated file transfer acceleration.
As we are talking to customers, one of the biggest areas of concern about cloud migration is how to get the material up and down from cloud video storage. When you are dealing with the very large files of professional video, it is natural to see transfers as a potential major bottleneck.
To solve this, we have partnered with Data Expedition, a specialist in accelerated communication. Its product CloudDat can push data transfers up to 5 gigabits a second on a single instance, and instances can be stacked when exceptionally high performance is required. The EditShare integration allows for direct upload to FLEX storage for online use or to Amazon S3 for archive or to use with EditShare’s Seamless Proxy Editing feature.
This file acceleration is bundled into a turnkey system and it works out of the box. It also fits into the cloud philosophy in that you pay for it only while you use it: the license is by connected time.
The second major challenge is management of the cloud workstation environment to reduce costs and overheads for management. FLEX Cloud Edit+ integrates the HP Teradici Cloud Access Manager (CAM) to handle the management layer.
As an administrator of the system, the Cloud Access Manager allows you to allocate users to workstations, giving the flexibility to choose from allocating one user to one workstation, through to allowing all users access to a pool of workstations (or any combination between). From the end user perspective, they simply use the standard PC over IP client to connect to the CAM. Once authenticated, the user will be shown the list of workstations they have access to, which workstations are in use and the ability to remotely start a workstation if it is powered off. Not only does this simplify the user experience, it provides significant cost savings – you are only charged for the workstation whilst it is powered on.
FLEX Cloud Edit+ has built-in Active Directory management to support single log-in credentials for all users and functions, which can be used stand-alone or connected to existing Active Directories.
In summary, EditShare has worked with two other industry leaders, HP Teradici and Data Expedition, to build an integrated solution to cloud editing for users who do not want to get into the details of AWS administration. It is a seamless, turnkey experience: a fast on-ramp to the cloud for those businesses who would rather focus on their core creative skills.
Alconost is a localization company, but we also create videos for games.
We’ve been creating game videos since 2013, and in that time we’ve amassed considerable production experience that I think you’ll find useful. In this demo reel you can see what our experience is based on.
Videos vary considerably. But to produce any video, be it a trailer for a marketplace or a teaser for an advertising campaign, we use the same video production workflow for each project. You can easily follow the same process when creating a video on your own.
Our standard production pipeline is as follows:
Brief
Script
Storyboard
Music and voiceover
Animation
Sound design
Today I’m going to guide you through this process and give you some practical tips on how to end up with a game video that you can be proud of.
The brief: prioritize game features from square one
Everything starts with a short questionnaire that determines the framework. Our brief contains 12 questions, but I’d like to highlight four of them. What you decide here will influence the decisions you go on to make at subsequent production stages.
Select your goal: visit the game’s page vs. install the game
First, ask yourself: is your video intended to bring the users to the game’s page? Or is its goal to convert game page visitors into users? When you know the goal, and understand the context in which users will be watching your video, it will be easier for you to develop your ideas.
Select the audience: age, knowledge, cultural background, gaming experience, etc.
Next, think about your video’s intended audience. Their perception, their red lines, and whether they will understand the idea you wish to convey depends on factors like their cultural background, gaming experience, etc. This can affect your creative decisions regarding the concept and style of your video.
Requirements: technical and creative restrictions
Your decisions may also be influenced by the rules of the platforms where you are going to place your video. For example, if you need a video for the App Store, its duration must be from 15 to 30 seconds — no more, no less.
Moreover, to meet the App Store’s recommendations you need to focus more on showing actual gameplay than on telling your game’s universe story. So give the platform’s guidelines a close read to avoid having to redo your video significantly.
Prioritize your game’s key features
Finally, keeping in mind all of the above, prioritize your game’s key features. For example, if your target audience is users who are not overly experienced in gaming, it might be a good idea to focus more on basic functions than, say, to delve deep into combat tactics or other features that advanced players would appreciate.
In the screenshot below, you can see an example of how the prioritized list could look.
Of course, prioritizing isn’t as simple as it seems, because you’re a developer: each feature is like a child of yours, and it’s hard to choose what to omit. But this is an essential step in order to emphasize the features that have the best chances of grabbing your audience’s interest.
Once the framework has taken shape, it’s time to start thinking over the script.
Script: think of the scene’s function, the action in the frame, and the voiceover text simultaneously
Scriptwriting is an exciting process, but this excitement can cause you to lose focus. When your thoughts are scattered, a comprehensive approach can help.
Let’s have a look at the sample in another screenshot below.
This is a sample script structure that shows how each scene has its own function — for example, to elaborate on a specific game feature. And this function should be emphasized by more than just the visuals — the calls to action on the banners and the voiceover text should tell the same story, so that everything in the scene is connected.
To make it even easier for your audience to follow your thoughts, try to stick to the “one feature, one scene” principle. This will help keep the narrative clear, avoid overloading, and transition smoothly from one feature to the next.
Although working on scripts is riveting and absorbing, it’s crucial to remember what can affect the production in your particular circumstances. You may have a tight budget, limited manpower, a deadline, or all of the above.
So when thinking over the visual part of your video, ask yourself: what assets will comprise each scene? Would just actual gameplay footage be enough to demonstrate a specific feature? And if not, do you have the resources for a more complex demo of this feature? Give this question at least preliminary consideration. If you make a mistake, it will come out at the storyboarding stage.
Storyboarding: arrange your assets wisely
When developing a storyboard, remember that for some scenes you may need to design multiple stages. For scenes where gameplay capture is supposed to be shown, consider recording the gameplay at this stage, reviewing the captures, and making sure that they fully convey the idea of the scene.
If the capture doesn’t work as well as you thought, there are at least three options to avoid disaster. First, you can always come back to the script and revise it.
Another, arguably better, option is to allocate resources for building the scene in the game engine, make all the necessary adjustments, and record the gameplay not from the build but from the engine. One more option is to show the feature using animated graphics, be it new art that you design specifically for the video or preexisting game assets.
If you need a video in different aspect ratios, storyboarding for these extra versions isn’t a must, but it may still be something to consider. For instance, a given scene may not be understandable in a vertical version due to cropping. And you can conserve resources if you allow for variations in advance.
To simplify things for your production team, organize all your visual assets wisely. Select only the art that is necessary, and make this collection of assets easy to navigate.
Let’s look at an example of a video that required really well-planned storyboarding. It consists of scenes with animated graphics. And arranging all the art at the storyboarding stage was a good way to simplify the animation stage. Check out this teaser for the game Monster Hustle.
If the video you need for your game is along these lines, it may turn out that certain essential visual details do not yet exist in your assets, in which case you may need to draw them specially for the video.
When you are all set with the storyboard, it’s time to proceed… not to the animation just yet, but to the background music and voiceover track.
Music, voiceover, and why they go before animation
Let’s start with the music. The best solution is to select the background track before you start working on the animation. This will allow you to set your animation “dancing” to the tempo of the music, so that the audio and video sequences echo each other. This makes the watching experience more immersive and enjoyable.
Remember that you don’t have to stick to the in-game music. For instance, the ambient music from locations may prove too monotonous and unsuited to the dramatic structure or emotional load of your video. The solution is to either browse royalty-free markets or, if you work with a composer for your project, get them to write a custom musical theme for your video.
For voiceover, before you record the text with a native-speaking professional, record the voiceover on your own and try combining this draft narration with the storyboard and the music. This way you’ll be able to double check whether the voice and the picture support each other semantically and tell the same story. If you notice any deficiencies, at this stage it’s quite easy to correct them.
Next, once you’ve made sure that the voiceover text is flawless, provide a professional voiceover artist not only with the text to be read aloud, but also with the storyboard, music, and specific instructions. For instance, elaborate on what kind of a storyteller you want them to impersonate: describe the desired manner of speaking, voice tone, and pace.
Last but not least, explain to them how your characters’ names or even the game’s title should be pronounced, including stresses. It may seem a small thing, but it really matters.
Once the music has been selected and the professional voiceover has been recorded, it’s time to move on to the animation stage.
Animating to the beat of the music
This is the stage where you focus on motion design. To simplify and speed up the production process, try assembling the video scene by scene. Animate one or two scenes and evaluate the intermediate result.
Remember that your team may have something to say as well. If you encounter mutually exclusive ideas, your task will be to reconcile the different points of view, structure your team’s comments, and provide a motion designer with consistent and coherent feedback.
When evaluating the intermediate result, remember that you need more than nice-looking animation — you need an attention-grabbing video. For this purpose, focus on how the viewer’s attention is being controlled. For instance, you can:
Zoom in
Make the camera follow a key moving object
Highlight this object
Magnify it
Add an animated pointer
This is not an exhaustive list. Tricks like these make the video easy to watch, which is something that doesn’t just happen on its own: it has to be embedded into the animation.
What should also be embedded is synchronization of the motion to the beat of the background music. To achieve this, create a metronome that will follow the tempo of the music and try showing key animated actions on the stressed beats.
Have a look at the example below. In the screenshot, you can see that the stressed beats of the metronome correspond to the beat of the track. Believe it or not, a simple thing like that can work really well as a skeleton for the animation.
Of course, there are many more details that can make the animation really terrific or, conversely, spoil the impression. But careful execution isn’t the only key to perfection. Consider the animation not simply as an embellishment, but as a means of transmitting ideas. Make your animation meaningful. Try to make the motion convey emotion. When the right ideas and the right emotions meet, the result is magic.
When the animation is ready, it’s time for the final stage: sound design.
Sound design and a convincing reason not to skimp on it
At this stage you may need to cut the music track to match the duration of the animation, and to match particular parts of the music to particular events in the video sequence.
Using sound effects you’ll be able to enhance specific emotions, be it excitement, suspense, or even fear. Actions such as scene changes, tagline fly-in, or the game logo’s appearance can also be emphasized with sound effects. But don’t go overboard. Use sound effects wisely, emphasizing only what needs to be emphasized.
There is one factor that may discourage you from investing in sound design for your video. The fact is, one to two thirds of users watch their videos muted. The game video creator’s job is to make the video ideal for both those who watch the video with sound and without. In the long run, since sound design won’t cost you an arm and a leg, it makes little sense to skimp on it.
As an argument in favor of giving attention to sound design, you can check out this video created for the game Infinitode 2, where the music and sounds are essential components.
Pitfalls & snags: 12 mistakes to avoid
Sometimes it’s not easy to tear a video to pieces in search of the secret ingredient that makes it cool. Usually it’s a combination of a well thought-out concept and flawless execution. However, if I had to rate the most common mistakes in game video production, I would mention these twelve points (see image below).
Those listed on the left have their roots in the conceptual part. It’s all about loose ends at the briefing and scriptwriting stages.
Others, listed on the right, are the result of imperfect production, like the absence of visual accents, camera shake, pixelization, and so on.
Lastly, the ones listed in the triangle in the middle are not deal breakers, but without them the video would have a more polished look. These include undue screen time for the game’s title or the studio logo at the beginning of the video, scene duration imbalance, and imprecise synchronization of the animation with the music.
On top of that, sometimes you wince at missed opportunities to send shivers down a viewer’s spine. Together, all these drawbacks sometimes just… don’t let the magic happen.
How not to fall into these traps? Of course, there’s no silver bullet, but let me give you a piece of advice: try to put yourself in the potential player’s shoes. Imagine the context in which your videos will be shown, and imagine that you need to explain your game to a person who knows nothing about it, and maybe has never played any game like this before. Help that person: motivate them to give your game a try.
Localization is everywhere. That is because the public can only enjoy entertainment products if they are able to understand them.
You cannot enjoy movie if you do not understand what the characters are saying or read a book if you do not understand the language, right?
The same applies to video games: titles have a much better chance of success in multiple markets when they are localized and adapted to them. This may appear obvious but often we don’t think about why this is the case.
This article details five reasons why localization matters based on statistical data, with practical examples to understand its power and how it can be used by video games developers and publishers to achieve their goals.
1. Make your game relevant
2. Improve user reviews
3. Engage communities
4. Leverage the power of local influencers
5. Achieve a wider reach
1. Make your game relevant
The first reason why localization truly matters may seem obvious but that does not make it any less significant: if we cannot understand something, it may as well not exist.
Boiled down to its simplest implication, if a game is not understandable for a player, it has no relevance for them. The game that players would enjoy and invest time and money in is completely unknown to them.
You may have spent thousands of hours on development and promotion to create a compelling experience to be loved by many but it will have all been for nothing if the audience cannot get past the title menu.
In essence, this is what localization solves for; much more than just translating content. It makes that content exist for the target audience. It makes it relevant to them.
Currently, most Western companies will develop their game in English to reach the maximum number of potential players from the start. This means they still think of localization as ‘English to other language’ which, as we will see, is far from being the only way to go.
When playing the English language versions of games, those non-native speakers who are not proficient enough might see their experience hindered. This has been shown to reflect in their perception and reviews.
Even if they were native English speakers, not localizing a title created in this language would mean it would only be comprehensible by a minority of the world’s population, leaving the majority outside your scope.
But of course, English is not the only language games are developed in. It is not even the language most people play games in.
Any developer neglecting to appropriately localize their game into Chinese, will be missing out on the chance to obtain revenue in the world’s biggest market.
Of course, for Chinese developers, the same applies and focusing on the domestic market only will make the product invisible to millions of potential players outside China.
The examples mentioned before are so paradigmatic not only because of the size of the markets, but also the very patent differences in language.
Not sharing alphabet may make it seem like these two languages have a wider gap to bridge between them. The truth is that to a French speaker, for example, English or any other language can be exactly as foreign and impenetrable if they have not learnt it before. They may recognize the letters if they share the alphabet but have no clue what they mean either way.
Obviously, no one can localize into every single language that exists.
Take a game that has been developed in English: localization into four target languages would pave the way to access the five biggest markets per revenue (China, Japan, South Korea, Germany). Four more languages and you would cover the entire list of the 10 biggest markets per revenue, making a game relevant to more than a billion potential players.
2. Improve user reviews
So, we have established that localization makes games content relevant for target audiences. Once that is achieved and players pick up the game, you obviously want them to spend time playing and, ultimately, investing money in it.
The obvious driving force that will keep them returning to a title is if they have fun while playing it. Measuring “fun” is not an easy task but we do have a useful tool to track user satisfaction directly from their own experience: user reviews. So, the question is, can localization affect how users review a title?
The answer is yes, it does.
One study analyzed thousands of user reviews in different stores and platforms and found out that roughly 16% percent of them mentioned localization in one way or another.
Most interesting is the correlation between how good or bad those players perceive the game — or how much they would recommend the game to others — and the presence of a good/bad localization, or none at all.
The finding is that more than 80% of reviews with positive localization feedback were also very positive overall.
When presented with quality localization, players tend to give higher ratings to games, thus positioning it higher in the charts or making it easier to earn the coveted “Overwhelmingly Positive” badge on Steam, paving the way for other players to decide to play the title based on other people’s reviews.
Speaking of Steam, discovery in the platform is one of the best promotion tools any company has for their title and, as seen in this recent article by Simon Carless, to make it into the store as a default game for a player in China, you need to localize into Chinese.
This will put the title in a “different store view” with much less competition, which is an incredible opportunity.
On the other hand, in the absence of localization, players can reduce the overall rating by up to 25% while requesting to have the game in their language. These reviews come from the frustration of players that have tried, and maybe enjoyed the game, but know they would enjoy it much more if it were in their mother tongue.
One could deduce that these players would spend more time and money and leave a better review if they did not feel this frustration.
Finally, it is worth noting not all localization efforts will do. In fact, players mentioning localization give a slightly worse rating to games with bad localization than those that request having the game in their language.
The latter expresses a wish for a game they already enjoy but it seems that bad localization hinders the experience in an even more tangible way.
The lack of professional review or text coming from bad machine translation engines without proper post editing are sure ways to obtain a poor localization that will drive reviews downwards.
3. Engage communities
We saw how localization is an essential tool to put your game on the radar of millions of players and how good localization can be decisive in improving user reviews.
But once you have the players’ attention and they have enjoyed your game, can localization help to keep them coming back? Absolutely.
Story-driven single player games are usually bought once but other models, from games-as-a-service to hypercasual mobile titles, rely heavily on two pillars to keep players engaged and active:
New content streams: Players will not be replaying the same content for too long, so providing a steady flow of new maps, characters, gameplay mechanics is essential.
Curated events and promotions: Those periods in between content releases need to be filled with items that retain attention, special events or tasks with rewards that keep players engaged.
Those events and promotions need to be aimed at specific audiences. The players could well be active only in a region to celebrate a local festivity but to truly engage with those specific audiences, you need to speak them in their language, using their codes.
The principle of localization shines the most in these circumstances, where you need to capture the essence of a culture and communicate so that player bases perceive you as part of their culture.
It will never be the same to offer a 20% discount to celebrate Rio’s carnival in a game that is not even translated into Portuguese, than making that same promotion with your game localized, maybe even using puns or local slang to better capture the positive sentiments of those players.
4. Leverage the power of local influencers
Another great way to engage specific communities is to leverage the influencers and thought leaders in that specific region. Although there are a few big names that appeal to the global audience, most of the time the ecosystem is populated by local stars.
If you look at the biggest names of some countries, it is easy to see they prefer localized games that they know their audiences can follow while watching, not to mention the fact that they may not even speak the original language the game was developed themselves.
Failing to get streaming time from these influencers means you could be missing out on millions worth of free publicity for your title.
An example of a very popular streamer and their power is Marmok, Russia’s No.1 gaming Youtuber with 15.6 million subscribers on Youtube. Marmok’s videos are all in Russian and playing games translated into Russian (see screenshot below). A game not localized into that language will probably fall outside his and, most importantly, his followers’ radars.
The Russian market is especially attractive for free-to-play games, as these accounted for 47% of the overall turnover in 2020 (for comparison, on average in Europe, this share is much less, 20%.)
Over in Brazil, YoDa is the No.1 gaming streamer, with 2.1 million followers on Twitch and 11 million hours watched. This young streamer is another great example of a profile with penetration in just one area of the world but with extreme influencing power thanks to a massive local follower base.
Again, by watching his streams you can clearly see he favours games localized into Brazilian Portuguese, so chances to land a spot on his streams probably will only come if you decide to make the game accessible to him and his audience.
According to the latest data by Newzoo, the battle royale genre is the main driving force of the Brazilian market, which in global terms is estimated to see $2.3 billion in revenue in 2021.
Brazil is a booming market for games with an audience with a low English proficiency, so localization and its power to attract influencers and the general audience is key to successfully land in the region.
These are just examples, but we could mention hundreds of similar ones in areas with emerging markets such as the Asia Pacific Region or other Latin American countries.
5. Achieve a wider reach
One thing is certain: whenever a title is well-received by the public, localization ensues. If it had none before, it receives it, and if it did have some, it gets expanded.
We see from indie devs when they hit the spot with a game as well as with the bigger AAA players. This trend applies to every type of game, but it is particularly visible in those that require active communities and a steady following, such as esports.
The popularity and global reach of these can be measured by the number of hours watched on streaming platforms. Below you have a table of the 10 most watched esports on Twitch during April 2021, according to Newzoo. Looking into it, it can clearly be seen how a successful competitive game always has a significant localization effort attached.
One by one, these are the languages the first five are localized into (excluding English):
League of Legends: Text and audio localization into 14 languages
CS:GO: Text localization into 28 different languages
Dota 2: Text localization into 28 different languages
Rainbow Six: Siege: Text and audio localization into seven languages and only text into an additional 8. Total of 15 languages
Rocket League: Text localization into 12 languages
But this relationship between localization and popularity is not only seen in esports. Look at other major players in the industry such as King, who provides support into more than 20 languages, or think of the massive success of miHoYo’s Genshin Impact. It wouldn’t have been possible outside its native China without text localization into 12 languages and voice-over into three apart from Chinese.
All the big names and indie hits are trusting localization to expand their reach and keep their games engaging for players around the world. Anyone wanting to mimic their success might as well follow their lead.
So, you think the game you are working on just needs the right publisher to help you take over the gaming world. But how do you go about creating a pitch deck for your game which will be effective and help find the right publisher for you?
A pitch deck is only one piece of the puzzle, but it’s a key part, not only to have something to present or send to publishers, but also as a process to help sanity check the why, what and how for your game, and in particular identify any gaps in your planning.
At Fundamentally Games, we review a significant number of pitches every month. Previous to Fundamentally Games, I was a developer (and had to create pitch decks myself) and then worked as a consultant helping developers to raise money and helping investors to find and assess potential games.
When we review pitch decks, we see many developers facing the same challenges, so we decided to create a publisher pitch deck template to help address some of these, especially when pitching a living game. We’re not the first to create such templates, there are some great examples online from other publishers and individuals, and while ours is focused on living games and therefore has a specific angle, the advice is relevant to all games.
I do note however that raising equity investment into a company is fundamentally different to raising money for a game, and as such the pitch deck needs to be completely different.
Before we dive into the details, let’s look at the key topics you should be looking to cover:
What is your game and why is it for?
What do you want and where are you now?
Why should the reader trust that you can make this game successful?
Additionally, you should be thinking about taking the reader on a journey; don’t just think about content, think about flow as well.
The following are the key sections that we recommend you cover in a publisher pitch deck.
1. Title page (obviously!)
The title page should be simple, with your game name and studio name, but importantly, it needs to catch my eye. What visuals would you use on your marketing materials? Think about how to get me excited to read more through the images you share — and apply that throughout the deck, not just on this page.
2. Introduction (or executive summary)
I have seen a lot of debate around whether to include a summary slide at the start of your deck. My view is that it’s really important, because I want to know the basics before I dive into the detail. This is useful for two reasons — firstly, it helps me to understand the context of what I’m reading, and secondly, it helps me, as a publisher, check that the game actually fits our criteria.
Assuming you agree you should have an introduction, then this slide should have short bullet points of the basics… but really keep it short and easy to digest. Think about the key selling points as well as the key practical points that a publisher will need to know.
3. Show me the game
Now for the fun bit — this is where you tell the reader about the game itself. You need to explain your game clearly and make your reader care about it. The way we like to think about this is:
Immediate: help the reader understand your game in seconds, show what is special about your game and convince the reader that players will want to download your game.
Relevant: explain why players will keep playing your game, what is the progression? Explain how players will be onboarded and how they will master the game. Don’t just tell me what your key features are; tell me why those key features matter.
Gorgeous: this doesn’t mean AAA quality, but it does mean that theme and art style will appeal to your audience and meet expectations.
4. Why should this game exist now?
Everyone has a reason behind why they are making their game, however a common challenge we see is an assumption that there is a market, and audience need, for the game.
Firstly, consider your market. Your market isn’t the whole games market, it’s a specific segment. What are the trends in this market, where is there a gap? Are you sure it’s a genuine gap and not just something that you want to play? Who are your competitors, what are your biggest challenges entering this market considering the other games that are already there? What are the market norms — what expectations are there for games in this market?
Then consider your audience. Who are they? ‘Male 18-35’ is not an audience — an audience is one or more groups of people, defined to sufficient granular detail that you know where you can reach them and what messaging they will respond to.
Games will often have more than one audience group, we tend to think about this in terms of primary, secondary and tertiary audiences, all of whom will play your game for different reasons and in different ways. Personas are a common way of identifying each audience group, as is looking at other games that they are currently playing.
Finally, and most importantly, tie your market and audience assumptions back to your game design. How does your game meet a genuine market gap and audience need? What is it about your game that will appeal? How does your game’s lifestyle fit and mode of use match how, where and when your target audience play games?
5. The team
The team is always critical to any project, but every team presents a different risk. Your job throughout the deck is to demonstrate how you are reducing risk as much as possible, and to present an opportunity where the risk and potential reward is reasonably balanced. The team plays a key part in that — if you’re experienced, and you’ve had successful games before, that’s going to reduce risk more than if you’re a new team of graduates.
Whatever your team’s background, you need to explain their key skills and experience, and make sure that: your team + planned hires + help that you’re asking for in the deck = covering all the bases needed to make this game commercially successful.
It’s ok to not have all the skills in house, or to lack experience, but whatever you are missing, you need to show that you recognise it, and that you have a plan to address it.
6. Data, data, data
As the team can reduce risk, so can proving that there is actually an audience for your game. Think of a game design as a hypothesis, and data as proving (or disproving) that hypothesis. Without data, you’re asking someone to invest time (and maybe money) on a hypothesis. If your team has a track record of successful hypothesis (previous successful games), then you may get away with needing less data, but nothing will ever replace actual real players confirming that they will play — and spend money on — your game.
Firstly, consider what success looks like and how you will measure against it, and how you will use market norms as a line in the sand. Consider the types of data you will gather; this will depend on various factors including the type of game — a free-to-play mobile title will gather different data to a narrative indie PC game.
Secondly, tell me what (if any) data you’ve gathered to date. If you haven’t gathered any, why not?
Thirdly, tell me how you’re going to gather data going forward, what types of testing you will do, and how your production plan is designed to support this, i.e. how will your process allow you to act on your findings?
7. Community & marketing
Some games will have the intention of leaving this completely to a publisher, and for some games that’s fine (but if that’s the case, make sure that’s clear). However, most games need to build community, and in many cases the game benefits from the developer being at least involved in that process, if not running it.
So, assuming that you are planning on having at least some involvement in this area, then you should explain your plans. How will you engage and build a community, and how will you use that to improve your game? Why will anyone care about your game, what will your marketing strategy be? How will you build a rhythm of activity towards and post launch? If user acquisition is relevant to your game, how will you measure and test its effectiveness, what will your KPIs be?
8. Production
This is where you explain your budget, timeline, process and milestones. This information is usually best presented visually, I don’t need the full details, just they key aspects.
What budget have you spent to date and how much more do you need to spend to get to launch? How much do you need to get to the point where the game is revenue sustaining? What still needs to be built and what is your timeline? What are your key milestones, and what are the key risks or unknowns that could vary your plan?
You want to ensure the reader is left feeling like your plan is realistic based on the game, the team and the market norms.
9. What do you need?
Finally, this is where you tell the reader what you’re asking for.
You may be asking for money to fund production. If so, then clearly explain how much you need, what you’re going to spend it on and when you need it by, and make sure it ties back to your production plan.
It’s likely you will also need other support, so list those things too. You may want marketing support, but you may also need help, advice or support in other areas.
Additionally, consider who you’re pitching to. Every publisher is different, there is no point asking for an amount of money or a specific type of support that is different to what the specific publisher can provide. Tailor your pitch as needed to the publisher you’re pitching to.
Finally, make sure that what you’re asking for is realistic, that it will give you everything you need to make this game a success — asking for too little is just as bad as asking for too much.
There is no right or wrong way to post produce a project: there is no right or wrong software package for each part of the process. How you choose to complete the work is down to a number of factors, not least individual preferences.
Except that for most organizations, they are locked into a specific toolset because that is the only way they can move projects around and work collaboratively. Everyone using the same suite of software applications may limit the operators, but it means projects can be (reasonably) seamlessly exchanged.
At EditShare we wanted to take a fresh approach to this. Our users told us that it would be great to have more flexibility. This is why we created Universal Projects, which allows you to move between platforms as easily as possible.
The idea is that you can start a project in any tool – including EditShare FLOW to set up bins and even rough cuts – and work in any other.
In the real world it may be unlikely that a single project will be worked on by multiple editors each using different NLEs, so you might ask why we have devoted our development efforts to this. But there are real-world use cases.
Imagine, for instance, working on an episodic series at an Avid post house. During the edit, the production company or broadcaster needs to start on the marketing campaign, and the in-house trailer editor prefers Premiere Pro. Having to go back to the raw footage and start the search for clips from scratch is clearly not an economic option. Being able to look into the programme edit, browse bins for each episode, and with key moments tagged by the producer, saves days of effort and leads to a much better result. When the pressure is always on to deliver things faster, this is a big benefit.
The idea of being able to share projects between platforms is sound. What does it mean in practice? Inevitably, there are differences between platforms.
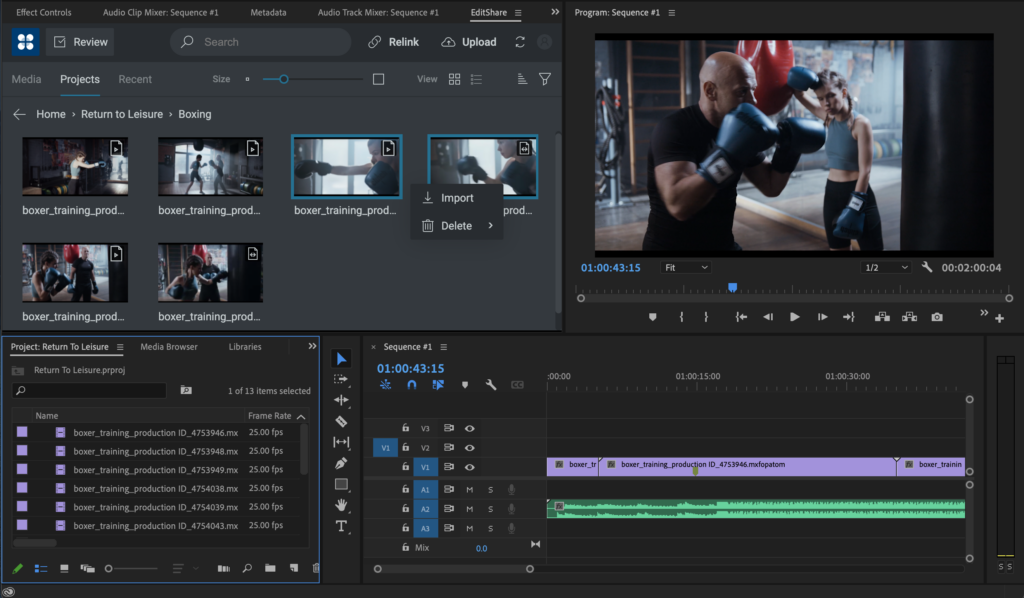
FLOW is the EditShare media management platform. In 2021 we introduced FLOW Panels – plug-ins – for Adobe® Premiere® Pro and for DaVinci Resolve, which were very well received. The Panels provide a means of accessing FLOW media management from within the familiar editor user interface.
FLOW panel connected directly into the Adobe® Premiere® Pro UI
More importantly, it is a simple means to swap bin structures, content, and all the metadata around the edit. Where it can, this is all maintained completely automatically. So you can create a project structure in advance in FLOW and have it pop up ready when you log in to your editor. If you add bins or sub-divide timelines or make any other structural changes, these are immediately reflected back into FLOW, and are available to any other user who logs in.
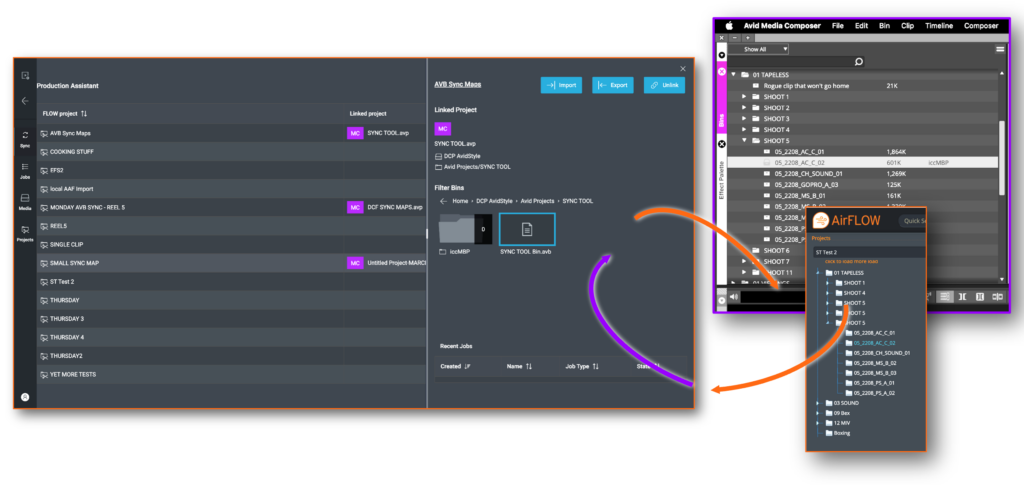
Avid Media Composer takes a slightly different approach and lacks the simple hooks for tight, cross-platform integration. But it would not be a very valuable cross-platform integration if it did not include Avid. So we have now brought Media Composer under the Universal Projects umbrella.
We think we are pioneering the universal projects concept. We are certainly the first to be able to integrate Avid technology and workflows into cross-platform collaborations.
Our implementation respects Media Composer’s way of working, like locking bins when a user has logged into a project. To allow it to be always available to other collaborative users, we implemented a routine that automatically generates a copy of the structure which is then reconciled again when the original user logs out or publishes.
This works in conjunction with the Avid Attic, so projects are backed up both here and in FLOW, ensuring each user can always access the history of a project as well as the latest version.
In effect, EditShare FLOW appears as another user in the Media Composer environment. It becomes a very powerful edit assistant, either manually through other portals into FLOW or automatically.
Sync between FLOW and Media Composer respecting bin locking
The original Universal Projects links are already available; the complete system including Media Composer integration is currently in advanced beta trials with a number of organizations from boutique post houses to major national broadcasters.
Whatever the application, it gives you an overview of every project and a means of planning and optimizing workflows. As a side benefit, it also helps engineers plan for future expansion, showing where the bottlenecks are in projects, and facilitating data-lead decisions about where to optimize workflows.
Ultimately, it is part of the new metadata revolution, whereby a strong, common, resilient set of information is used to drive complex workflows and automated processes from the camera to the screen.
Want to find out more? See it in action at IBC, book a meeting or a demo here, or request a follow-up
We are very excited to be bringing back the MediaSilo brand, and the product previously known as Shift will be known as MediaSilo moving forward. Having the company AND product named Shift has led to some confusion and questions in the market. Changing the Shift product brand to MediaSilo allows us to better communicate who we are, streamline our product offerings, and tap into the trust and respect the MediaSilo name has represented for years.
The only immediate changes in the product are the logo and name. We’ll continue improving the interface and user experience, but you won’t be met with a completely new experience the next time you log-in.
In the media industry right now, a lot of people are publishing opinions on the cloud. But they tend to focus on the features of the cloud, not the benefits.
We are all very aware of the features offered by outsourcing storage and processing. It is scalable, so you can turn things on and off, giving you the agility to try new things. But what are the things you might want to turn on and off? What, in short, are the benefits.
Take the case of a post house. You have a building, a fixed amount of space for which you pay rent. In that you build some facilities – edit suites, grading rooms, audio mixing and so on – and equip it with the necessary hardware and network connectivity. That is the limit of what you can offer, short of taking on more space, paying more rent, and buying more hardware.
If you are in a market, like London or New York, which expects city-centre facilities, it may not even be possible to expand. It will certainly be very expensive.
Today, if a regular and important client comes in with a large and interesting project, they may well say they want to edit from their location. Or the set. Or from the editor’s home. Blocking out an edit suite for the project, knowing that the room will be empty and the editor working over Teradici – looks like a poor use of your expensive real estate and resources. The client will certainly want to negotiate a discounted rate, but all you are saving is the runner’s time making cappuccinos. Rent, business rates, power and all the other overheads will still be there.
You could, of course, say that they can be in the building or they can be on the other side of the world: the rate for the edit suite is always the same. The client would then most likely shop around and either find someone else to do it for them, or potentially put something together on Amazon Web Services (AWS) themselves. Either way, you’ve lost this project, and perhaps the client, forever.
Or maybe you are a broadcaster, and your commercial team win the rights to a high profile sporting event. Suddenly you are asked to add a huge amount of editorial capacity, for a short time. Taking the conventional approach of building the extra edit suites – buying hardware and converting office space to creative rooms, even renting OB trucks – is not commercially viable if it is all going to be redundant the day after the event finishes.
Perhaps you want to experiment with augmented reality in one of your studios, because someone wants to try it on a pilot production which may turn out to be a one-off or may become a series. To support it, you need to add a lot of processing and storage for design and rendering, in order to create the virtual elements and give the show the wow factor.
These are the sort of opportunities for which the cloud can deliver real benefits. This is why we talk about scalability in the cloud, about being agile enough to add facilities and functionality quickly when you need it, without heavy capital investment which may never be amortised.
But the cloud is a great leveller. If we agree that you can do all these things in the cloud, then any disruptor could come in and win these sort of contracts from a blank sheet of paper.
The reason that the cloud opens up these opportunities for established businesses is that you already have proven strengths. The cloud just gives you the added capacity. To take advantage of it, you must move your existing business to be cloud-ready.
Importantly, you are not abandoning anything you already have today. Your capital investments, your business reputation, your physical location and working environments: they all stay exactly as they are, carrying on winning you business.
Now is the time to start building some experience in the cloud, no matter how small, so that you have the wheels greased, you have the systems in place so you are ready to go when the call comes. People across your business need to become comfortable with the cloud, allowing you to confidently guide clients who want to take advantage of your remote capabilities, or your pop-up extended functionality.
The reason that we call our cloud video storage and asset management platform FLEX is that it is built, from the ground up, to be completely flexible for both on the ground and in the cloud. That includes the ability to scale up and down, in compute as well as storage, without any changes to the user interface or working environment.
Making a small investment to start your experiments with FLEX in the cloud will help you realise just how simple it is to operate, how to add capacity as you need it, where it shines, and what changes you made need to adapt your workflows.
Armed with that knowledge and understanding, you now have a big advantage in the marketplace, because you’re ready to ramp up capabilities on demand. Your cloud experience becomes a demonstrable asset when pitching. You can punch well above your weight, simply because you can turn on the capacity you need at any time.
That is the real benefit of the cloud: it allows you to step up to any business opportunity and deliver creative quality, whatever the requirement and wherever the location.
Choosing the right type of post production storage for media production and post production is critical for enabling creative teams to collaborate effectively and deliver work on time. The needs of media workflows are quite different from other applications and also from traditional IT-oriented considerations. Instead of focusing on the number of operations (IOPS) available from the storage layer, the critical metric for working with high resolution video is throughput: how many (typically) large media files can be read from (and written to) shared storage simultaneously by multiple editors and other users of the system.
The simplest form of storage used in media production is DAS: direct attached storage. That is, a disk drive (or maybe a RAID array of disk drives) attached directly to a workstation, typically via USB or Thunderbolt or other external protocols such as SAS. It is fast and, by definition, there can be no contention because only one person can use it at a time. If more than one person needs access to the media on the drive, they will have to unplug it from one workstation and plug it into another. The alternative is for each person to have their own DAS, which quickly adds up in terms of raw drive costs and means a lot of copying files around, with the inevitable challenges of managing versions and keeping changes in sync.
To avoid all these limitations we need to move to an architecture which provides shared storage.
One flavor of shared storage is SAN (Storage Area Network) storage. This is a large server environment to which multiple clients can attach and access a shared pool of storage available from across many servers and drives. When a client connects to a SAN it appears the same as a local drive, essentially like DAS, and applications will talk to the storage at the block level.
While the SAN provides a pool of storage, meaning that each workstation attached to it can have access to a large amount of storage when required, a given segment of the raw storage can still only be attached to a single workstation at a time and so has many of the similar limitations for media workflows as DAS.
Also, to get its promised performance, the SAN typically uses fibre channel connectivity (today, more usually FCoE: fibre channel over ethernet), a protocol which delivers fast data rates, but which really only works on local area networks, so is not suitable for remote collaboration.
There may be times when you need blisteringly fast connectivity, like dealing in uncompressed 4K or beyond with data rates in excess of 2GB/sec for digital cinematography, film restoration, and high end finishing. In these cases, SAN could be the solution, however these workflows can also be achieved with other shared storage options that also allow for easier collaboration, further optimising workflows and reducing overall data storage capacity requirements.
The alternative storage option is NAS, network attached storage. EditShare’s software defined shared storage is a high performance scale out NAS, whether deployed on-premises or in the cloud. The EditShare File System (EFS) is renowned for its excellent performance in production and post-production. Whilst you might initially think of NAS as a low performance storage designed for smaller applications, with a clustered architecture and other optimizations NAS can deliver high data rates and all the flexible and cost effective advantages of NAS without the need to build out a SAN.
A NAS, as its name suggests, is storage which sits on your core TCP/IP network, not a branch off to a separate, dedicated network. Any other device on the network can access any part of the NAS, so collaborative workflows become completely simple and transparent.
Unlike a SAN, though, NAS is not accessed at the block level: file operations are sent over the network. This file-level locking has the huge benefit of making it simple to integrate with creative software and intuitive in use.
The question, then, is how to get the performance we need for premium post-production with shared storage on a NAS?
Typically, workstations and NAS servers communicate using standard protocols like SMB or NFS. These are designed to be suitable for whatever the computer needs, however can have limitations when pushed to the limits demanded by high bit rate editing and post.
So EditShare developed its own, media-specific network protocol, accessible using EFS Native Client file system drivers that are available on MacOS, Windows and Linux.
Media applications rely heavily on multi-threaded operations to present multiple video, audio and other data to be streamed to users in high resolution. The EFS Native Client takes advantage of this pattern to balance the throughput load across multiple storage nodes and determine the fastest way to deliver files back to the application. The result is much higher performance than with conventional network protocols.
EditShare EFS storage systems are also inherently scalable: when you need more space, you add additional nodes and hard drives to grow the overall capacity of the system. A major advantage of this approach is that you can get a two-for-one deal: providing additional protection by spreading data across servers but also gain throughput benefits when reading data from multiple nodes to avoid hotspot of contention on particular hard drives or server nodes.
The advantages of software defined NAS are many. You can freely mix SSD and spinning disks (although in the real world you may well find that you do not need SSD as much as you think you do). You do not need to define the number and allocation of clients. Multiple clients can access the same files: you would have to manually define copy tasks on a SAN. If you need to re-size volumes from project to project, you do it with a couple of mouse clicks, not the wholesale restructure you need for SAN. In addition, the commodity TCP/IP network connectivity infrastructure you already have can be utilized, instead of having to deploy costly and inflexible parallel SAN infrastructure or bespoke dual personality Fibre Channel/NIC cards.
Importantly, for solutions such as EditShare EFS, there is a focus on the aggregate performance of the storage across multiple workstations simultaneously accessing a large pool of media. Of course, individual client performance is critical and EditShare continuously optimises both client and server to align to the sweet spot for real media applications. But beyond the individual it is just as important to consider the overall capabilities of the storage layer to support many users collaborating together across a range of applications that put different demands on the storage throughout the production lifecycle. It is this focus on performance of the applications using the storage that is important: can multiple users edit multiple streams without latency, jitter or dropped frames? The answer with EditShare EFS is, they can.
In the post industry, the biggest pressure today – aside from the usual need to control costs and boost productivity – is the need to support a “work anywhere” environment. Creative staff want the flexibility to work their preferred hours, from a location of their choosing. It reduces or eliminates the commute to an office, which has real environmental benefits as well as reducing stress for the editor.
EditShare led the industry in developing cloud solutions. It took existing, successful products and concepts and added the open-ness, interoperability and scalability that the cloud offers.
All of this experience is now brought together in EditShare FLEX, which offers a highly tailored environment for all the major tasks from remote editing to secure archiving. Most importantly, FLEX is designed in such a way that it is simple to implement and intuitive to manage. It does not require IT expertise to get the best of the system, nor to ensure security and reliability.
Migrating to the cloud gives businesses the obvious advantage that they do not need to physically host the hardware on which their work depends. This reduces the space they need, the power they consume, the air conditioning demands and the downtime and staff to ensure that the hardware is maintained and updated as required.
Conversely, the creative team will be accustomed to their preferred software and know how it should respond. Forcing a change of edit software, for example, would be simply unacceptable. Equally, making the system less responsive to key presses or mouse clicks would be unsettling and cause slow down workflows and become a stumbling block in adoption.
The guiding principle of EditShare FLEX is that you should carry on using your preferred tools in exactly the way you are used to. Cloud and remote working means there is an abstraction between the operator and the physical workstation, but that cannot be any sort of obstacle: it must be completely transparent.
To make this possible, EditShare has collaborated with industry leaders. FLEX uses the popular and widely recognised Teradici software to provide remote access from anywhere to virtual workstations. And if you are new to cloud connectivity and do not have an established fast file transfer process we can integrate CloudDat software from Data Expedition Inc.
Even more important, the FLEX virtual workstations in the cloud support whatever NLE software you currently use: it is completely agnostic. Indeed, if you have some editors who prefer Premiere Pro, some who are Avid fans and others who are most comfortable on DaVinci Resolve, you can support all of them, simultaneously and completely transparently.
There are two main bundles of the FLEX offering at present, with more to come in the future. FLEX Cloud Edit does what the name suggests: allows your editors to sit wherever they like and edit on virtual machines in the AWS cloud. Customers can take this bundle a step further with FLEX Cloud Edit+ which adds workstation management and file transfer acceleration, providing video production teams with an end-to-end video studio suite virtualized in the cloud.
The second bundle is FLEX Sync, which synchronizes between local EFS storage and cloud-based archives. It can be set to be completely automatic and it eliminates the need for LTO tape libraries, another continuing cost for space, maintenance, tapes and upgrades. By moving your archive or DR backup to the cloud, you also gain massive resilience. Once your archive is available in the cloud it unlock opportunities to utilize it for other cloud solutions, including FLEX Cloud Edit.
There are options in each service so you can tailor your system to precisely your requirements. If you do not have the necessary IT and engineering skills in house, then EditShare’s professional services team can provide the system design and scoping.
The great advantage of FLEX, though, is that you maintain full control over your working environment. Your talented and creative team will notice few changes, and will be able to work as productively as before, if not more so.
It delivers against the key concerns. It provides secure and efficient remote working, alongside edit-in-the-cloud, with all the CapEx savings and OpEx control that implies. And you maintain full control over your working environment and, most important, the security of the content entrusted to you.
The newest Shift updates let you shorten the time you spend on the sharing tasks you perform most often. From grabbing all the files you need at once, to flying through dialogs faster, to finding links at your fingertips – getting more of your time back is the biggest feature you’ll find in the latest release of Shift.
Newest features and improvements:
Now frequent sharers can fly through the sharing dialog quickly without digging through options they don’t need. The Share menu now offers basic and advanced views to streamline our most common user workflows, while maintaining advanced functionality for more in-depth workflows. The most common sharing settings are now presented first and set to the admin’s defaults when sharing, while advanced settings are easily available to users who want more granular control.
Customers can opt to add visible watermarks to specific, one-off instances of sharing assets in a Review Link, even if the project was not set up to require watermarking. If a file is coming from a watermarked project, the Share dialog will default to the project settings. What’s more, the original asset will remain clean and unmarked for other uses – but visibly protected in the specific link.
Mix and match file sharing
Instead of selecting only files or a folder, now you can multi-select combinations of files and folders to move all at once. Add the files and folders you select to the collection bin or playlist, share them via Review Links or Presentations, or delete them. Just hold down Command (Mac) or Control (Windows) to select whatever combinations of files and folders you need.
Sent Items Drawer
Finding previously sent items is now much quicker, making it easier for anyone who needs to review and edit the contents of Review Links. Just open up the left drawer of the Shift UI, navigate to the new Sent Links tab, and click into the Review Link you want to edit. You can reorder assets, drag in new folders and files, or remove items from the link. Open up and edit link settings from this space as well. Once you’ve edited the link, it’s automatically updated so prior recipients don’t need a new link.
Player Updates
Play video content in whatever way makes it easier for you to view – in a loop, auto-advance, with varied playback speed, a 5-second skip forward & back, and adjustable volume – with the new and improved player controls added to Shift. Your video setting preferences are saved and carried throughout the app, no more having to re-select showing duration every time you watch a video!
History Tab
Check out the newest addition to the sharing dialog – the History tab. See at a glance who has been sent a link, when it was sent to them, and who has had access to it in its lifespan – even on public and password-protected links. From there you can immediately re-send the link to them, or copy the link URL, with the click of a button.
For more information on how this release might benefit your team, or to discuss how to add watermarking to your account, reach out to your CSM or customersuccess@shift.