Datasheet

EFS NVMe Datasheet

Ultra-fast shared media storage for the most demanding creative video production workflows, including VFX & finishing workflows.

Workflow, server and delivery solutions from storyboard to screen

Stand D40, London Olympia, May 15-16, 2024EditShare, the technology leader that enables storytellers to create and manage collaborative workflows at every stage from storyboard to screen, is exhibiting at the 2024 Media Production & Technology Show to showcase its unified approach to content management. The demonstration will show EditShare’s scalable and collaborative solutions for media across multiple premises, cloud and hybrid implementations, focusing on ease of operation and security of content.

EFS, the EditShare media storage architecture, has now been boosted with the addition of EFS NVMe, adding the high performance, high bandwidth solid state technology as another building block. For demanding creative applications – like DPX, OpenEXR, 4k, 8k and beyond – EFS NVMe provides throughput three times faster than previous generation SSD servers, while still being integrated with and managed by the overall EFS environment including traditional online servers, nearline storage, archives and the cloud.
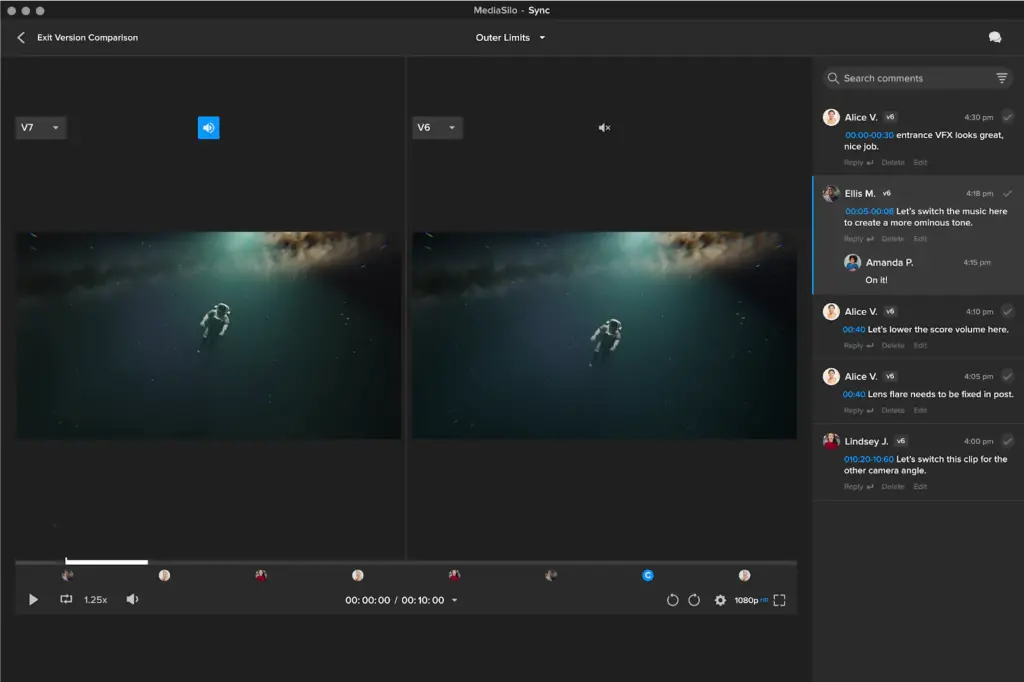
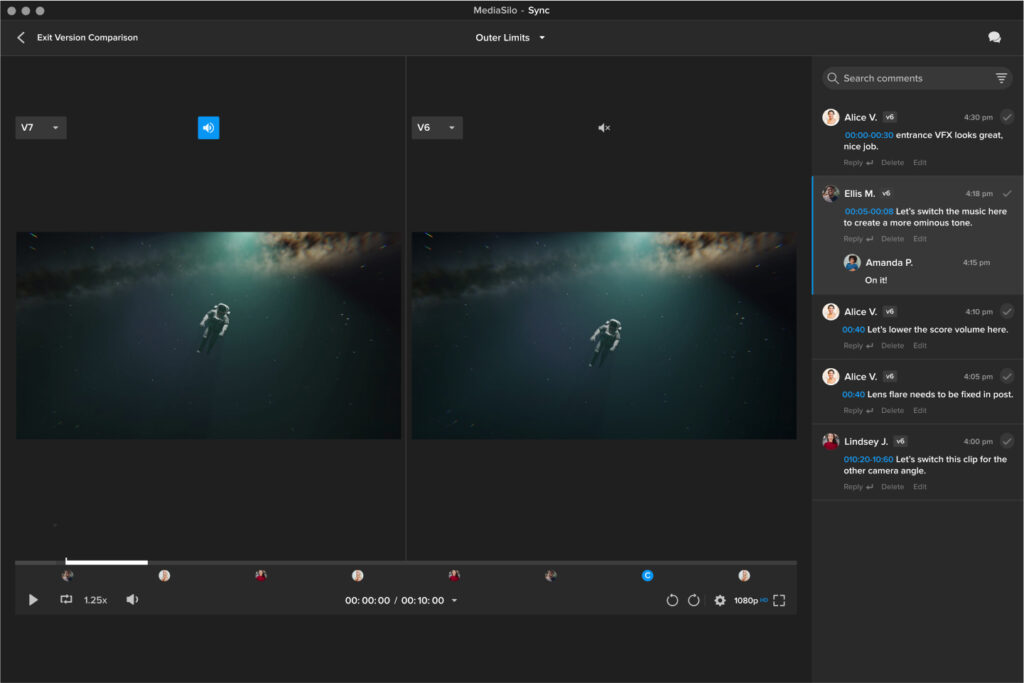
 Attendees at the Media Production & Technology Show will have the exclusive opportunity to experience a live demo of this cutting-edge technology firsthand.

MediaSilo, the premier video collaboration platform trusted by the biggest names in entertainment, sees enhanced review functionality, including side-by-side version comparisons, @ user mentioning, and range-based commenting to provide feedback on entire scenes. To provide protection when sharing videos for review, MediaSilo incorporates visible and forensic watermarking, dynamically inserting customisable viewer information into the file. Now MediaSilo also offers image and document watermarking, protecting non-video content including scripts, casting shots and marketing materials.

Shogun MediaSilo Atomos

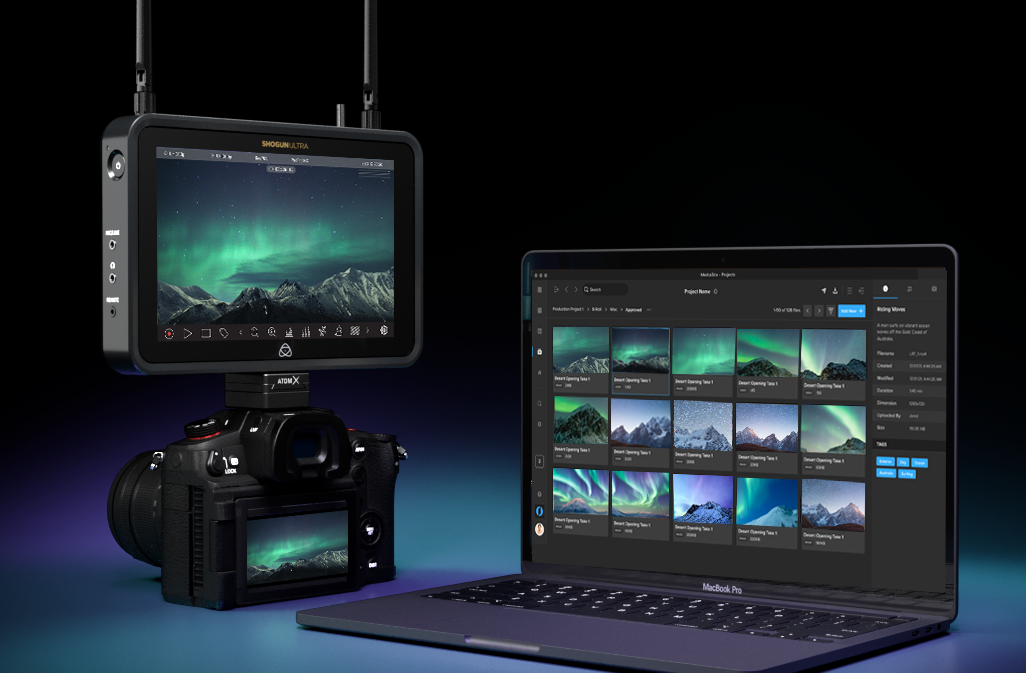
Also, MediaSilo is now seamlessly integrated with Atomos’ pioneering cloud-connected range of camera-mounted monitor-recorders, offering attendees a firsthand view of this innovative collaboration. Camera to Cloud workflows accelerate the creative process by shrinking the capture-to-edit timeframe, enabling editors to begin working on media instantly instead of waiting for hard drives or delayed file transfers. The Atomos MediaSilo integration elegantly unlocks these capabilities. Additionally, MediaSilo creates dynamic review links that automatically update as more footage is shot, providing external collaborators with one destination for feedback.

Improved security, along with more branding customization and in-video logo watermarks are also among the enhancements for Screeners.com, the preferred press screener widely used by major studios and production companies worldwide. Reviewers will see an enhanced OTT-style experience, with improved content recommendations, watchlists and expiry notifications. 

“EditShare was formed 20 years ago now, and from that day to this our sole focus has been on freeing content creators to exercise their craft and not worry about the technology,” said Tara Montford, Co-Founder and EVP of Sales at EditShare. “That still drives our developments today, and we continue to innovate as we strive for those goals. We allow open interworking with the tools users really need such as editing software; we provide the platform for truly end-to-end workflows from ingest to screeners; and we protect it all through excellent security,

“Our direction is set through a deep understanding of our clients and their needs, so events like MPTS are vital in building and maintaining those relationships,” Montford added.

Staff will be on hand on stand D40 at MPTS to talk about all of the latest enhancements to EditShare products, like FLEX Sync which provides powerful tools to sync with services like Amazon S3, Wasabi and Backblaze to create an automated but completely secure, completely reliable backup system.

Find out more on stand D40 at MPTS, or click here to get in touch.

About EditShare

EditShare is an Emmy Award-winning technology leader, supporting storytellers through collaborative media workflows across on-premise, cloud and hybrid architectures. The market-leading open software solutions and robust APIs  improve workflow collaboration, third-party integrations and content sharing across the entire production chain. Designed specifically for media applications, the high performance line-up provides shared storage, archiving and backup, and intelligent media asset management.

Through a merger with Shift Media, EditShare now also integrates tools for content review and distribution, the creation of customised and branded pitch reels, and secure preview of high-value pre-release content.

©2024 EditShare LLC. All rights reserved. EditShare® is a registered trademark of EditShare.

Press Contact
Kara Myhill
Manor Marketing
kara@manormarketing.tv
+44 (0) 7899 977222

Integration between MediaSilo and Atomos Cloud Studio unlocking rapid transfer of content from on-set to editors to be showcased at NAB 2024

Boston, MA – April 11, 2024EditShare®, a technology leader that enables storytellers to create and manage collaborative media workflows, today announced it has partnered with Atomos to bring camera to cloud workflows to MediaSilo, the leading video collaboration platform. MediaSilo will be integrated with Atomos’ pioneering cloud connected range of camera mounted monitor-recorders, which can be attached to virtually any HDMI or SDI camera source.
Camera to Cloud workflows accelerate the creative process. By shrinking the capture-to-edit time frame, editors can begin working on media instantly instead of waiting for hard drives or delayed file transfers. The Atomos MediaSilo integration unlocks these capabilities elegantly. Simply connect your camera to your cloud enabled Atomos device via HDMI or SDI. After pairing your device via your Atomos Cloud Studio account and adding MediaSilo as your destination, you can select the target project and folder for media upload. Once you hit record, proxy files will automatically sync to the MediaSilo project or folder you have selected. Team members can then jump in to start reviewing the footage as it arrives. MediaSilo also creates dynamic review links that automatically update as more footage is shot, so external collaborators have one destination for feedback.

Access to your MediaSilo account is included in Atomos Cloud Studio’s Camera to Cloud plan. Anyone purchasing an Atomos Connect (for Ninja V, V+, Ninja or Ninja Ultra), a Shogun, or Shogun Ultra automatically receives a free all-inclusive subscription. Both plans include single/dual recording, 4K upload, and progressive upload, Atomos’ unique progressive file transfer technology that gets content into MediaSilo while you are still shooting.

EditShare CEO Ramu Potarazu said, “We’re extremely excited to start MediaSilo’s camera to cloud journey with Atomos. Our decision was rooted in the EditShare brand ethos of flexibility: we want our customers to work with creative tools of their choice. Integrating MediaSilo to Atomos products such as the Shogun and Ninja lets people choose the right camera product for each project. We look forward to seeing our customers benefit from the speed and flexibility they’ll see with MediaSilo + Atomos camera to cloud.”

“I’m delighted to announce another camera to cloud integration with Atomos Cloud Studio. We’ve always considered ourselves to be a neutral ‘gateway’ to a wide selection of secure destinations for our customers’ content,” said Jeromy Young, CEO of Atomos. “MediaSilo is highly respected in the post production world for accelerating collaboration, and its addition to our online platform offers our DNx-orientated customers in particular a route into Camera to Cloud. It’s very much a win-win scenario for both parties.”

The integration will be on display at NAB 2024 at both the Atomos booth (Central Hall – C4931) and the EditShare booth (South Hall Lower – SL8087), and will be generally available in mid Q2 of 2024.

For more information on all EditShare solutions, please visit the website at www.editshare.com. Information on the Atomos product portfolio can be found at www.atomos.com.

#

About EditShare
EditShare is a technology leader that enables collaborative media workflows from storyboard to screen on-premise, in the cloud, or in a hybrid configuration. With customer and partner success at the heart of EditShare’s core values, our open software solutions and robust APIs improve workflow collaboration and third-party integrations across the entire production chain, ensuring a world-class experience that is second to none. The high-performance software lineup includes media optimized shared storage management, archiving and backup, and media management, all supported with open APIs for extensible integration. EditShare’s cloud-enabled remote editing and project management technology was recently recognized by the National Academy of Television Arts and Sciences (NATAS) with a prestigious 2021 Emmy® Award for Technology and Engineering.


About Atomos
Atomos is a video technology innovator. When we started just over a decade ago, we combined high-quality touchscreen monitors, removable storage, and Apple ProRes to dramatically improve the quality of video captured by almost any camera. For the first time, video makers could take the uncompressed output from the camera and store it in Apple’s professional, easy-to-edit format. 

With Connect, Atomos extends the capabilities of its monitor-recorders with a host of cloud-based tools and services. Content creators now have greater peace of mind as their footage is simultaneously stored on the camera, in the cloud and on the Atomos recorder. Workflows anywhere in the world can access media from a cloud connected Atomos device. 
Our online services extend our physical products’ capabilities, empowering filmmakers, and video creators with essential tools for camera-to-cloud, collaboration and review, cloud editing, live multi-cam production, wireless timecode, and streaming. It is a flexible ecosystem of subscription-based services that can grow with customers’ needs. 

©2024 EditShare LLC. All rights reserved. EditShare® is a registered trademark of EditShare.

Press Contacts
EditShare
Kara Myhill
Manor Marketing
kara@manormarketing.tv
+44 (0) 789 9977222

Atomos
e: Denise Williams denisew@bubbleagency.com t: +1 503 806 0755 (The Americas/APAC)
e: Danielle Harper danielleh@bubbleagency.com t: +44 7514 495 819 (EMEA)

Amy and Drive to Survive producer updates collaborators simply and securely

Boston, MA, March 18, 2024Box to Box Films, an Emmy® award winning producer of high end documentaries and factual entertainment, has extended their agreement with EditShare and will  continue to leverage MediaSilo for delivering work-in-progress content to collaborators. The software allows clips and completed content to be distributed simply and securely, for viewing on any platform.

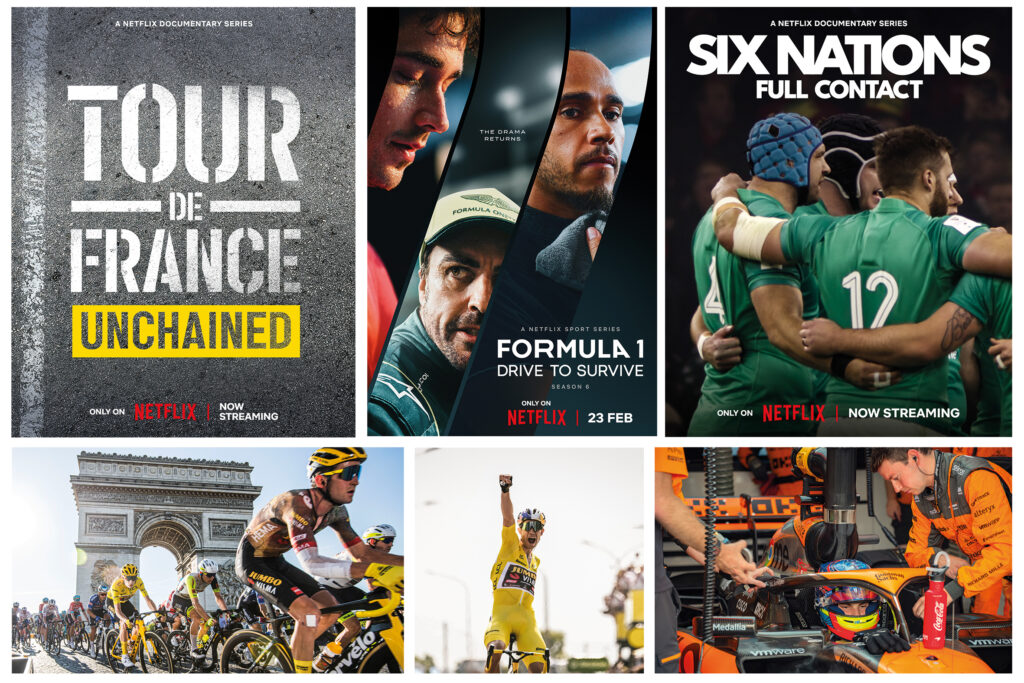
Box to Box is the producer behind the acclaimed documentary Diego Maradona, which chronicles the career of celebrated football player Diego Maradona. Its Formula 1: Drive to Survive inside motorsports documentaries reached series six on Netflix in February 2024. The company prides itself on its ability to create dynamic and dramatic narratives for international audiences.

For these and many more one-offs and series, each project is managed independently, with different managements, clients, post facilities and producers. MediaSilo gives Box to Box a ready way to distribute dailies and cuts, just to the team involved in that particular production. It provides a completely flexible storage space, allowing it to serve the requirements of different projects, and to allow multiple users to access it.

“On a typical project we would send a cut to maybe two bosses, three or four executive producers, showrunner and producer, post supervisors and more,” explained Box to Box technical editor Rafael Bettega. “We send the picture lock cut to the composer, and to the creative marketing people so they can plan and start the campaign as early as possible.”

“With MediaSilo we don’t need to worry about technology,” Bettega continued. “The users simply receive a review link with a video which they can access with a password, to play just by pressing the spacebar. No need to download additional software; no need to take up licences in an asset management system. And because of the two-factor security it is acceptable to the networks we’re partnering with, which prioritize secure methods for content transfer”.

Bettega first used MediaSilo on Amy in 2013, at the suggestion of the post house he was working with. It now uses the system for all its productions.

“This is the perfect application for MediaSilo,” said Eric Wynalek, EVP marketing & strategy at EditShare. “As massive fans of Box to Box’s productions like Drive to Survive and 6 Nations: Full Contact, we’re honoured to be an integral part of their workflow. Box to Box has a set of diverse users who need to collaborate on content securely, including protection with custom permissions and receipt of usage analytics. The interface allows groups to be set up for each project, with permissions set by user, so each clip and cut is sent to just the right people and the all-important feedback is received quickly.”

For more information on MediaSilo and all EditShare solutions, please click here to get in touch.

About EditShare

EditShare is an Emmy Award-winning technology leader, supporting storytellers through collaborative media workflows across on-premise, cloud and hybrid architectures. The market-leading open software solutions and robust APIs  improve workflow collaboration, third-party integrations and content sharing across the entire production chain. Designed specifically for media applications, the high performance line-up provides shared storage, archiving and backup, and intelligent media asset management.

Through a merger with Shift Media, EditShare now also integrates tools for content review and distribution, the creation of customised and branded pitch reels, and secure preview of high-value pre-release content.

©2024 EditShare LLC. All rights reserved. EditShare® is a registered trademark of EditShare.

Press Contact
Kara Myhill
Manor Marketing
kara@manormarketing.tv
+44 (0) 7899 977222

Major South African production facility uses EFS and FLOW

Boston, MA, March 4, 2024Rapid Blue, one of the leading production companies in Africa, is now using the EFS 300 storage system from EditShare for all its in-house shows. Through the use of EditShare FLOW media management and workflow tools, the company has built a very efficient and cost-effective platform which allows multiple users direct access for review and approval, as well as supporting large post production teams. Rapid Blue’s productions encompass a diverse array of content, spanning from drama serials such as Is’thunzi to studio shows like Family Feud South Africa and Last One Laughing South Africa, as well as location-based reality programs including The Bachelor and Come Dine With Me South Africa. Rapid Blue, who is part of BBC Studios’ international family of production companies, is also the South African producer of international hits such as The Great South African Bake Off and Dancing with the Stars. The result is large volumes of content acquisition, often needing very rapid turnaround times.

When its central storage system reached end of life and began to raise serious issues with reliability, Rapid Blue looked for a system that would deliver content security as the top priority. Workflows needed to be fast, intuitive and cost effective. The EFS platform answered all the questions, and the company installed a 280TB storage network, implementing the system in conjunction with Protea Broadcast & Multimedia, EditShare’s South African partner.

“The whole facility runs off it, and it’s been awesome,” said Jacques Wolfaardt, Rapid Blue Head of IT. “It hosts almost all of our productions, and we can connect all our edit suites – as many as 20 – at the same time on the same content, giving us great productivity and fast turnarounds.”

Rapid Blue uses both Adobe Premiere Pro and DaVinci Resolve non-linear editors, and both are tightly integrated into the EditShare FLOW media management functionality. The relevant parts of the shared storage appear as locations within the software, so editors get direct access to the material they need, and can save cuts directly to the storage network.

“We connect many desktops directly to FLOW, and it automatically generates high-quality proxies” Wolfaardt said, “Producers working on their own computers can select the content they need from bulk ingests before it gets to editors – and reality shows generate a massive amount of content. They can also review and approve cuts, all without tying up edit suites just to look at material. That saves us time and resources, and makes us much more efficient.

“We also use the workflow automation in FLOW,” he continued. “It creates all the deliverables in different formats, and delivers them to FTP sites, without tying up staff or facilities.”

James Macpherson of Protea Broadcast & Multimedia said “Reliability was a key deciding factor for Rapid Blue, and we could clearly show that EditShare leads the field. In production, deadlines are often very tight, and a day’s delay can be catastrophic. 

“Jacques and his team would certainly let me know if there had been any issues, but EditShare has delivered the performance they need with no downtime.”

For more information on EditShare solutions, please click here to get in touch.

About EditShare

EditShare is an Emmy Award-winning technology leader, supporting storytellers through collaborative media workflows across on-premise, cloud and hybrid architectures. The market-leading open software solutions and robust APIs  improve workflow collaboration, third-party integrations and content sharing across the entire production chain. Designed specifically for media applications, the high performance line-up provides shared storage, archiving and backup, and intelligent media asset management.

Through a merger with Shift Media, EditShare now also integrates tools for content review and distribution, the creation of customised and branded pitch reels, and secure preview of high-value pre-release content.

©2024 EditShare LLC. All rights reserved. EditShare® is a registered trademark of EditShare.

Press Contact
Kara Myhill
Manor Marketing
kara@manormarketing.tv
+44 (0) 7899 977222

Expanded lineup includes new EFS NVMe finishing nodes, revolutionary private cloud technology and powerful enhancements to FLOW asset management, MediaSilo and Screeners.com

Boston, MA, February 29, 2024EditShare, the technology leader that enables storytellers to create and manage collaborative workflows, is celebrating 20 years of outstanding innovation at the 2024 NAB Show (booth SL8087, Las Vegas Convention Center, 14 – 17 April). It will mark the milestone by unveiling powerful new tools for producers and post facilities, new software and hardware, and the initial integration between FLOW and MediaSilo.

EditShare has always pushed the boundaries of media engineered storage solutions and will be demonstrating for the first time the new EFS NVMe, which enables creatives to work in demanding media formats such as DPX, OpenEXR, 4K/8K and beyond – all powered by the media aware industry standard file system, EFS. EFS NVMe provides unprecedented throughput, three times greater than the aggregate bandwidth of previous SSD generation servers, making it ideal for users working with VFX and other high bandwidth, high throughput environments.

EditShare completed its merger with Shift Media in September 2023, and at NAB 2024 the company is already unveiling major steps in integration and enhancements. Users of FLOW, the asset and workflow management platform integrated into EditShare’s storage systems, will be able to directly access all of the tools in the MediaSilo video collaboration platform to distribute viewing copies and collate annotations, speeding still further the processes of collaboration and content sign-off.

Within MediaSilo, collaborative creative editorial review improvements will include side-by-side version comparisons, user mentioning and range-based commenting. These advances further the effectiveness of MediaSilo as a review tool during the production and post timeline. To protect content, MediaSilo incorporates visible and forensic watermarking, which dynamically inserts viewer information into the file and is completely customizable including text and images. EditShare also recently released image and document watermarking support in MediaSilo, further bolstering its security capabilities for assets such as scripts, casting shots, and sensitive marketing materials.

Screeners.com, the preferred press screener solution of publicists and content security teams, will see a fresh look unveiled for the reviewer user interface. Publicists will have more branding customization options including in-video logo watermarks, specific color palettes on network pages, and broader options for key art. Reviewers will see an enhanced OTT-style experience with improved content recommendations, watchlists, and expiration notifications.  

“From the day, 20 years ago, that EditShare was formed, there has been a tight focus on freeing content creators to exercise their craft, minimizing the need to interact with the technology,” said Tara Montford, Co-Founder and EVP Sales at EditShare. “Thanks to the close relationship we have with our clients, we are able to understand their needs and rapidly develop solutions to meet them.

“I am particularly proud of the way we have integrated the former Shift Media technology into our overall platform and program,” he added. “To be able to unveil really complex interworking just a few months after the merger is impressive. But what is really important is that it makes both EditShare FLOW and MediaSilo even more effective and valuable for our clients.”

Also on display at NAB 2024 will be FLEX Sync, which builds on EditShare FLEX’s cloud storage management layer. FLEX Sync provides powerful tools to sync with services such as Amazon S3, Wasabi and Backblaze. By making it easy to establish sync destinations and pick storage tiers, users will have complete confidence in their backups to the cloud. FLEX Sync also paves the way to use the cloud for specialist processor-intensive tasks like AI, fully integrated into the workflow.

Now available with all new EFS systems, EditShare Connect features new swift link technology, a revolutionary productivity tool turning your on-premise storage into your own private cloud for remote editing workflows. Reliably connect from any location using automatic latency detection and use your favorite NLE software on any OS to work on your media remotely and securely.

Finally, NAB Show will see the launch of expanded EditShare One functionality. EditShare One enhances the experience of FLOW users by providing a single user interface for collaborating across the FLOW feature set. Organize, the latest EditShare One module, ensures users can easily identify assets, whether they are stored in the cloud, on-premise or in a hybrid network. It means a producer or edit assistant can preview and log assets, view and edit metadata, and prepare content for work from any connected desktop, releasing edit suites for creative work. Organize joins the Produce module as part of EditShare One’s transformational approach to asset management, organization and collaboration during video production and post-production.

Celebrate the 20th anniversary with EditShare on booth SL8087, book time with us at the show by clicking here. 

For more information on EditShare solutions, please click here to get in touch.

About EditShare

EditShare is an Emmy Award-winning technology leader, supporting storytellers through collaborative media workflows across on-premise, cloud and hybrid architectures. The market-leading open software solutions and robust APIs  improve workflow collaboration, third-party integrations and content sharing across the entire production chain. Designed specifically for media applications, the high performance line-up provides shared storage, archiving and backup, and intelligent media asset management.

Through a merger with Shift Media, EditShare now also integrates tools for content review and distribution, the creation of customised and branded pitch reels, and secure preview of high-value pre-release content.

©2024 EditShare LLC. All rights reserved. EditShare® is a registered trademark of EditShare.

Press Contact
Kara Myhill
Manor Marketing
kara@manormarketing.tv
+44 (0) 7899 977222

For creative professionals, showreels are a resume, portfolio and calling card all rolled into one. Whether you work at an agency, production company or any of the dozens of other businesses where creativity is at a premium, showing your work in the best possible light can mean the difference between getting the gig and being forgotten. 

Creative and marketing agencies of all types use reels for pitching agency services, demonstrating category experience, illustrating case studies and differentiating their creative thinking processes from those of competitors. Meanwhile, companies that represent production, post-production and supporting talent use their reels to show off the past work of their talented creatives, highlight specific skills or technical capabilities, and draw attention to the specific voices of their artisans. 

While those two categories of businesses often have very different goals when showing reels, they have even more in common. All of them ultimately are accessing the power of sight, sound and motion to present the best of their creative output. 

In this guide, we’ll highlight how creative agencies and the production world can each optimize their reels to get the attention they deserve and win more business. Then we’ll review the most critical considerations in setting up an in-house system for building great reels

building pitch reels wiredrive

Pain-Free Pitching For Ad Agencies 

The traditional agency pitch is a drawn-out, sprawling, cumbersome process that has now spread throughout the creative industry. From pitching on a client’s entire creative business to bidding on a specific project or campaign, creative agencies in advertising, marketing, experiential, PR and digital all dutifully invest time, creative energy and resources into frustratingly rigid dog-and-pony shows. 

“We’re meant to be in the business of creativity, but the focus has shifted…The average agency now spends around 2,000 hours a year working on pitches, time that’s often tacked on to the end of the working day.” 

Lucy Taylor, MullenLowe Group UK 

So how can you shift the odds in your favor when preparing for the dreaded pitch? Consider the basic criteria clients use to determine the fit of any agency: 

The most important thing to remember is that the best reels reflect the specific client watching it and demonstrate what you can do for their exact needs. Of course, every client is different, meaning the best reel you can use is customized particularly for them. If you’re going to engage with multiple prospects, it makes sense to scale up your reel-building capabilities internally. Doing this will allow you to conduct business development proactively, respond more swiftly to requests, reduce the expense of customizing your reels and, most importantly, increase the “at bats” your agency gets by pitching as many clients as possible. 

A Digital Foot In The Door — Reel Building For Prodcos And Post Vendors

When you first approach an agency or client, you often don’t even get the chance to talk to anyone. It’s only after you’ve sent a reel and they like it that you get to have an actual conversation about the talent you represent. Whether you’re an independent rep hoping to get your future star on an agency’s radar or an executive producer with a director or editor who’s ready to tear up the awards circuit, the first step is getting agency producers or creatives to take notice. And that means you need a showreel. But how do you make your showreels work harder and cut through the clutter amidst so much competition? Our guide will help you make the most of your work by making the most of your reels.

Use advertising tactics to cut through the clutter. 

You want a combination of reach and frequency, so use a platform that allows you to track viewership metrics and follow-up. You want to keep in touch and maintain an ongoing relationship to ensure viewers engage. 

Choose work that demonstrates you’ll take their project to the next level. You want to show them how good their work could be if they hire you. 

Specialize your reel for their project. 

If you’re really strong in multiple genres or styles, there’s nothing wrong with creating separate reels for each of them, but it’s often a good idea to refrain from putting it all on one showreel (unless specifically requested). 

Leave them wanting more. 

Especially with new and developing talent, having a short reel is fine, and far preferable to a reel of mixed quality with some flawed pieces that aren’t up to standard. As a guideline, people will assume you’re as good as the worst work they’ve seen from you. 

Look the part. 

Include company graphics or animation at the head and tail, and make the hosting page or presentation look flawless. If possible, you may even want to include their logo or customize the reel with a mention of the project.

Building a great showreel can be a bit like building a great meal. You want enough courses to make everyone satisfied, but you don’t want to overwhelm with volume. 

In the end, what you choose to put on the reel is about reassuring a prospective client that you have the knowledge and skills to make their project great, even if you haven’t done that exact thing before. That connection between your work and the client’s needs is what gives a reel the best chance of getting you in the door. So the more customized you can make the reel, the better your chances of winning the job. 

What Matters When You’re Building Reels In-House 

So you’ve decided to set up an in-house system for making your reels. There are a few basic parameters to keep in mind when you’re setting up your reel-building system: 

Organization: Every additional step it takes to get your work samples onto your finished reel is another obstacle between you and your potential new work. You want to have anything that you might ever use on a reel in one place so that no one has to go hunting for an asset or version. And you want all the pieces well organized and in compatible formats, ensuring your presentations are consistent and reliable. 

Simplicity, Speed, and Efficiency: Your system should be straightforward and non-technical enough that anyone on your staff can create a great reel in a pinch, even if you’re out of the office. And it should be efficient enough that it can be done on short notice. Your responsiveness alone—along with your ability to turn around a beautiful presentation quickly—will make a strong impression from the start and potentially get you the chance to compete for projects you might have missed out on otherwise. 

Customization: You should be able to make customized reels for any client or project and be able to adjust the look and presentation so that each client feels like it was made just for them. Find a solution with premade templates, customizable design themes and drag-and drop presentation-building features to ensure consistency and deliver presentations quickly. 

Security: Unlike showcase websites and traditional asset storage solutions, modern asset management and reel-building systems can also offer higher-tech security features, like watermarking and personal access codes. Some platforms offer more advanced multi-factor security and even integrate it with their analytics so you can keep track of who is seeing your work in real-time. You need to keep your materials safe and ensure that only the right eyes see them. This also shows prospective clients that you understand their security needs and how to keep your future work for them secure. 

Analytics: You want to be able to harvest a robust set of data from the reels you send out. Being able to tell who has looked at a reel, which parts they watched, and for how long can be critical in pursuing new business and following up with the presentations you’ve already sent out. Finding this type of solution can help you make better, more profitable new business decisions. 

Make Your Next Pitch A Fast One 

The arduous process of building reels isn’t going away any time soon. But with tools that let you quickly present the beautiful work you’ve already created, you can get on the shortlist and possibly even short-circuit the process of winning more work.

Wiredrive by EditShare can help you share winning work with the world. Contact us to get started with a demo of the industry gold standard for building and presenting winning showreels. 

Docs are real films 

Since the Lumière brothers wowed audiences with footage of a train pulling into a station in 1896, documentary films have been a part of cinema. Some documentaries record life as it happens, and some films interweave re-enactments, graphics, or archival footage. But all documentaries promise to grant the viewer a glimpse of the truth. They seek to deliver insight into the truth of things instead of just the pantomime of reality that narrative fiction brings to the screen. For those brave filmmakers seeking to challenge, inspire, and illuminate the world through documentaries, we present this guide to making real films.

Some documentaries follow a “hands-off” approach. The goal of these filmmakers is to be a fly on the wall. They want to introduce as little disruption to the events they document as humanly possible. Others see limitations to this approach and cast actors to amplify the emotional impact of a story. 

We want to get into the nuts and bolts of crafting a compelling doc. Mastery of lensing, the use of audio, story structure, editing, music clearances, and distribution lead to a total package that rises above the noise. Of course, there are also different levels of documentary. You can see docs shot on phones and docs shot on RED cameras. The critical thing is that you use all the tools at your disposal to draw the audience into the emotional arc of the story. So, we will cover the planning, shooting, and editing so that you can go into your next unscripted project fully prepared. It’s true that beginners can just grab a phone and get shooting. But we want to push things to the next level and see what it takes to craft a top-tier documentary.

Filmmaker Elaine McMilion Sheldon has been on both sides of the coin. Elaine McMillion Sheldon is an Academy Award-nominated, Peabody-winning, and two-time Emmy-winning documentary filmmaker. She premiered her latest feature-length documentary, “King Coal” at the 2023 Sundance Film Festival. “King Coal,” employs the latter method to weave an evocative story about the coal communities of her childhood.

In an interview with EditShare, the filmmaker describes casting the two young girls who help to tell the story visually. They were cast from the local community for their ability to “ignore the camera.” And their presence in the film provides a visual metaphor for the experiences of the locals. Elaine McMilion Sheldon wrote and delivered narration, thereby revealing her own perspective as another layer in this ethereal documentary. These divergent techniques show how much a documentary film is the product of the director’s heart and soul. Documentaries embody a point-of-view and express a desire to bring the viewer into that perspective and see real life through the eyes of another. 

Story priorities should guide camera choice

Some filmmakers get more excited about buying gear than making films. They make more videos about buying, comparing, unboxing, and reviewing equipment than actual films. This is mainly because YouTube rewards this kind of video with ad revenue. But in another way, nerding out on technology is easier than going out and shooting something that exposes your soul to an audience and invites criticism or rejection. Choosing a brand can be like choosing a sports team or a personal fashion style. It is too easy for your camera to become an extension of your ego and a mark of your belonging to a particular tribe. But with that being said, there’s nothing like bringing home a new baby cine cam and getting it all rigged up to go make a movie. The right gear prevents headaches and amplifies your creativity. So, I’m not one who says cameras are just tools. For whatever reason, they are more than that. They do become the means through which you see, create, and communicate. Like the sword of a samurai or a knight, cameras become part of our professional identity as image makers, and that’s why we agonize over the choice. Just don’t let your tools define your personal identity, and you’ll be okay.

How do you determine the best camera choice? Consider your storytelling priorities. If you are putting together a run-and-gun project, consider these questions. 

On the other hand, you might have more time to compose shots and the ability to take a bit more gear. If you have a small crew, you can take a more capable camera and give some attention to lighting. In that case, image quality may trump extreme portability.

Canon C300 MK III

The Canon C300 series has long been considered the king of documentary cameras. It works with Canon EF mount photo lenses. Those lenses are high quality and available just about anywhere in the world. You can run your XLR audio cables right into the camera as well. The C300 MK III also features built-in ND filters. That makes it easy to adjust your exposure while shooting outside. Canon is, of course, renowned for its warm, pleasing images, and the C300 MK III delivers on image quality. At $8,999, it is not inexpensive, but it provides excellent value and can be rented at reasonable rates.

Sony FX3

Sony has been working hard to elevate the mirrorless camera form factor to provide the functionality of a cinema camera. The FX3 has a full-frame sensor, excellent auto-focus capabilities, and built-in image stabilization. Its tiny size makes it perfect for shooters who need to be agile and low profile. While it can send a RAW signal from the HDMI jack, you won’t get ProRes or RAW recording in the camera body itself. The Sony comes in at $3,899, making it less than half the Canon C300 MK III cost. 

Panasonic Lumix GH6

Panasonic combines a smaller “micro 4/3rds” sensor with the professional ProRes recording format. This makes the GH6 attractive because its lenses are smaller and lighter. Since it has a professional codec, you eliminate the need to record externally. At just $1,697, it is less than half of the Sony FX3. Panasonic’s weakness is that it does not have the same autofocus performance as the Sony or Canon. But it does offer enhancements to Lumix lenses. You can set up those lenses so that they are able to pull focus manually instead of focus-by-wire. This is important if you are shooting a scene where an actor needs to hit a mark. 

RED Komodo X

When image quality takes priority over the speed of operation, you might turn your attention to cine cameras, like the new RED Komodo X. At $9,995, it is the most expensive camera on the list. RED offers in-body REDCODE RAW. That is a 16-bit RAW recording format that offers maximum flexibility in post. As a documentary shooter, I love shooting in REDCODE RAW because it is the most forgiving format when you’ve over- or under-exposed a shot. You can’t always control the light in a given situation; that is where raw codecs shine. To my eye, the images that come out of the RED cameras “look right.” REDCODE RAW is also flexible, allowing for quality levels that deliver raw images at data rates lower than ProRes. But RED cameras are designed with a crew in mind. Yes, you can use them solo. For instance, RED offers a PL mount with electronic ND filters, but this solution does not come cheap. So remember that RED cameras work best when paired with a camera assistant. 

iPhone 14 Pro Max 

I won’t lie. When in a pinch, the iPhone Pro Max will deliver a ProRes (512GB version $1,399) image that can work. The new cinematic mode even allows you to pull focus in post! The software will denoise footage and manage highlights for you. Its in-body image stabilization is just amazing. The biggest issue I have with it is the lenses. It can be challenging to rid your image of unwanted glare when shooting with a backlit subject, and the “smart” features of the camera can often work against you. Battery life, heat, internal capacity, and file offload speed are issues with this camera. But every year, Apple delivers better video performance. Most of all, if you are trying to shoot unobtrusively, the iPhone could be your go-to tool of choice.

The high end:

The cameras listed above favor a lightweight style of documentary shooting. If your project demands the highest quality of images, and you have the budget for lights and crew, the RED V-Raptor ($24,995) makes a lot of sense. When a project calls for high-resolution images, the V-Raptor delivers 8k at 120fps in REDCODE RAW. It is RED’s best camera for low light and combines superior dynamic range with a body built for efficiency when you work with a team. If you are working on the next “Chef’s Table” cinematic-style documentary, then the RED V-Raptor might be the right choice.

Even if a film doesn’t use a “high-end” camera, that doesn’t mean a documentary can’t have a cinematic look. Lens choice, quality camera support, and lighting techniques can create beautiful images with low-cost equipment. The real challenge to creating compelling b-roll is not in equipment but in conceptualizing sequences that communicate concepts. Visual metaphors and vignettes go a long way toward engaging a viewer than merely pretty visuals. So, work to find ways to shoot sequences of shots that amplify the message of your interviewees.

Audio is more important than video

You’ve probably heard the old adage, “People will watch a video with bad video quality but not with bad audio quality.” That is especially true for documentaries. Viewers understand that capturing life as it happens means trading off polished visuals for behind-the-scenes access. 

The best way to ensure top-quality audio for your documentary film is to hire a sound mixer when you shoot. They will be able to provide the microphones for the right situation, balance levels on the fly, and ensure that unwanted sounds aren’t affecting your recording. 

Documentarians often don’t have the budget to hire a sound mixer or their setup calls for something as minimal as a shotgun mic on a boom pole over a seated interviewee. Here are some recommendations for gear to help the solo shooter get the best audio for their film.

Zoom F3 Audio Recorder

The Zoom F3 audio recorder features 32-bit float recording technology. This technology means that you don’t have to worry about your recording “clipping” when an interviewee gets too loud. The F3 offers timecode sync via a Bluetooth adapter, the UltraSync Blue, and UltraSync One combo of timecode boxes. When recording an interview, you can run a cable out of the line out into your camera. This setup gives a nice, clean recording in the camera and a higher quality 32-bit float recording in the F3 itself. (It also provides a little insurance if you forgot to press record on your audio recorder, not that anyone has ever failed to do such a thing!) The F3 is small yet can power XLR microphones that need phantom power. If you need more than two channels, the Zoom F6 is a good choice.

Another popular method of syncing timecode is the Tentacle Sync system. Tentacle Sync is used by sound professionals worldwide to ensure that the audio recorder and camera stay perfectly in sync. 

Microphones

There are so many choices for microphones. And more than any other area of audio/video production, “you get what you pay for” applies to mics. More expensive mics sound better. But for the typical documentary shooter, the keys to success are simplicity and reliability. 

Apogee ClipMic Digital 2

Just about everyone has a smartphone. You can use the Apogee ClipMic Digital 2 to plug into a phone and record right to it. It works with the same UltraSync timecode system as the Zoom F3 to keep all your recordings in sync. At $199, the ClipMic provides one of the least expensive ways to get quality audio for the documentary shooter.  

RODE Wireless PRO

Rode just released a 32-bit float, timecode-enabled lavalier system. This solution eliminates the need for an additional audio recorder like the Zoom F3. You also won’t need external timecode boxes like the UltraSync. 

Sennheiser AVX-ME2

Sennheiser delivers a great-sounding and simple-to-use lavalier mic system. The build quality of these mics is a step up from the lower-cost solutions. They fall into a space in the market that is short of the higher-end professional solutions and better than the prosumer offerings. 

Hiding lav mics

When a lav mic shows in the shot, it really reminds you that you are watching a produced piece. Ironically, it takes more work to hide the mic. Sean Woods has a great 3-part series on how to hide lav mics on different shirts and then how to easily EQ the mic to compensate for it being under clothing.

Sennheiser MKE 600

If your subject is stationary, like in a sit-down interview, or if you have a boom op on set, you’ll want to consider a shotgun microphone. Shotgun mics reject noise around the subject and focus on a narrow pickup pattern. This pattern makes it great for environments where you can’t control the ambient audio. The Sennheiser MKE 600 lets you power it from the camera or audio recorder’s phantom power jacks. But you can also use an AA battery and power it without phantom power.

Sennheiser MKH 50

As microphones increase in price, they become more specialized. As you consider the various environments you’ll record in, you begin to see why sound pros bring a selection of mics with them on location. One of the most highly regarded microphones for indoor recording is the Sennheiser MKH 50. It provides a beautifully warm natural recording that will elevate your audio to a professional level. It isn’t the best choice when you are outside or if the mic has to be far from the subject. 

Rigging a boom pole

If you are conducting a sit-down interview, having a solid rig to hold your mic over your interviewee is essential. You’ll want to position the mic out-of-frame and pointed toward your subject’s chin. Here are the key pieces of equipment that will help you build a solid and lightweight rig.

Matthews Reverse Stand

The reverse stand is great for packing in a case when traveling. It is lighter than a standard baby stand and easier to work with than a C-stand. It has a “baby pin” on the tip, which makes it compatible with video-oriented rigging gear, unlike many light stands designed for still photography. 

Matthews Grip head

Place a grip head on the reverse stand to hold accessories firmly. Don’t skimp out and buy a plastic grip head of some sort. This piece of kit prevents your boom pole from slipping and bonking your interviewee on the head. 

Boom pole holder

A boom pole holder, or yoke, will enable you to position your boom pole at a slightly upward angle. This positioning will compensate for the flex in your boom pole when it extends. Make sure that you don’t skip this piece and try to put your boom pole through the grip head.

Boom pole

The most important tool for rigging your mic is the boom pole. You can use it handheld or as a part of a rig. This boom pole from K-tek has an internal XLR cable that will keep your rig tidy. It extends so you can place your stand away from your subject and keep it out of the shot. 

Shock mount

Your shotgun mic is held in place by a shock mount. This mount eliminates handling vibrations from being transferred into the microphone. Make sure that the shock mount you choose fits your microphone. For instance, the Sennheiser MKH 50 P48 has its own shock mount.

Boa bag

The last thing you want is for your microphone rig to fall over. You can take a boa bag or other shot bag and wrap it around the base of your stand. This is a critical piece for the safety of both your gear and the on-camera talent. 

XLR Cable

Don’t forget a high-quality XLR cable. This cable will go from the back of the boom pole to the audio recorder. It will transfer power to the microphone and signal to the audio recorder. It can be convenient to have this cable be a different color than black to distinguish it from all the other cables in your kit.

Headphones

A good pair of closed-back headphones is essential to successfully recording audio on location. Don’t fall into the trap of trying to use an old pair of Apple headphones from an old iPhone. Sennheiser’s HD280 Pro headphones are relatively inexpensive and will serve you well both in the field and when you are editing. The key is to use a pair of headphones that deliver a relatively flat frequency response, unlike Beats or other headphones designed to accentuate specific frequencies for music listening. 

Closed-back headphones are critical because you want to hear the environment through the headphones only. It is also essential to avoid audio bleed-through, like on a pair of “open-back” headphones, which will affect your recording. If the Sennheiser headphones are too bulky, you might like the Sony MDR-7506 headphones.

Listening to locations

Half the work is done if you can scout out a location ahead of filming. Listen for heating and cooling systems. Clap your hands in the room and listen for echoes. Ask about construction projects in the area. If there are ways to reduce the background noise in the location during filming, it will save you an enormous amount of time in post-production. 

In addition to listening for sounds to remove, listen for sounds to capture. Can things like fans, vehicles, or natural sounds enhance the story when used with b-roll? If you have hired a sound mixer, bring them on the location scout and treat their ears like you would treat the eyes of a cinematographer. They can help enhance the story by identifying both sounds to remove and sounds to capture.

Archival documentaries

Some docs shoot interviews, and some just use archival footage to tell their story. In the Netflix documentary WHAM!, the filmmakers didn’t film interviews. Instead, they used extant footage and interviews. They combined this with footage of a scrapbook one of the pop duo’s moms made during her son’s journey to stardom. The National Geographic documentary LA92 took the same approach. The filmmakers used news footage and archives to demonstrate the strife that shook that city and the nation. The effect of archival footage is powerful. As a viewer, you get a sense of the bigger narrative. The filmmaker’s point-of-view can be just as effectively portrayed through archival footage as through original video. 

Clearances

The challenging aspect of archival documentary is known as “clearances.” This involves balancing the need to contact the original TV network or studio that created the media in the first place against the “fair use” doctrine. Fair use is a legal doctrine allowing media to be reused in specific ways. It is intentionally vague. A documentary filmmaker must carefully evaluate the guidelines for fair use and determine their willingness to take on the risk of using media under fair use. If the owner of that clip contests the use of that media as not being legitimate under fair use, you could face a legal fight. 

The other option is to contact the media owner and pay them a licensing fee, which will be negotiated based on your project’s budget, the places the documentary will be shown, and the license duration (e.g., ten years or in perpetuity). 

In these cases, it is a good idea to enlist the services of an entertainment attorney to help guide your decision-making process. Sometimes, a clip needs multiple layers of releases to clear it. 

When it comes to music clearances, it is helpful to employ a music supervisor who can help you navigate the complex world of licensing songs. Using a famous hit will be expensive and time-consuming, so keep that in mind before attempting to license a television performance of a famous musician. You may need to negotiate with their estate if they have passed on.

Photo licensing can be more straightforward. Getty offers services for licensing its catalog of images. It can be easier to license a photo of a famous person than to license audio or video footage.

After Skid Row

Sometimes, a documentary comes together after months of careful planning; other times, an opportunity presents itself, and you have to move quickly. That was how Lindsey Hagen was able to assemble a small crew and capture the experience of “Gangsta Grannie,” Barbie Carter, in her short doc film After Skid Row. Lindsey is a Director, Executive Producer and Story Producer at Gnarly Bay. Together, the team at Gnarly Bay has garnered multiple awards and produces films for Fortune 500 brands. In 2022, they won the Vimeo Film Festival award for the best branded video for Cannondale, which Hagen directed. Lindsey Hagen It went on to be Oscar Qualified, and L.A. Times distributed it. 

The crew was small, and their gear was light. That helped them to take a “fly-on-the-wall” approach to this film. Hagen notes that the story was really about their subject “reclaiming her identity.” As a result of the film’s impact, the crew was able to raise funds for Carter’s medical needs as well. It really stands out as a beautiful example of how an audience can enter into the suffering of someone, and yet the subject of the film can retain their agency so that it is their story, told on their terms. 

Editing a documentary film

Walter Murch edited the brilliant documentary Particle Fever. In this look at the editing process, he talks about the ratio of footage shot to footage used as 300:1.

This presentation is a tour-de-force in the level of organization that it takes to surface a compelling narrative from so much footage. The story is there, and the tension and drama are real, but the effort it takes to form that story into a movie is immense. 

The key is to organize and log that footage. One of the best tools for doing that is transcripts. Here is a case where AI comes into play. Adobe Premiere, DaVinci Resolve, and Lumberjack Builder (initially designed for Final Cut Pro) use machine learning to generate transcripts. Those transcripts are key to identifying common themes and making those spots quick and easy to access. 

Transcripts allow editors to do a “paper edit” or “radio edit” based on the interview content. This edit can help the editor build a backbone for the story with the drama necessary to maintain the audience’s interest. Because no matter how important your story is, it won’t matter if you lose the audience’s attention.

Ode to Desolation

Lindsey Haggen also directed the short documentary Ode to Desolation, where she and her cinematographer/editor, Chris Naum, voyaged into the North Cascades. The gear for this film was even lighter. They shot on camera designed for stills but paired it with some beautiful lenses to capture the majestic landscapes that can be seen from the fire lookouts of Washington state. The filmmakers captured Jim Henterly’s role as a “keeper of history” and “maintainer of the story” of one of the last fire lookouts in North America. 

The shoot took four days. They slept at altitude, hiked up a mountain for hours, and traveled by boat. This goes to show that you truly can tell a majestic story with a kit that can fit into a couple of backpacks. 

Storage and Workflow

It takes a team to execute a film. That’s true on set, and it’s true in post. The assets you create and share with your team need to live in a central location that is separate from your editing team’s MAM (media asset manager) and accessible remotely. 

When creating a world-class documentary, you accumulate a huge number of assets. I’ve written about the challenges of organizing massive amounts of footage. This is especially true when you are trying to shuttle drives back and forth. I once heard a story of someone who shipped drives via FedEx and the truck got into an accident, and the drives were lost! It’s best if you can deploy multiple strategies for backing up footage. Shipping two drives separately would be one approach that gives you redundancy. But as upload speeds have greatly improved, cloud-based collaboration workflows are revolutionizing the way teams work.

The team at DEFINITION6 shoots everything from unscripted work to Sesame Street. MediaSilo is their tool of choice for collaboration. According to their Chief Engineer Luis Albritton, DEFINITION 6 uploaded over 10,000 assets, sent nearly 7,000 review links, and hosted almost 24,000 viewers of their content in MediaSilo during 2022 alone. With MediaSilo, producers, executives, and stakeholders can stay in the loop on the post-production process while maintaining the security that is critical to their clients.

Conclusion

Documentary filmmaking can be your ticket to see the world or see the world from a new perspective. It’s taken me to Oxford, Cambridge, the Jerusalem Museum, and the Vatican Library for Fragments of Truth. Some projects are small and tell the story of your family; others can be on the cosmic level. They can showcase the beauty and struggles of a community, like King Coal, or the beauty of nature. But one thing all good documentaries share is a point of view. They show the world from a unique perspective and seek to touch the hearts of an audience and challenge their perspectives on the world.


Reuben Evans (Member, Producers Guild of America) is a director, an award-winning producer, writer and director. His company Visuals 1st Films, LLC is producing a documentary on the hymn Amazing Grace, starring John Rhys-Davies. He is the former Executive Producer at Faithlife Films & Faithlife TV. He’s produced and directed multiple feature-length documentaries including Fragments of Truth (2018) and The Unseen Realm (2020). Most recently Reuben produced “The Disappearance of Violet, Willoughby” (coming in 2023).


EditShare’s video workflow and storage solutions power the biggest names in entertainment and advertising, helping them securely manage, present, and collaborate on their highest-value projects. To learn more about how EditShare can help your video production team, contact us today.

The EditShare team designed this guide as a reference for the most commonly used codec you will run into in your work in motion picture post production. It can’t serve as a universal encyclopedia of codecs; there are just too many to count, and new special purpose formats arrive seemingly every month. 

Motion picture post production has luckily settled on a few commonly used codecs that have a large footprint in the industry, and a good working knowledge of each will help you tremendously as you go about your work.

Apple ProRes

Apple ProRes is currently the most widely used codec in all of motion picture post production. If you work in a Mac shop, and Macs continue to dominate a lot of post, you’ll likely run into ProRes on a daily basis. In fact, one of the factors that keep Macs on top in motion picture post is the functionality and ubiquity of ProRes. 

ProRes is used all the way from image capture in major platforms like the Arri Alexa, through editing in any of the four major NLE platforms, all the way through delivery, with streamers and major networks accepting ProRes file for delivery. If you are worried about the drawbacks of transcoding from one format to another, ProRes avoids those issues with an end-to-end pipeline that stays in one codec throughout.

Though you shouldn’t be afraid of transcoding for your edit workflow, you can always reconnect back to another format at the end in your online color session. Whatever format you shoot, you’ll be happier with your edit if you take the time to transcode to ProRes, especially an edit-friendly flavor.

If you are going to be working with ProRes extensively, it’s well worth a read of the ProRes Whitepaper, the technical sheet that Apple keeps alive spelling out the ins and outs of ProRes as a format. 

The basics to understand is that Apple ProRes isn’t just a single codec, but a family of codecs built around the same technology, available in multiple implementations. You can think of these as “flavors” or “strengths” of ProRes. These flavors refer to both the method of encoding the image, 422 or 4444, and the data rate, how many Mb per second are allocated to creating the image. The higher the data rate, the higher quality the image reproduction will be, with fewer artifacts, but on the flip side, the larger the file will be.

The data rate scales with the image size, meaning that a given flavor of ProRes will be a much bigger file if you shoot a higher resolution and a smaller file if you shoot a smaller resolution. You can see the strengths in the following chart, combined with their data rate when working at 1080p 29.97.

ProRes File Sizes

This starts all the way at the smallest file sizes with ProRes Proxy and goes up to the currently largest file sizes of ProRes XQ. You might shoot your film and capture it in XQ, then transcode it to LT for editing, then reconnect back to the XQ’s for color grading, then deliver to your network in 4444.

4444 and XQ both support Alpha Channels (that’s the fourth four in 4444), which allows for passing transparency information back and forth with VFX platforms like After Effects, Fusion and Nuke. Most VFX houses work on PC platforms and prefer to get files delivered as image sequences (discussed below), but there is increasing use of 4444 and XQ for some motion graphics and VFX workflows.

For many years, ProRes support on Windows was relatively weak, but the last few years have seen an explosion of both approved and work-around versions of that support. You can currently work natively with ProRes in applications like Avid, Premiere and Resolve on a Windows machine, which is very useful for professional workflow. Where things break down is at the consumer level. If you are delivering a file to a client, there still isn’t an easy way to get a non-tech savvy Windows user who defaults to Windows Media Player to playback a ProRes file.

ProRes naming has sometimes been a little difficult, with “proxy” confusing some users since a lot of software can create “proxy” files, but in any format. You can use Premiere to make “proxies,” but they don’t have to be ProRes proxy; they could be in LT. 4444 is often difficult to say, so many say four by four or quatro, with quatro being more common on the west coast. Plain old “prores” without any modifiers can be confusing since you might say to someone, “can I have it in ProRes,” meaning plain prores, and they’ll ask, “what flavor,” and you say, “ProRes,” and comedy ensues. Thus most use the term “prime,” as in, “let’s use ProRes prime for that workflow,” to mean the middle-level codec.

While you might think “bigger is always better,” bigger files take up more storage, take longer to move around and are more taxing on the system to work with, so you often choose the flavor that works for your workflow. ProRes proxy is rarely used anymore since the image quality is visibly degraded, and storage is less expensive than it used to be. Most projects use LT for “offline” work like editing, then a bigger flavor for finishing & VFX.

But if your camera doesn’t shoot enough data, it’s likely not worth going to a huge format like XQ since those files are large, and the extra data rate isn’t going to magically create quality that isn’t there in the source file. XQ is really for cameras that are capable of shooting high bit depths natively (like an Alexa, for instance). If your camera shot in 10bit 4:2:2 video, transcoding it to 4444XQ doesn’t magically add extra quality. Typically most productions render out to plain old 4444 for their final master file.

While originally built primarily for the .mov video wrapper, Apple ProRes is officially supported in the .mxf wrapper, which is widely used in broadcast applications and has some features that can make it more useful, including better implementation of timecode.

Avid DNx

While Apple ProRes has become far more ubiquitous in post-production workflows, Avid DNx as a codec family actually launched first and has a few key features that make it more useful in a few key situations that should keep it on your radar.

DNx, like ProRes, is actually a family of codecs available at a variety of data rates and encoding for a variety of workflows. You can shoot straight to it in cameras like the Alexa, the RED lineup and more, and you can edit it and deliver it to networks. 

DNx is most comfortable in the .mxf (media exchange format) wrapper, which is a robust format with a lot of professional features, though you can also write DNx into a .mov wrapper if, for some reason, your workflow requires that. 

DNx is widely supported on both PC and Mac machines, meaning it can be a great codec to use if your facility has mixed platforms or you are collaborating with others working in a variety of different formats. This has been its greatest strength. However, it’s not particularly easy to install for the less technically savvy, so it again doesn’t make a great format for delivering cuts to clients since it requires installing a professional application for support.

DNx originally launched as DNxHD in a series of flavors that baked their data rate right into the name of the codec; you had DNx36 for editing and DNx175 for masters. DNx36 was a 36 Mb/s codec, designed to work well with 1080p 23.98 footage, and somewhat equivalent to ProRes proxy though ever so slightly smaller.

The problems came when formats started exploding. When the vast majority of work was 1080p, having the codec name and implementation built around a data rate made sense. While a 1080p 23.98 codec might look fine at 36Mb/s (not great, but fine), a 4k 60fps file would look terrible at that format. The larger resolution and framerate need more data to still look good.

Users, of course, could and should use a different flavor of DNx for 4k files than 1080p files, but many users were accustomed to using 36 for their edit. Avid revised the rollout of the DNx codecs to a new platform, which you would commonly work from today as the DNxHR format of codecs. These shift their data rate depending on the resolution and framerate of the source footage, making them work more like how ProRes works and more how users expect them to work.

So, to compare with ProRes, the new DNxHR HQ format at 1080p 29.97 is 25.99 MB/s, while ProRes HQ is 220 Mb/s. That might seem like a big difference until you note that the Avid number is MB, while the Mac number is Mb. MB is megabyte, and Mb is megabit. Putting them both in Mb, the DNxHR HQ is around 207 Mb/s, roughly equivalent to ProRes HQ.

DNxHR is a very common format in all houses running Avid Media composer, and its cross-platform compatibility makes it useful when dealing with moving from PC and Mac.

H.264/H.265

These codecs are consumer-facing codecs that post-production professionals need to be aware of and work with on a daily basis, but have some huge drawbacks. It’s important to understand and master to keep your workflow performing optimally. The main place you will want to actively use these codecs is in delivery, especially on web platforms. You aren’t going to send an H.265 file to Netflix or HBO, but if delivering to IG, YT, Vimeo or a work-in-progress review platform, you are going to be using H.265 all day long to get a file that is both small enough to quickly upload but still looks good enough to share with the world.

H.264 has been around longer, and H.265 is an update of the technology that offers similar image quality with about half the file size. You’ll sometimes see H.265 referred to as “HEVC,” an abbreviation for “high efficient video codec.”  

H.264 is far more ubiquitous since it’s been around longer and is easier to license. H.265 has relatively high license pricing, so while you’ll find it supported natively in all the major editing platforms and all the major web delivery platforms (Youtube, Instagram, Vimeo, etc.) you’re still going to run into the occasional weird platform that doesn’t fully support H.265. If you are having trouble delivering to a strange client portal or obscure streaming software the client uses, the issue might be that that platform doesn’t support H.265, and you should try making an H.264 instead.

These codecs are built around Long GOP technology, in which a group of frames is compressed together to save space in the file. This is a wonderful technology for when you are viewing something linearly forward in time, making this a great codec for delivering video over the web. However, Long GOP can be very awkward in the editing room, since it requires your video software to recreate individual frames by looking at the group of frames. If you are scrubbing around, it can be laggy, and if you cut in the middle of a GOP group, the software has to recreate the missing picture information by holding those other frames in memory.

While some software platforms like to market that they can natively cut in H.264 or H.265, it is highly recommended you transcode footage into an editing codec like ProRes or DNxHR for an easier post-workflow experience. Running an overnight dailies render will make the rest of your post pipeline so much easier.

H.264/H.265 can also be used for capture, though that is generally something to be avoided if you can, as the image quality drawbacks can be very frustrating. Even cameras like the iPhone now shoot straight to ProRes, so the arguments for capturing into H.265 are less pressing than they were a few years ago. If you have to shoot to H.265, choose the highest bitrate you can and choose “All-I” if it is an option, which will make every frame an “I” frame instead of compressing groups of frames together for compression.

H.264/H.265 formats can support whatever data rate you want to encode; generally, your encoder will let you change the data rate of your compression when you make the file. It is highly encouraged you test your specific encoder and project at a variety of data rates to find one that works for your projects and deliveries. For some reason, most encoders (like Resolve, Adobe Media Encoder, Compressor, etc.) have relatively small data rates as their “high-quality” file size. If you aren’t happy with how your images look when compressing to these codecs, try testing at higher quality file sizes to see when you start to like the image. 

DPX AND SIMILAR IMAGE SEQUENCES

These aren’t technically “codecs,” but you should be aware of image sequences as a tool in post production. DPX is the most common image sequence (and the one we’ll focus most on here), though EXR and Cineon are other common image sequences.

Image sequences are literally just a folder with a series of still images, numbered sequentially, saved into it. That’s pretty much the totality of it. Software dealing with image sequences (like Resolve and most VFX platforms like Nuke) will look at that folder full of still images and see it as a single image file that you can manipulate just like a video file.

Image sequences are incredibly popular in the VFX world for a few main reasons. First off, they are easier to move around. If you have a 40GB file, and your file transfer crashes halfway through your upload to the web, you have to start over from the beginning. Not with an image sequence; you can just start over with the last frame copied.

Beyond that, if you have a render and 90% of the shoot looks perfect, but you need to fix part of something that looked off at the end, with an image sequence, you only need to re-render those final frames. With a video file, you need to re-render the whole shot. With render times sometimes being exceptionally long in the VFX world, this is a huge time savings.

VFX artists aren’t going to give up image sequences any time soon for those benefits. If you are being asked to interface with a VFX artist and they are asking for an image sequence, you can and should ask them for a spec sheet on what they are looking for. Then you can deliver it with a tool like Resolve, which has full support for multiple image sequence formats built-in natively.

RAW FORMATS

RAW capture formats aren’t technically “codecs” since RAW happens to the video signal before it gets wrapped into a codec, but it’s good to have a handle on the most common RAW formats and how they might present in your workflow. RAW isn’t “video” in that it can’t be played easily by a video player. RAW formats take the RAW camera signal from the sensor and compress it into a file before it gets processed into video and the menu settings like ISO, white balance, etc. get applied. This makes more processing required in post (since your editing station has to do all that work that the camera used to have to do), but they offer the benefit of more flexibility in post. If you want to change your mind about white balance or ISO, you can do it in the edit or color suite, which is helpful, especially if the settings were accidentally wrong on camera.

There are two major categories of RAW forms, open RAW formats and proprietary or closed RAW formats. Open RAW formats are designed for many different platforms to capture to or work with. Proprietary formats created by a camera company are often only supported by that one company, with varying support from post-production software. The major proprietary RAW formats are now natively supported in all the major software platforms, but if you run into a more obscure format, you’ll often need to download software support from their website.

OPEN RAW FORMATS

Before discussing the two open RAW formats, one issue needs to be discussed: the red RAW patent. RED introduced the RED ONE camera at NAB 2006, and it was a working model that captured compressed motion picture RAW footage into an internal recorder. They applied for and received a patent on that technology. Both Sony and Apple have challenged the patent in court, and even with their legal resources, both lost. The RED patent stands, and as far as we know (it’s not always public), the other internal RAW proprietary formats are paying some sort of license fee to RED.

This led to two different strategies for how to implement a RAW video format that was accessible to all users without paying for the RED license fee, since whatever that fee is, it doesn’t make sense within a mass-market-facing, consumer-focused video market. 

ProRes RAW

The first “open” RAW to market is ProRes Raw, a format co-developed by Apple and Atomos, which makes an external monitor/recorder platform. That is their method for getting around the limitations of the RED patent; ProRes RAW is something you record to an external recorder.

Currently, ProRes raw has native support in Final Cut Pro, Avid Media Composer and Adobe Premiere, but not in Blackmagic Resolve. There are no announced plans to bring it to Resolve. If you are planning on doing your final color grade in Resolve, ProRes Raw isn’t going to be the format for you.

Interestingly, DJI has implemented ProRes RAW into some of their drones, since, technically, with a drone, the camera is actually dangling underneath the drone, and the recorder is up in the body of the drone, which is enough to make it an “external” recording. ProRes RAW was briefly available in the DJI Ronin 4D but then disappeared, and the suspicion is that they weren’t able to argue that it counted as “external” on that camera.

ProRes Raw is available in two data rates and offers substantial image quality benefits for shots that weren’t exposed under proper settings, such as with the wrong white balance. However, for shots properly exposed and with correct menu settings, the benefits are not large, though they are there.

Blackmagic RAW

Blackmagic had an interesting challenge in building their RAW codec; they make external recorders, and editing software, but they also make cameras, and they wanted their RAW to work inside a Blackmagic Camera. However, they sell a lot of cameras, and outsiders suspect they wanted to avoid a RED license fee considering the sheer volume of units they ship. To get around it they designed the Blackmagic RAW format which is partially debayered. It’s not a full debayer, which means there are still some of the benefits of RAW (you can change ISO and white balance in post), but also avoid the patent limitations of trying to record full RAW.

Blackmagic RAW is an open format, supported by all the major NLEs, and available in Blackmagic cameras and recorders, supported by several other camera manufacturers, including Fujifilm. 

Blackmagic RAW is available in multiple bitrates but, interestingly, is also available in a variable bitrate format. This changes the bitrate based on the content of the shot so that a very static shot (an interview, for instance, where only the mouth of the speaker moves) can be a smaller file than a handheld shot out the moving window of a car in a busy street where there is a ton of movement. Variable bitrate shooting makes some users nervous, but some doc shooters have taken to the format for data rate savings in predictable environments.

PROPRIETARY OR CLOSED RAW FORMATS

We can’t cover every proprietary raw format here as there are too many, but there are two we need to discuss a bit. If you run into another format, you should go to the camera manufacturers website for more info.

.r3d RED RAW

RED RAW, recorded in the .r3d wrapper, is the format that started the RAW video revolution. RED RAW takes the RAW camera data, applies a JPEG2000 compression to it, and wraps it up in a file that you can then process to your heart’s content in post production.

RED RAW is currently supported basically everywhere. It’s been around 15 years, and all the major software platforms have fully integrated it’s technology into their systems.

RED files are surprisingly small, considering the quality of their imagery; because of the nature of their compression, many users are surprised to discover that the files can get larger when transcoding to an edit codec like ProRes, depending on your editing resolution and codec choice.

.ARRIRAW 

ARRIRAW is the other major file format to discuss, not just because ARRI is at the top of the industry but also because the files are just huge. For a long time, you needed to rent an additional external recorder from Codex to record ARRIRAW (to avoid the patent, most assume), though you can now record ARRIRAW internally to an ARRI camera. Either ARRI figured out some very tricky way to argue their internal recorder is actually external, or they are paying the license fee to RED.

The thing to know about ARRIRAW files is that they are big. If you are bidding your first ARRIRAW job after years of RED RAW, know that it’s going to require more hardware resources than you are used to. These are massive files. Transcode them immediately to an edit-friendly codec, then deal with them again only at the end for color grading on a powerful machine. Their saving grace is that ARRI cameras only shoot up to 4k; an 8k or 12k ARRIRAW file would be a monster.

ODDBALL FORMATS

While this guide can’t go into detail on every possible format and codec you might encounter, we want to offer some general advice when a shot lands in your lap that might not immediately make sense to you.

Your first tip is to use the “get info” command, either in the finder, in QuickTime player or in an app like “Screen,” to get a better sense of what is going on with the codec. A quick Google search will often turn up more info on the codec, and it is usually available for download and install on your system for playback. If “get info” isn’t helping, there is a great app called “MediaInfo” that might offer more information.

There are some limits to this (Apple ProRes still has issues with running on a Windows machine in certain players depending on the install), but for the most part, pretty much every codec you need is possible to download, and that will often lead to your software being able to decode the video.

If you run into a truly unplayable codec, there is a player you should know about called VLC. It’s a video playback software that is often a “swiss army knife” in post when you’ve been given a strange video format to deal with. Maybe you are working on a documentary with a lot of archival home-video footage in an obscure format that didn’t take off commercially. Or you are working on a film with footage coming in from primary sources from a variety of archives. Or you have a shot that has gremlins and just doesn’t want to play. VLC is often the tool that will finally get that video open, and then you can export from VLC into a more traditional codec and format that will let you play it in your editing platform of choice.

EditShare’s video workflow and storage solutions power the biggest names in entertainment and advertising, helping them securely manage, present, and collaborate on their highest-value projects. To learn more about how EditShare can help your video production team, contact us today.

With so many different types of cameras on the market, it’s difficult to keep up with the specific features of each. The MediaSilo by EditShare team designed this guide to cover the major factors affecting post-production for each of the major camera platforms currently popular in production. Our goal with this guide was to help you know what questions to ask and what to expect when coming on to a production shooting on any of these systems.

ARRI ALEXA 

ARRI has been a dominant camera maker for going on 100 years now, and the ARRI ALEXA platform is a widespread capture format across motion pictures, television, commercials and music videos.

The ALEXA platform can shoot into both video files (in either ProRes or DNx formats, depending on your workflow) in either the .mxf or .mov wrappers) or into RAW. For a long time, RAW was less common on ALEXA jobs since it required renting an accessory recorder that significantly raised costs, but for several years now .ARRIRAW capture has been built into the system. 

RAW isn’t the default on mid or low-budget projects, as the files are massive. Working with RAW requires a lot of post-processing to handle and more hard drive space for downloading and backup. The larger productions default to .ARRIRAW, but many smaller productions will shoot video files in Log.

The ARRI Log format is known as Log C, and there is a LUT available on the ARRI website to support it. Currently, there are two versions of the Log C LUT in common use: LogC3, which is the newest LUT for earlier generations of the ALEXA, and LogC4, which is used for the new color science that came with the ALEXA 35 and that is supported with the LF and Mini LF. ALEXA Log C color (both 3 and 4) is also fully implemented in the ACES workflow and Resolve Color Management. In fact, the ALEXA implants a flag in the video files so that Resolve can auto-detect if it was shot in Log C, in which version, and automatically transforms it to linear video when working in Resolve Color Management. 

The ALEXA platform doesn’t typically support recording simultaneously to RAW and video proxies, though that isn’t recommended anyway when working with a single-card camera like the ALEXA lineup. Doing simultaneous RAW and proxy recording to a single card increases data management time and hard drive expense.

The ALEXA has a common timecode input standard for the industry, 5-pin LEMO. It also reputationally has one of the better internal timecode clocks that seems to drift less than others, but there is still some drift, and timecode should be jammed at least twice a day.

While it seems like the ALEXA lineup has everything a post team might want, the lineup does have some hiccups that post teams should be aware of, especially around the area of audio. The most notable is that the full-sized ALEXA LF only has a 5-pin XLR input (instead of the normal 3-pin) and the Mini LF uses the obscure and pricey 6-pin LEMO connection. This special connector is for a single-cable connection to bring 4 tracks of audio into the cable the simplest way possible, which is a noble goal, but of course, requires the sound team to have the cable. In addition, while many cameras allow audio to be input at either mic or line level, the ALEXA lineup traditionally only allowed for line level, which means if you wanted to record a “scratch” audio track with a microphone on the camera for absolute backup or to hear operators comments, you needed a mic to line converter. The newest bodies, the Mini LF and the ALEXA 35, now have built-in microphones to serve this purpose.

ALEXA bodies put out the filename over SDI, so you can use something like a Teradek Cube to make proxies with a filename match for later relinking.

If you are encouraging the production team to run a scratch mix to the camera, they might well enough up needing to purchase a special cable or down converter to do so.

RED

The RED camera platform is widespread both on RED-native productions and also as a special-purpose camera on other productions for its flexibility. It was one of the first platforms to launch with a smaller camera form factor (the DSCM2 bodies) and was capable of high frame rates without the expense and complication of a specialty camera like the Phantom. As such, it’s incredibly common to see the RED as a second camera on an ALEXA show since the ALEXA had more limited slow-motion capture options. The ALEXA would be A and B camera for most of the heavy lifting, and then the RED would fly out on a steadicam or a gimbal for action sequences.

RED camera as a company is heavily responsible for pushing RAW image capture in motion pictures, starting with their launch at NAB 2006, and for a long time, was a true leader in the space. In the early years, there were some frustrations with their post integrations, with the company making statements like, “Kodak doesn’t tell you how to develop your film, we won’t tell you what to do with our images,” which was frustrating for many users since, in fact, Kodak did publish technical guides on development, and a camera maker having robust post software support was a good thing. RED originally pushed its own software, REDCine, for a lot of early post work.

However, RED has now fully integrated with other popular software platforms and could arguably be considered one of the most widely supported cameras in the post world. Native support for RED RAW .r3d file processing is built into every major NLE, and when RED updates its firmware with new image parameters, the updates flow into other software like Resolve with rapid speed.

One thing to remember with RED RAW is that it is live debayering the images, which can be processor intensive. If your editor will be working on a lower-power machine, it is still highly recommended that you render video dailies into a format like ProRes or DNx for editing. RED does offer the ability to change your debayer quality, which can make for easier processing on your system, but that comes with image quality tradeoffs.

While RED does have a Log format, it is very uncommonly used, as the default and most common format to capture when shooting RED is straight to RAW in .r3d files.

RED cameras offer the ability to shoot natively to both .r3d RAW files and .mov or .mxf video files at the same time. However, most users find that this fills cards up more quickly, increases download time and increases the complication and expense of on-set downloads. While there are occasional jobs where this might make sense (a tight turnaround job that requires both the flexibility of RAW and the immediacy of dailies), it’s very uncommon. Another solution to that same problem would be using a proxy box like the Teradek Cube to make immediate proxies. The filename passes over SDI with the RED cameras for later relinking to your RAW file.

RED cameras use the common 5-pin DIN timecode format. Reputationally RED cameras don’t keep the best internal timecode, and many recommend re-jamming often or using an external timecode box to feed more stable timecode into the system.

RED camera bodies have both on-body microphones for scratch tracks and have industry-standard audio inputs for sending in a microphone or a mix if necessary.

Panavision

Panavision is in an interesting position in that they have a major camera platform, the DXL (or Digital-XL), that is very popular, especially in Television production.

However, as Panavision is best known for its lenses and was never particularly famous for its camera bodies, they actually built the DXL system on top of RED camera bodies. The DXL systems have their own color science baked in and use Panavision lens mounts and accessories, but the primary decisions you’ll be making with a DXL are very similar to the decisions you’ll be making with a RED camera platform.

Phantom

Phantom cameras are the current gold standard of high frame rate slow-motion capture. While traditional motion picture cameras from RED and Blackmagic are getting speeds up to 240fps, for action sequences or product work there is often a benefit in going higher, up to 480fps or even 960 and above. For those moments, most productions go with a Phantom camera.

In terms of production use, the Phantom has a bit of a reputation for being slightly high maintenance. They are made in lower volumes by a company with more of a specialization in scientific imaging, and they aren’t always ready for all the various needs of motion picture production. That issue rolls on into post-production, where support for Phantom files is occasionally hiccupy. Most of the kinks are worked out, but be sure to do extra testing and prep for phantom-heavy jobs. 

Phantom shoots a file format called .cine and are RAW files recording the data coming straight off the sensor. They are a bit processor intensive, even on powerful machines, and you should absolutely make editing video proxy files as quickly as you can after production, only relinking back to the RAWs for final color. 

In order to shoot to higher framerates, the Phantom shoots at lower resolutions (as is common on other cameras). This can occasionally lead to some shots coming in from Phantom at lower resolutions, like 1280 x 720, if the production wanted to shoot at 2700 fps. This has led more than one post team to worry they were getting an editing proxy but not the camera-original file. Be sure to check the camera reports to see what resolution was shot since, with high—-speed work, it is often not the original format. Another tip is that if it’s a .cine file, it’s the camera original, since you can’t make a RAW proxy file with software.

Sound and timecode aren’t really something most people worry about with high-speed work, so they aren’t a major factor when working with files from the Phantom.

Panasonic

Panasonic has long been dominant in digital video capture, and after a few years of fewer offerings, have come back in force in the last few years with the Varicam and EVA-1 cameras. 

Both camera lines are primarily used for Log-based video recording, though they both support RAW to an external recorder (the Atomos lineup of ProRes RAW cameras and the Codex V-RAW system for the Varicam Pure). If the production shot V-Log (the Varicam Log format, also available on the EVA-1), LUTs are available on the Panasonic site, and ACES and Resolve Color Management support it, though there aren’t flags in the files, and you’ll need to tell RCM what camera the files were shot with.

Panasonic is excellent at interface, hardware and I/O. It uses standard audio interfaces and a timecode interface, the more affordable BNC connection, with an internal timecode clock that is considered quite stable. One nice feature on the Varicam bodies is that they feature both 5-pin XLR inputs for a stereo mixed input (as you might get from a dedicated sound mixer), and also individual 3-pin XLR inputs for a documentary or scratch workflow where you’ll want to run microphones directly into the camera.

Sony

Sony offers a wide gamut of cameras from the top-of-the-line VENICE platform (now up to VENICE 2) to the FX9, FX6 and FX3 cine-style video cameras and the A7 lineup of stills cameras that maintain their impact on motion picture production. Sony cameras are everywhere and will often show up as the B or C or “night-work” camera on productions just because the director owns one and they want to keep it in the mix.

At the top of the line is VENICE (you aren’t supposed to use the definite article “the,” like Concorde, Venice is not “the Venice,” just VENICE), their cinema camera offering that is designed to compete with the likes of ALEXA and is successfully doing so. With a full-frame sensor, the ability to shoot RAW internally to Sony’s proprietary X-OCN format, and a robust body design, VENICE has grown popular on a lot of productions at the high end of the market.

The X-OCN RAW files are full 16-bit RAW files recording the data coming off a 16-bit sensor, so they offer a high level of flexibility for your post-production grading pipeline. The other option is to shoot video files in S-Log3/SGamut3.cine, which is a popular format that is also available on the FX and A7S lineups of cameras and makes intercutting between those cameras relatively easy.

With its amazing low light and autofocus performance, the Sony A7S lineup has been a major hit for motion picture image capture, but it has some drawbacks that make it less ideal for larger productions. There is a motion-picture-focused version of the camera, the FX3, that is very similar internally in terms of sensor and processor but adds more robust inputs, including timecode, though a special adapter cable needs to be purchased.

One thing to be aware of is that Sony cameras have many more picture profiles than competitors, with more arguments for why you might use one or another. DPs will frequently have arguments around issues like, “I use S-Log3 for everything, except for night scenes, then it’s S-Log2.” Each of these formats has a different LUT or transform for converting them back to property viewing space, so you’ll need to watch the camera reports closely to be sure you have a handle on what you need to apply to each shot. 

Another issue to be aware of in post-production on Sony is that there is often proprietary software that will require you to sign up for a Sony account to purchase, and is required for post-production on the footage. X-OCN support is built into Resolve and other platforms natively, but if you are having an issue, downloading the dedicated Sony software can help troubleshoot problems. Even with that support for traditional workflows, some of their more unique features that require special software. For instance, the A7S3 has an accelerometer built-in and can record that data in the video file. This is useful in post if you want to use post stabilization; the software can extract stabilization info from the shot and use it to help make the shot appear smooth. To do that, however, requires Sony-specific software.

In the FX and VENICE lineups, timecode inputs exist and audio I/O is quite robust. The A7S lineup lacks those integrations, making it more frustrating and often requiring more work in post for audio and multi-camera syncing.

The A7S lineup shoots to an AVC-Intra format that doesn’t need to be reconnected for final finishing; you can take those files, transcode them directly to ProRes4444, and treat those files are your new master files. If someone has chosen to shoot that format on the FX line, you can do the same.

Blackmagic

Blackmagic makes a lineup of cameras from the small “Pocket” lineup through the larger URSA bodies that shoot up to 12k resolution. One of the key benefits of Blackmagic is that there is a lot of similarity across the camera lineup; all feature real audio inputs (full-sized XLR on the bigger URSA, Mini XLR on the pocket), timecode, video output and more. All shoot straight to SSD hard drives like the Samsung T7 lineup. All shoot Blackmagic RAW, prores or DNx. It makes for a very simplified lineup, with the main benefits of the larger camera bodies being more robust input and output features and higher resolutions.

Blackmagic RAW is not a full RAW format, it’s actually been partially debayered, but you can still correct your ISO and White Balance in post with the power of the camera’s original settings. The design of Blackmagic RAW makes it a relatively lightweight format for post-processing, and some productions edit it natively, though of course, it’s still always the best bet to crunch out some ProRes or DNx video dailies where possible.

Unsurprisingly, Blackmagic Camera footage integrates exceptionally well with Blackmagic DaVinci Resolve if you are using that for your dailies creation. For an RCM workflow, it will auto-detect not just what camera shot the footage but also what settings were in the camera in terms of gamma and color space.

One interesting feature of the Blackmagic Pocket camera is that it is the only major “small handheld DSLR form factor” camera with a robust timecode input. The audio input ⅛ inch jack will auto-detect if you run timecode into it. Most competitors’ cameras will accept timecode over that port but then record it as LTC (linear timecode, as audio data) that needs to be extracted with special software. With the Blackmagic Pocket 6k, it just comes in as timecode.

Audio inputs are robust, and all cameras have an in-camera microphone for scratch audio.

Canon

Canon likely has the broadest array of camera options that a post team will have to deal with. There is the cinema lineup, from C100 up to C700FF, with steps in between. Some of which have features out of order from what you would expect. The C200 shoots RAW, but the C300 doesn’t (the 300 came out years before the 200). 

In addition, there is the R5, their mirrorless full-frame cinema-focused camera, and the C70, their compact version of the cinema line. And you’ve got a lot of folks still doggedly hanging on to their older cameras like the 5D Mark IV, which came out in 2016 but still shows up on jobs from time to time.

Most Canon cameras shoot to H.264 or H.265, formats you should transcode to ProRes or DNx for editing. Many users transcode those files to a larger ProRes or DNx format like 4444 and then treat those new files as their new masters, never going back to the lower bandwidth camera original files. 

Canon supports the Cinema RAW Light format for RAW recording, but it is not dominant in the way RAW recording is on the RED or VENICE platforms. Canon will also allow you to shoot RAW out to an external recorder from some cameras, which is increasingly popular. 

Most users shoot in C-Log, with variations available, including C-Log 2 and C-Log 3, both of which remain popular. Be sure to check in with production to know which format they shot so you can apply the right LUT or Transform in your workflow.

The Cinema lineup, generally noted by the “C” at the start of the camera name, will have the timecode and audio I/O to do things right and make things easier on you in post-production. Unfortunately, you won’t get that level of integration from the other cameras, which were originally designed as still cameras, and remain focused on that world. They might shoot wonderful video images, but it will be difficult to run audio into them in a robust fashion, and they generally lack a real timecode workflow, though you can use an LTC timecode system to the audio track.

MediaSilo by EditShare can help your post production team get video projects approved faster. Contact us to learn more.