
Content creators put a lot of effort into presenting their work the way they’d like it to be seen, but what happens if the right people aren’t looking?
Add in the fact that your films, videos, creative assets, and pitch decks can be seen on mobile, laptops, tablets, and desktops and can be shared, streamed, and tagged, and it quickly becomes hard to track who is seeing what content where. And, perhaps most importantly, why some content trends more than others.
That’s why the team at MediaSilo has come together to create an all-in-one reporting dashboard to help you measure value, track consumption, and calculate ROI for all of your creative content.
The result?
MediaSilo’s Insights dashboard gives each member of your team the power to dissect data on specific content, weave together trends from across your portfolio, and paint a picture of who your audience is and the types of content they love to consume. Even better? You can customize the data you are looking for to see exactly what you need.
So what does deploying MediaSilo’s Insights mean for each of your teams, and how can they use it to drive next-level value?
Gain Insights for Every Team
From production and sales to editing and content security, Insights puts powerful reporting tools, filters, and analytics at your fingertips, giving every team member the ability to track, understand, and act on your content’s performance.
View our full video tutorial library here!
Use data to help sales and marketing educate, iterate, and win business.
Take a deep dive into your content’s viewership back to day one to see what is resonating with your audience, tagging content with filters and features that can be summarized to enlighten your team and fuel data-driven decisions about what and who to target next.
MediaSilo’s Insights can also help your team keep track of prospects and the types of content that is resonating with them, providing personalized data that can be used to facilitate new connections with potential buyers when they are most engaged.
Finally, step into your customer’s shoes during a sales pitch in real time with viewer-level reporting. Take the feedback to improve your sales pitch and present your most impactful content at the forefront.
Empower production to engage, track, and collaborate.
Looking for additional opportunities to streamline your production lifecycle and amplify the impact of each contribution?
Use Insights to track team viewership across the production lifecycle to develop a deeper understanding of internal engagement with your content to refine your workflows and identify choke points.
Your team can then use the data to remove barriers, hold team members accountable for meeting their timelines, and consolidate engagement and feedback data whether they’re sitting in the office or participating in remote collaboration across the globe.
Waiting for feedback from colleagues or collaborators? Use Insights to discover who is reviewing which assets and who might need a reminder.
Understand, optimize, and evolve content security.
With team members on the go and using a range of platforms, security has never been so critical.
Leverage the power of Insights to validate your security controls to confirm that your content stays in the hands of your intended audience and know the exact point when data began to flow outside of your area of trust, complete with viewer locations on an interactive map.

Seeing content behavior that you don’t like? Pivot your content security on the fly by editing expiration dates, password protection, or presentation and link settings in the dashboard.
Take Production to the Next Level with MediaSilo
Your team works hard to make the best creative content possible for your customers, clients, and audience to enjoy.
Every word, image, and frame has been carefully crafted to be impactful and engaging, so why would you depend on your best guess as to what will strike a chord with your viewers?
When it comes to taking your content to the next level, don’t guess. Drive an intelligent content strategy with Insights.
Want to see more from MediaSilo? Check out our new asset-based commenting features.

No two creative teams are the same, so it’s not efficient to force them to use the same collaboration and digital asset management tools. Given that the review and approval process varies by team and content type, a versatile platform capable of meeting a team’s needs without sacrificing visibility and structure is essential.
With MediaSilo’s customized and flexible asset-based commenting feature, teams can implement the processes that work best for their specific needs while providing different options required by other teams.
MediaSilo’s Flexible Digital Asset Management
No matter the file type—including documents, images, and videos—or stage of development, MediaSilo makes it easy for teams to collaborate on content, wherever and whenever your reviewers choose to do their work.
With the digital asset already in your MediaSilo workspace, the process can get started with a click of the “Review Mode” button. You are then presented with a history of past comments, and users have the ability to add their own feedback.
Collaborate directly on an asset.
Whether it is one large piece of content or a broad portfolio MediaSilo makes it easy to collaborate with a larger group.
As comments and feedback are made, team members can review, respond, and track the history of an edit. Using MediaSilo means all comments are consolidated in one place, making communication seamless and transparent and allowing constructive dialogue to flow all in one forum.
Find a resolution to a comment or want to make a specific suggestion? Mark the comment as resolved or make an edit. These comments can then be hidden to help streamline the review process.
View our full video tutorial library here!
Once the feedback period closes, everyone will be on the same page, and your team will spend less time tracking down edits and more time reviewing and approving the next steps.
Provide specific asset feedback.
MediaSilo even allows team members to comment on a specific section or portion of an asset.
Just select the area of the asset with the built-in toolbar and record the comment. As team members review the feedback, the relevant area of the media will be highlighted along with the comment.
Collaborate with review links.
Need to reach beyond your team for feedback and input? MediaSilo makes that easy too.
You can quickly generate and send a private review link to a target audience, easily bringing them into the loop while still maintaining the peace of mind that comes with knowing that your content is for certain eyes only.
To get started, select the files you want to share, enter the email addresses of your collaborators, and hit “Share.” If you want the feedback to stay within that group, select “Limit comments to this link” before sharing.

After the review period, access to the asset can be quickly turned off, but the comments or annotations will remain directly tied to the file itself, allowing the entire team to review feedback together.
Take the Next Step
With a constantly evolving design and digital asset management workflow, you need a platform that is able to evolve and flex with your team.
With features like Review Mode, your team is free to work in whatever way is best for them all while staying on the same page.
Ready to learn more about the MediaSilo platform and other innovative ways to enhance how your team manages digital content? Set up a time to chat with one of our experts.
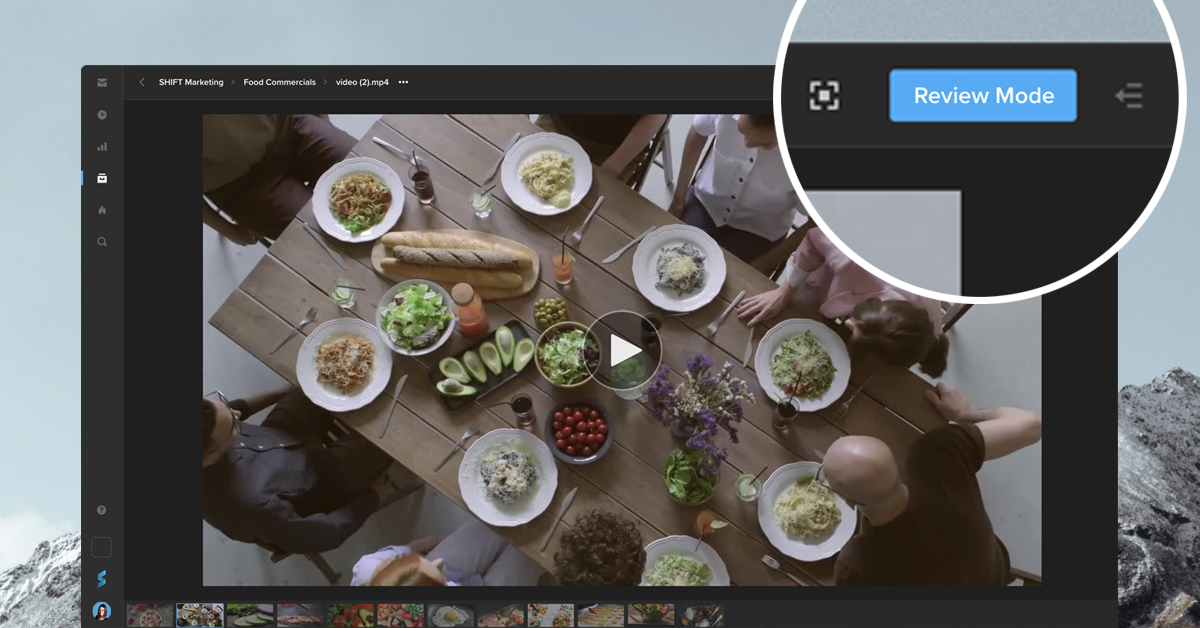
You can now leave comments on an asset directly from your Shift project. Simply go to the asset and click the “Review Mode” button to access your commenting and annotation tools. Your feedback will be visible to all collaborators with access to the asset. This mode also displays the comments made in review links, providing you with one centralized place to view all your feedback.
If your workflow requires a private review session, where comments are only visible to the people with a link, you can still create a Review Link and turn on the toggle “Limit comments to this link.”
Whether you need Review Link commenting or in-project commenting, our newest tools let you choose the best way to gather feedback on your content.
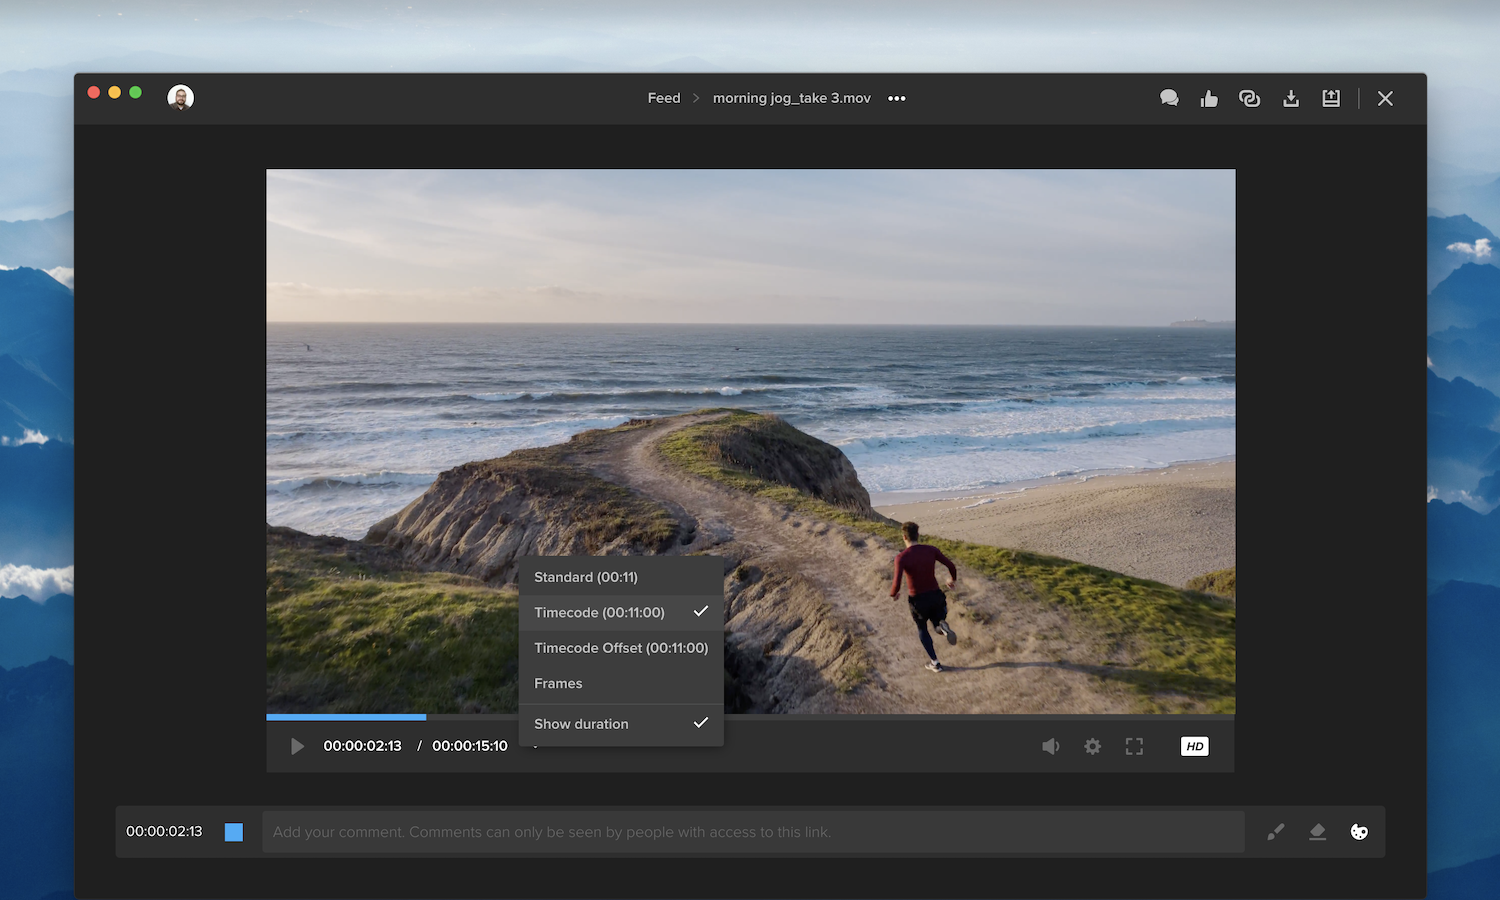
We’ve updated our video player to improve your viewing experience. The arrow button next to the timecode now opens a menu, so you can choose your preferred timecode format. You can also click “Show duration” to display the video’s duration alongside the timecode.
Additional features are now accessible by clicking the gear icon next to the volume button. For example, select “QC Mask” to apply an aspect-ratio overlay to the video, or select “Keyboard Shortcuts” for a list of time-saving shortcuts.

The comment bar below the video player also includes a checkbox, so you can choose to leave a timecode-specific comment or a general comment. All comments appear in the right-side drawer, which you can open and close by clicking the speech-bubbles icon. This section now includes search and filtering options to easily find and display the comments you’re looking for. Once a comment has been addressed, click the blank circle on the right to mark the comment as “resolved.” You can still access resolved comments by selecting “Show resolved” from the filters menu.

Insights is the new hub for analytics on all your links, viewers, and assets. See how your content is performing by clicking the Insights icon in the navigation bar.
The left side of the Insights page provides a summary of your activity, including the number of visits to your links, the number of unique visitors, and the date of last activity. Click “All Activity” to display a map with your viewers’ locations, or select “Graph” to track viewer engagement over a period of time. Use the search bar along the top of the page if you are looking for analytics on a particular link, viewer, or asset.
You can select any item on the left side of the page to display more information in the right column. This section contains details on your viewers’ activity, including the specific assets they viewed or downloaded and the video percentage watched.
To learn more about the ways Insights tracks activity, please visit our support article.
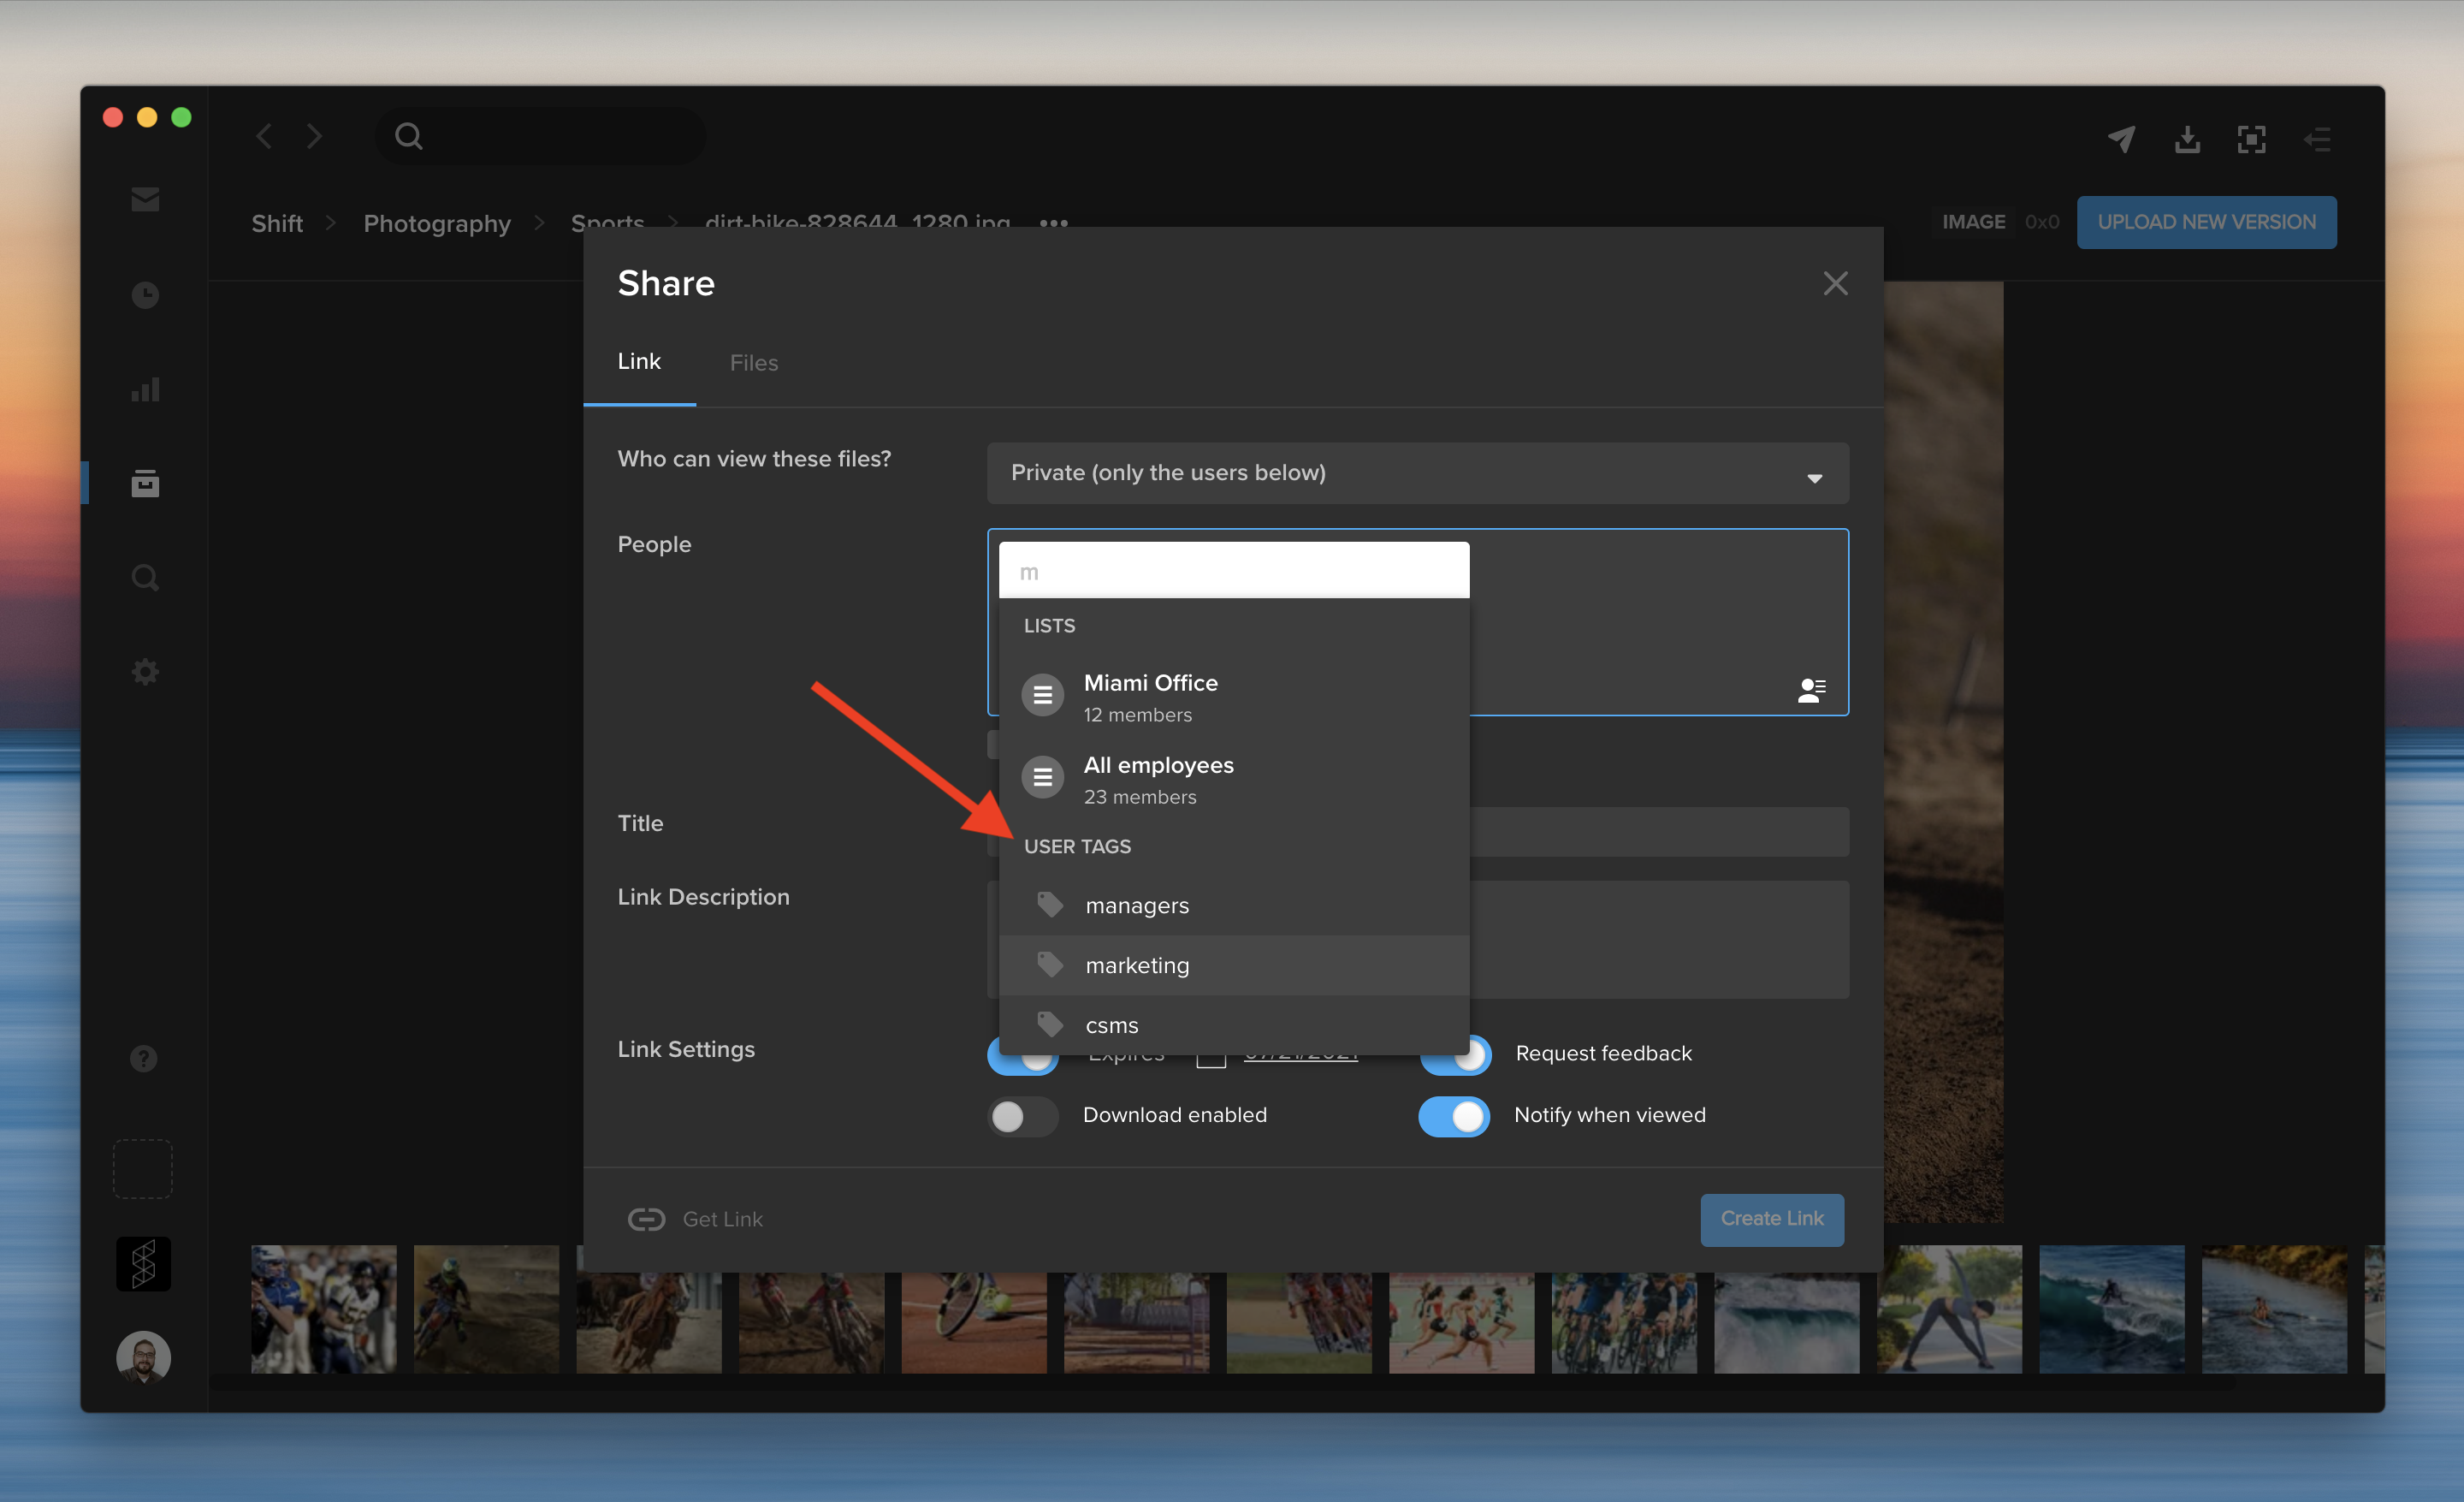
You can share content with a group of people without entering their email addresses every time. In addition to distribution lists, you can now enter a user tag to add multiple tagged users to a share. When you create a new share, start typing a user tag in the recipients field. Then, select a user tag to add all the tagged users at once.

User tags can also be used to easily filter or search for groups of users throughout the application. You can tag existing users on the Administration page by selecting “Add tags” from the Actions menu, or during the “Add Users” process for new users. User tags are listed along the left side of the Administration page.
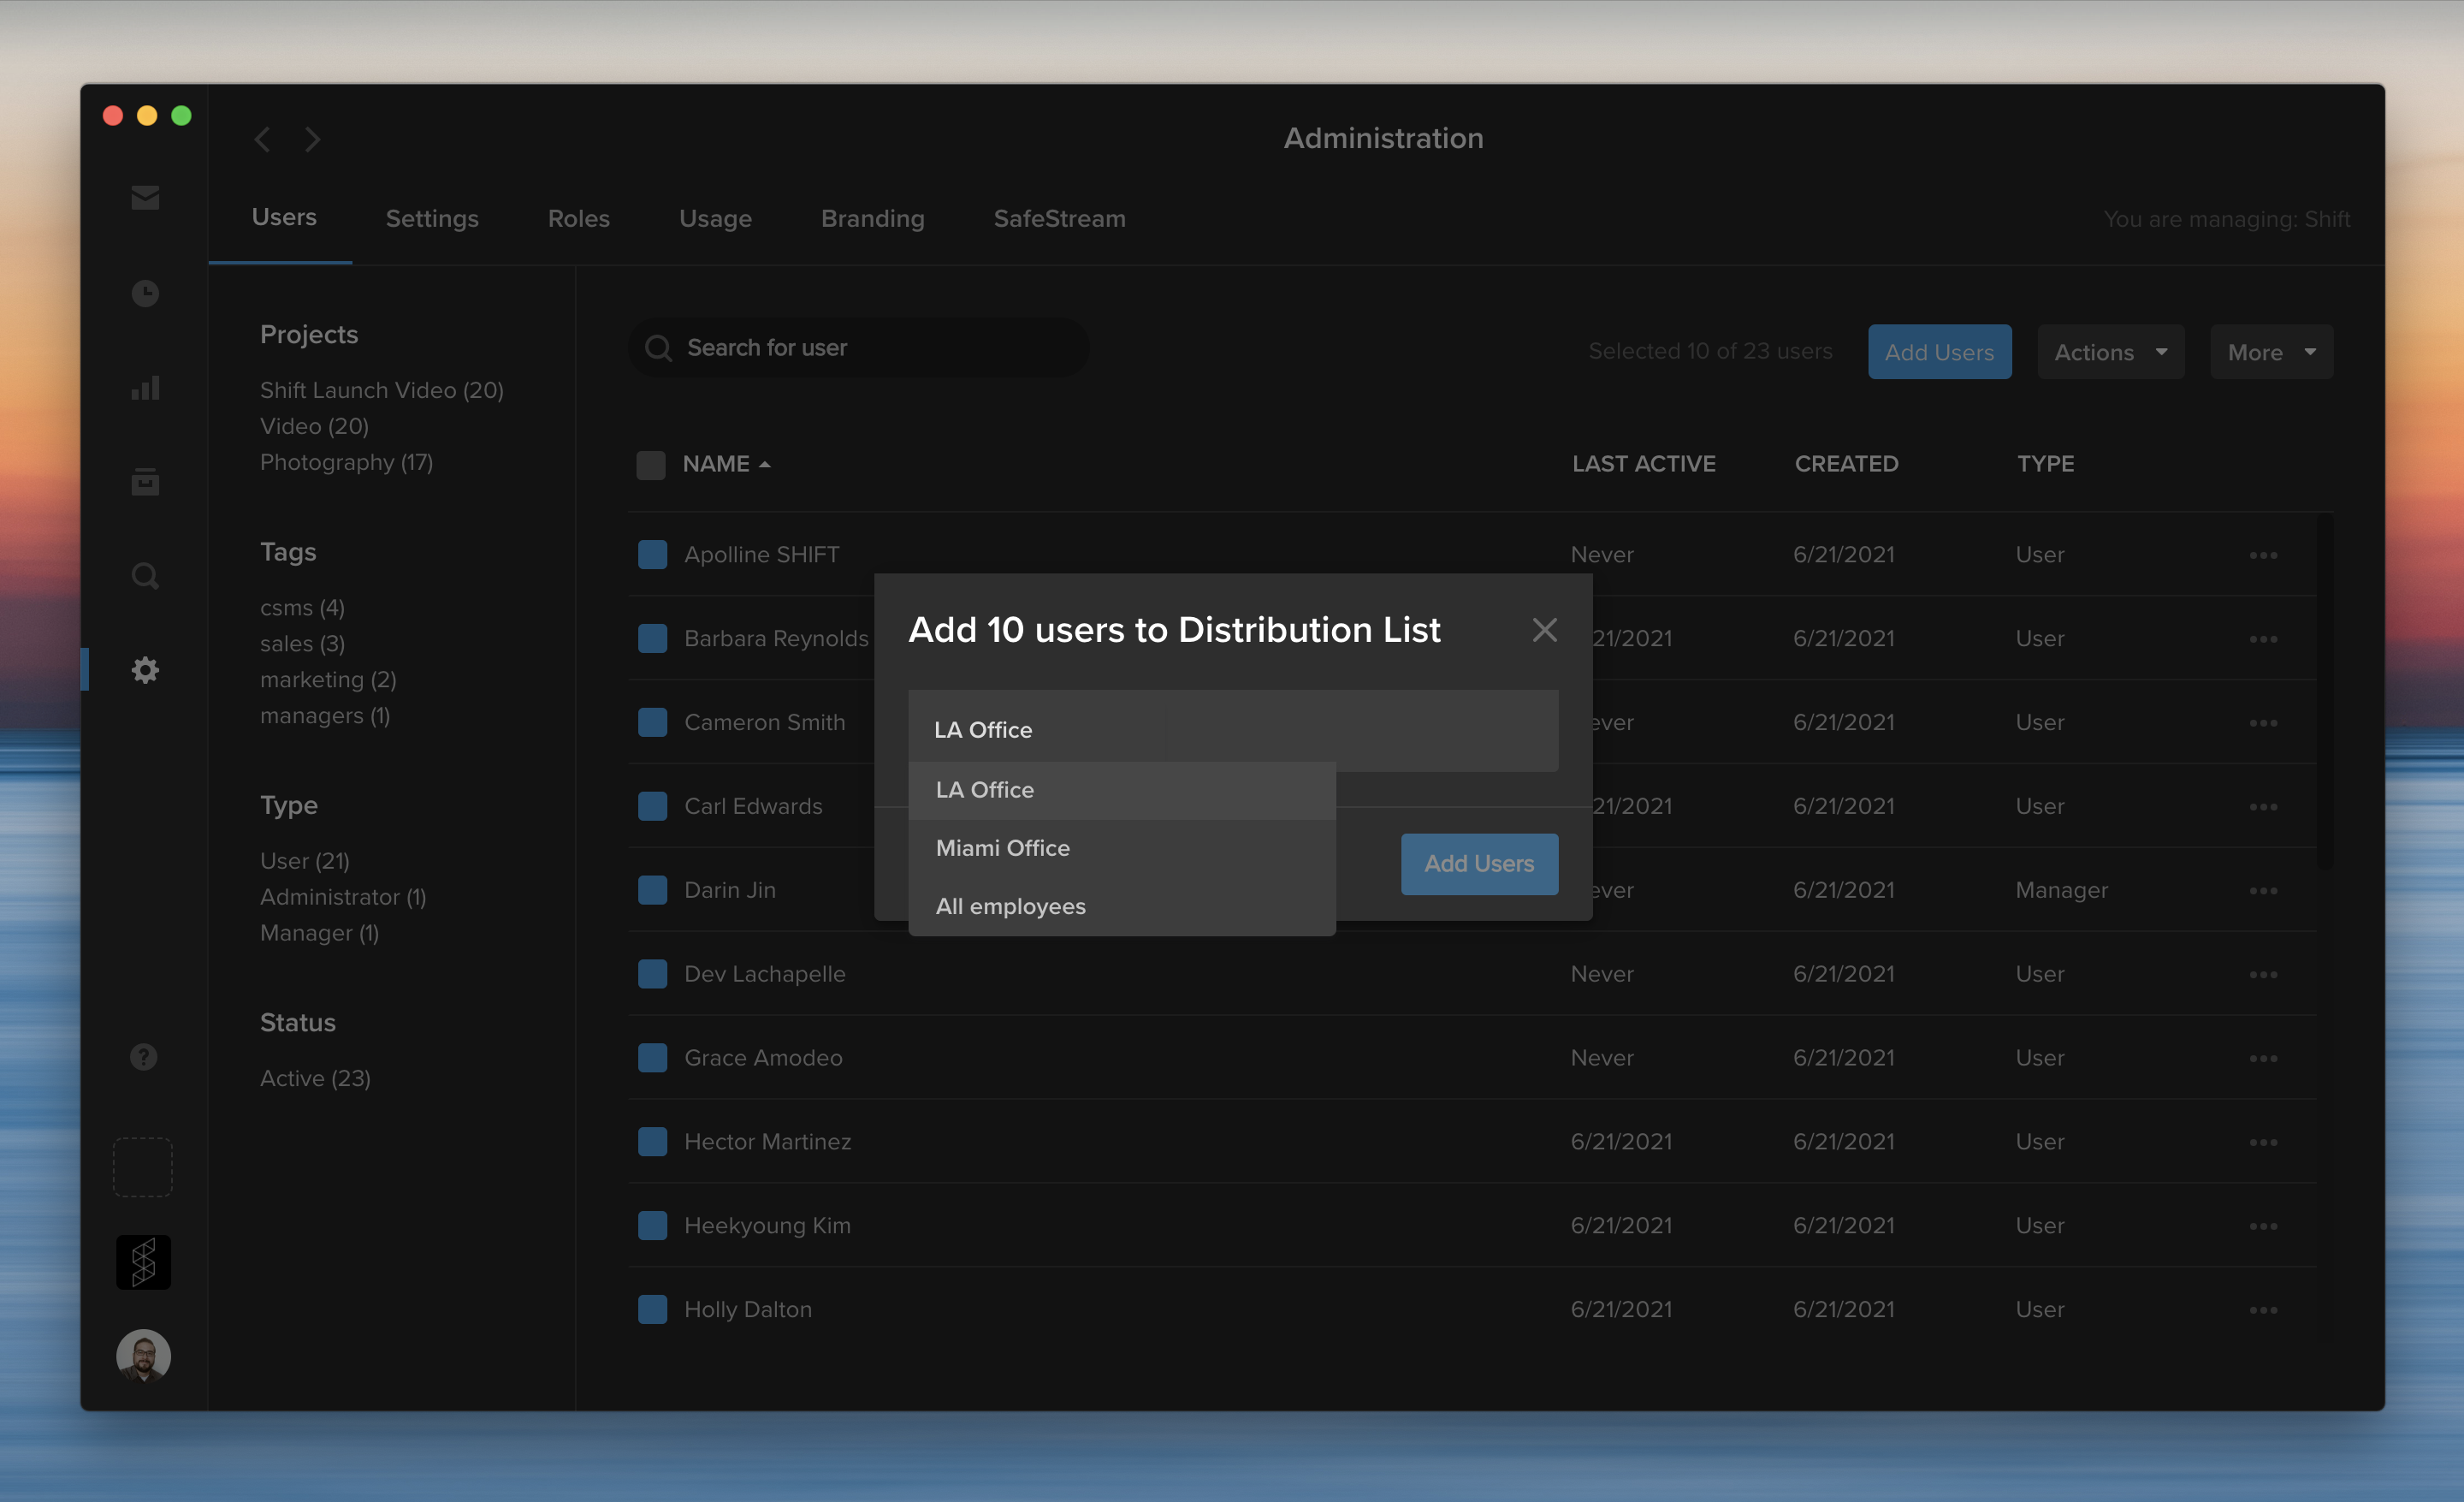
The Administration page now offers more ways to create, manage, and share distribution lists with other users.
To add people to a distribution list, click the checkbox next to their names. Then, click the Actions menu on the right, and select “Add users to a Distribution List.” You can select an existing distribution list, or click “Create New” to add them to a new list.

When you create or edit a distribution list, you can now share the list with specific workspace users or make the list accessible to your entire workspace. You can still create a private list that is only accessible to you by selecting “Just me” from the sharing options.
To edit a distribution list, click the More menu on the Administration page, and select “Manage Distribution Lists.” This opens a window where you can review and make changes to your lists, such as adding or removing members and choosing a different sharing option.
In addition to emails and names, you can now enter user tags to add multiple tagged users to a distribution list. For example, if five different users are tagged with “marketing,” start typing “marketing” to add all five of these users at the same time.
Adding new users to distribution lists
When you add new users to your workspace, you can now easily include them on existing distribution lists.

Start by clicking the blue “Add Users” button on the Administration page. Then, enter the users’ email addresses and choose their project assignments. Next, you can select a distribution list to add these new users to the list. For example, add new employees to an “All Employees” distribution list as they join your team.
In our previous entry in the Journey to the Cloud series, we reviewed virtual workstations. In that article we covered the advantages and concerns of using cloud-based workstations as non-linear video editing machines. For teams that are shifting their video production away from on-premise environments, it is important to consider how these workstations are managed, operationalized, and costs are controlled. That is what we will discuss in this article.
Virtual Workstation Recap
In a video production environment, a virtual workstation is an on-demand compute server running applications for editing, ingesting, and other functions of a video workflow. These workstations are appropriately sized to the tasks at hand – which in this case will be non-linear video editing. Offered with a variety of CPU speeds and cores, along with memory and video graphics acceleration, they can be right-sized for the needs of the codecs being processed and edited.
An important consideration in virtual workstation usage is managing the uptime of that workstation properly. In an ideal world, this would be similar to simply powering on the system when in use and then remembering to shut it down when no longer in use. In a cloud environment that process is not straight-forward. For one, users may not always be diligent about shutting down their computers, and if they were diligent they may find the process of spinning workstations up and down more complicated than a power button. Often it’s necessary to have access, and training, to operate the cloud management console where this operation is controlled. Alternatively the IT cloud team needs to get involved manually or write scripts to perform this operation. This is not a simple process, but it is perhaps the most important step in controlling cloud costs. Because of this, a need for workstation management tools has emerged.
What Will Workstation Management Do For Me?
There are a number of capabilities that workstation management solutions provide to make users’ lives easier, help them save money, and maintain control of their cloud environments. Let’s walk through a few of them.
Workstation Scheduling: Ideally, a workstation manager will allow team administrators to control the uptime of their virtual workstation environments. That’s as simple as turning them on in the morning and turning them off in the evening. The primary advantage here is cost savings. Instead of running a GPU assisted compute node 24×7, a workstation management system can control the overall uptime and usage schedule. The savings is straightforward here – there are approximately 722 hours in a month, yet typically only 173 working hours. Providing a simple scheduling management function can result in a 76% savings against your cloud bill.
Now there are solutions, such as AWS Instance Scheduler, that can provide similar functions, but will require the user to have the IT and programming skills to implement them. For video production teams, a simpler solution is almost always preferred.
Connection Management: This element of workstation management orchestrates the connection of users to virtual workstations and watches over the use of those connections. When logging in, a connection manager will find an idle workstation and connect that user to their new environment for the duration of that session. This element also has the ability to monitor the workstation usage. If the environment goes idle the connection manager will sense this and shutdown the workstation in order to minimize costs. Typically this idle period can be set to find that right balance of idle time acceptable to users.
To ensure productivity within a team, when users are disconnected from their virtual workstations, the compute instance is also suspended. This suspended mode often means that the storage associated with this workstation is maintained, not deleted. However, the compute instance is released and is no longer incurring a cost. The storage is maintained separately but these fees are relatively small, for example, AWS Elastic Block storage for a 200 GB volume will only be around $8-16/month. Once that user comes back online, that storage volume is connected to a new virtual workstation and users can become productive again.
Authentication: An important element is the ability to ensure only authorized users can access workstations. A workstation management solution will integrate smartly into your company’s security solutions and map to the correct policies set by your information security team.
Provisioning and Management: The ability to provision new workstations into your workstation pool is an important element of workstation management. For example, you may have 20 workstations available to your team, but find yourself facing a new project which will require an extra 5 workstations. The administrator of the workstation management system will have the rights to provision these new workstations, and later delete them when no longer in use. Similarly new video production workloads may arise requiring workstations capable of editing very high resolution video. These higher-end workstations can be created and provisioned specifically for these requirements, and then deleted when no longer in use.
Cost Insights: In a video production environment, workstations used for editing or ingest may be among the most costly cloud elements in use. The ability to have visibility into these costs will allow teams to maintain controls on their spend, well ahead of any surprise bills. In addition, this capability can make it much simpler for production groups to easily shift to an OpEx model where revenues from projects can be tightly aligned with the costs associated with that work.
The advantages of virtual video productions have become more compelling to teams as cloud costs plummet and bandwidth increases. However, as this world has emerged it has required a new set of skills and oversight that differs from on-premise solutions. For some organizations, tracking on-going costs can be more challenging than the analysis behind a CapEx investment of new equipment. A workstation management solution with visibility into costs can help manage this concern and provide clear visibility into spend.
Operationalizing Cloud Virtual Video Production
Moving to a cloud environment today may require team members to become familiar with a cloud vendor’s console administration, operations, coding, and cost calculators. Not exactly a set of skills a creative department may want to invest in. Some market solutions address this complexity with a Software-as-a-Service (SaaS) offering, allowing users to subscribe to a video production environment of fixed sizes and capabilities. This can sound compelling but it also eliminates the advantages of a scalable cloud approach, and requires customers to pay staggering fees as the SaaS vendor must over-provision their cloud infrastructure to account for worst case usage models.
EditShare’s approach has been to truly embrace the cloud offering a scalable solution which its customers can use cost-effectively in their cloud account. This ensures our customers receive the best pricing possible for their cloud infrastructure uses and allows them to maintain control and oversight. To provide further operational and cost oversight we have partnered with workstation management vendors such as 7FiveFive, and together we can provide the end to end solution that is manageable and operationally controlled by our customers. The entire environment – performant storage, asset management, archiving and ingest all operationalized in the cloud with full control over usage and cost management.
Get in Touch
Explore easy ways to get started in the cloud
Schedule time with an EditShare solutions specialist

The last few years have presented businesses with unique challenges, leading many companies to embrace more flexibility in deciding when and where their teams work.
To make these new arrangements effective, digital platforms have become critical in ensuring businesses maintain productivity without sacrificing security.
This is especially true when it comes to keeping your content safe, no matter where it is in the post-production workflow.
Helping organizations solve problems like these is at the core of MediaSilo’s products and services. We want to provide ways to keep your valuable content safe and secure, no matter your location or industry.
So, whether you’re unfamiliar with the MediaSilo platform, or a user who has been with us for years, here are some of MediaSilo’s top security features to keep your post-production workflow on track and safe.
1. Customize user access with Project-level and workspace permissions
Sometimes your production team needs the input of freelancers, contractors, vendors, or other internal employees. MediaSilo’s multi-level user access and role-based permissions can help keep collaboration moving and limit risk.
With our simple-to-use MediaSilo Admin Panel interface, you can assign Types to each user, controlling their ability to access projects or create their own. You can then dig deeper into other permissions with customizable Roles to fit your needs. For example, you can create rules to specify which groups of users can edit, upload, download, or share content on a per-project basis, giving your team the control they need to do their jobs while keeping your workspace secure.

2. Gate externally-shared content with private links
If your team needs to send content externally, MediaSilo provides an easy and secure way to do so with our Private Link feature.
Private Links require recipients to first verify themselves as users associated with your MediaSilo workspace before they can access your content. MediaSilo’s Private Link feature works with any share in MediaSilo—whether it’s a Review Link, Presentation, or Spotlight—and generates a simple, secure URL to send to recipients.
In addition to Private Links, your team can also choose to:
- Provide Public Links with the “Allow Download” setting enabled
- Distribute Public Links, but with set expiration dates
- Use the “Public Link with the Password” sharing option
3. Protect against content theft and misuse with SafeStream
For an extra layer of protection on your content, you can leverage MediaSilo’s built-in SafeStream functionality, offering on-demand watermarking technology.

This technology can create instant visual and forensic watermarking that can be burned into any video file.
SafeStream offers two different types of watermarks:
- A visible watermark provides a unique, traceable visual deterrent that will make viewers rethink sharing valuable, confidential content.
- The watermark can be customized to include the viewer’s full name, email address, or even custom text like “Property of MediaSilo.”
- A forensic (invisible) watermark is a set of unique, invisible characters digitally embedded into a video to identify its origin.
- Forensic watermarks can be used on their own or with visual watermarks, providing a secure, uninterrupted experience to viewers.
To mandate this high level of security, SafeStream watermarking can be enforced on a Project or Admin level. or even embedded in a template for use across your organization.
4. Log in securely with Multi-Factor Authentication
Another cybersecurity best practice available in the MediaSilo platform is the ability to use multi-factor authentication (MFA) to increase the security of your post-production workflow. Combining the use of a username, password, and another method of verifying your identity adds an extra layer of security to your account or workspace. MFA is a great option for workspaces that aren’t protected with single sign-on (SSO), and it is extremely easy to implement within your MediaSilo environment.
In fact, users can set up MFA on their own using a simple two-step process in their User Profiles. Your organization can also choose to require all users to enable it before they continue to use their accounts. This second option is a feature that MediaSilo Administrators can enable at a project or organization-wide level.
5. Track and control content activity
When working with sensitive content, you need a way to confirm the access controls in your MediaSilo workspace are functioning as expected. The MediaSilo Insights dashboard can help with this.
Use MediaSilo’s real-time reporting features to access a comprehensive list of all the links you or any member of your team have ever created, as well as granular activity data related to each link. You can also use this feature to change the status or expiration date of each public or private link.
You can choose to track the number of views and downloads on each of your shared files. Or, you can identify who is viewing your content, when they accessed it, and where they are located with a geolocation map. You can even go to the next level and track the origin of a leak down to the culprit’s IP address.

Future-Proof Your Post-Production Workflow
If the last couple of years have proved anything, it’s the need to have processes and tools that help your team stay productive, no matter when and where they work.
No matter your industry, MediaSilo provides a powerful way to keep your team communicating, collaborating, and creating, just as easily and safely as before.
If you are ready to learn more about how MediaSilo can enhance your post-production workflow with additional security and productivity features, our team can help you get started.
Get started with a free 14-day trial of MediaSilo today.
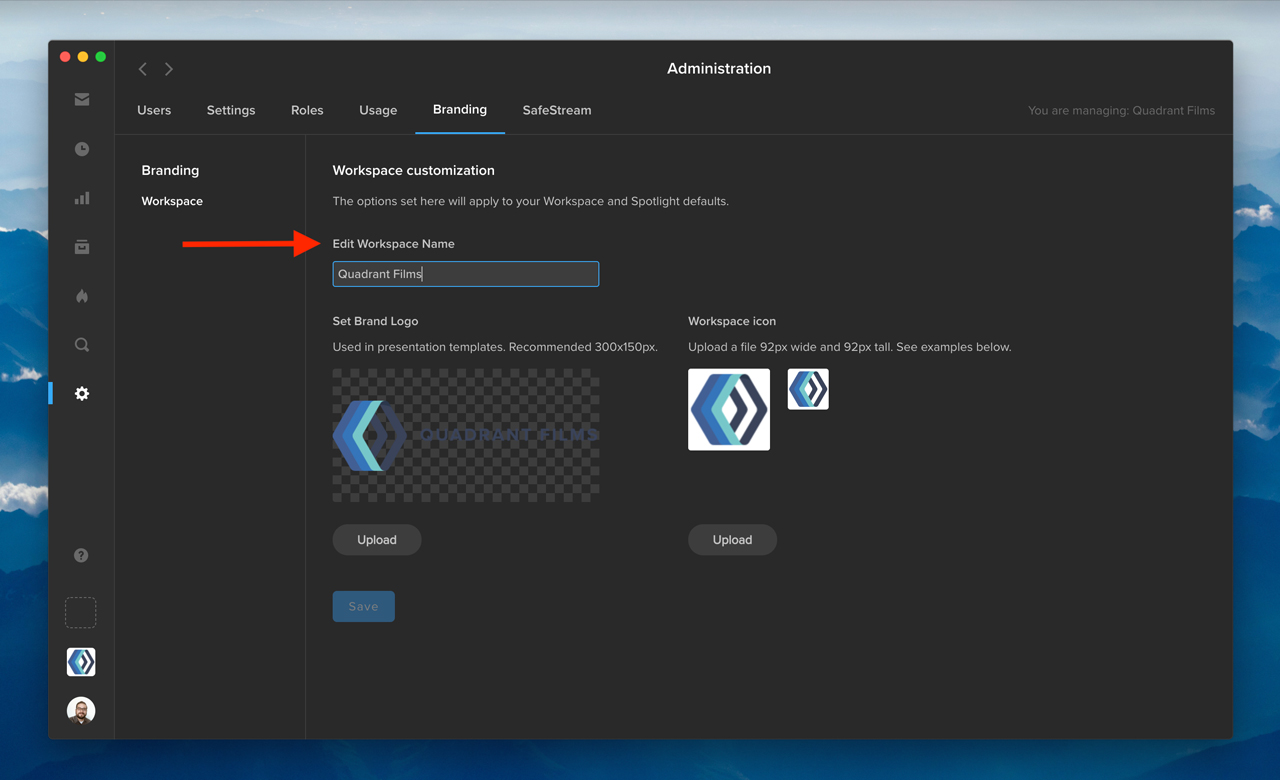
As a workspace administrator, you now have the ability to edit your workspace name. First, click the gear icon in the navigation bar to access the Administration section. Then, go to the Branding tab, and change your workspace name under “Edit Workspace Name.” Once you click “Save,” your updated workspace name will appear in the workspace switcher in the bottom left.

In addition, you can now edit the email address associated with an existing user on your Shift account. Under the Users tab in Administration, click the three-dots menu in any row, and select “Edit User.” In the “User Info” window, you can edit a user’s email address to reflect any changes to the user’s name or email domain. The user’s access to projects will remain unaffected.


