MediaSilo Panel for DaVinci Resolve Studio and Adobe® Premiere® Pro
Reuben Evans, Blade Ronner Media
MediaSilo’s panels for Adobe Premiere Pro, After Effects and DaVinci Resolve Studio* make uploading a breeze
Sometimes, at the end of a long editing session, you just want to hit “export” and call it night. But everyone has experienced waiting for exports to complete, then initiating an upload to a review platform, and then waiting for that to complete. Then, you have to wait for the transcode to complete. Then, you have to ensure it plays right and the watermark is applied. Then, you have to send emails to producers and directors. Next, you wait for their comments.
The next day, editors try to figure out how to match the comments from emails back into their timelines. Then, you have to be careful because making changes affects the timecode, which throws off another set of comments where a reviewer typed in the timecode in a Slack message. And so on.
MediaSilo’s Panels for Premiere Pro, After Effects and DaVinci Resolve Studio solve this whole mess for editors. Let’s investigate the panels and see how they can save you time and grief.
MediaSilo Panel for Premiere Pro and Resolve
The MediaSilo panel gives you access to assets in MediaSilo right within your NLE. It also allows you to export a timeline with a single click and have it uploaded into the right project folder on MediaSilo. You can choose your upload settings and identify the people who need to be notified. Once the team has made notes in MediaSilo’s review mode, you can immediately import those comments as markers into your sequence.
Those features streamline so many manual steps in the review and approval process. Basically, the MediaSilo panel gets you home in time for dinner.
DaVinci Resolve Studio
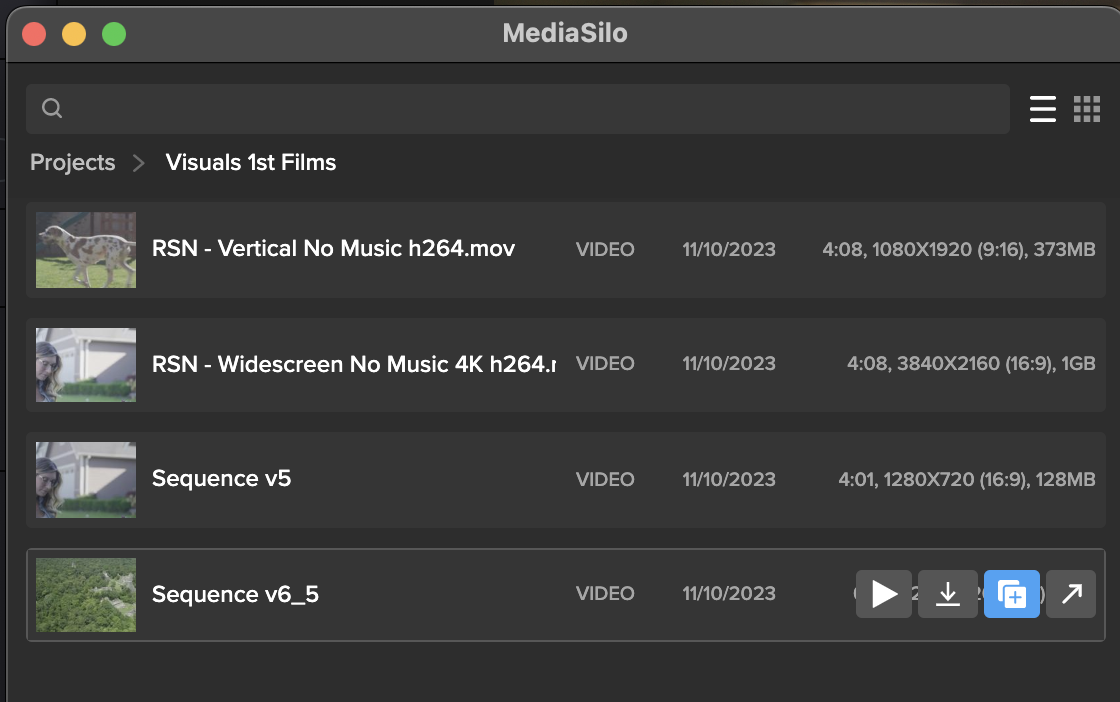
Once the panel is installed, Open DaVinci Resolve Studio and go to Workspace -> Workflow Integrations -> MediaSilo. A floating window appears with your projects. It uses a helper app called “Electron,” so don’t quit it. Your assets appear in the projects. When you float your mouse over each asset, you can preview (Resolve only), download, create a new version, or Open in MediaSilo.
Premiere Pro
Install the MediaSilo Panel from the Creative Cloud desktop app. Go to “Stock & Marketplace” and search for MediaSilo. Once the extension is installed in Premiere, open the Window menu > Extensions > MediaSilo.
After Effects
Install the MediaSilo Panel from the Creative Cloud desktop app. Go to “Stock & Marketplace” and search for MediaSilo. Once the extension is installed in After Effects, open the Window menu > Extensions > MediaSilo.
Downloading assets into your project
If you want to include one of your MediaSilo assets in your local project, just drag it into the media. If you prefer to download a proxy version, click the download icon and select “Proxy” from the drop-down menu. Proxies are smaller, lower-resolution versions of the original footage. They are handy when you are putting together a rough cut. And when your project is ready for color grading, you “conform” it to the original, high-resolution clips.
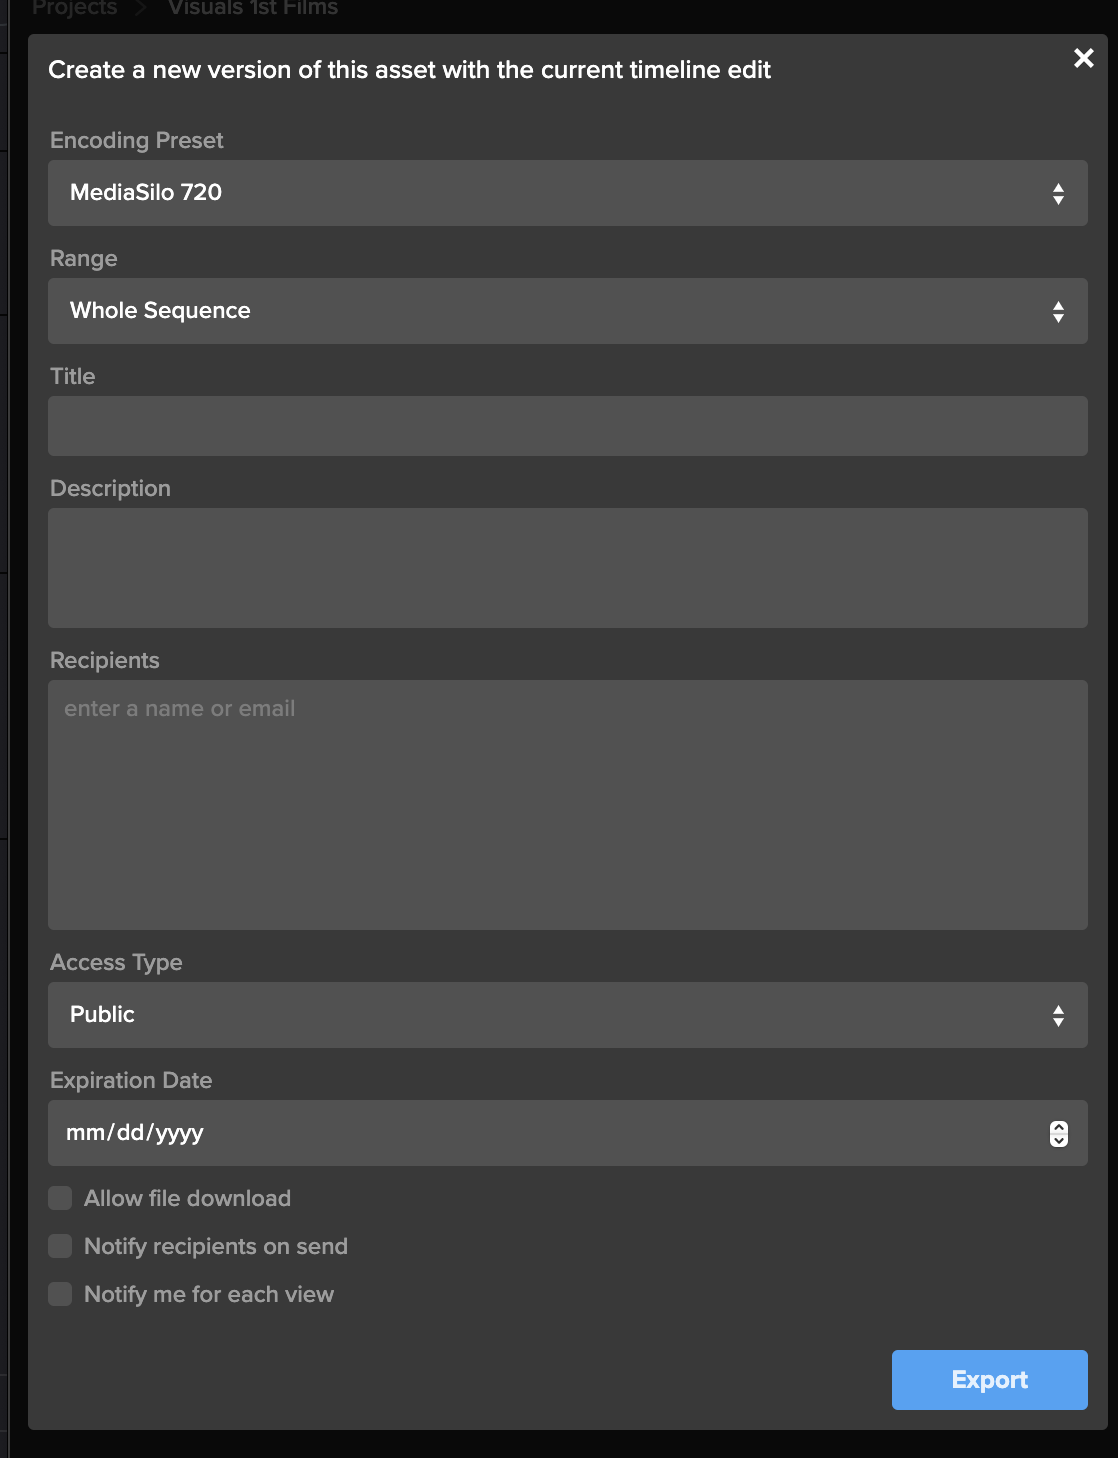
Exporting your timeline directly to MediaSilo is a breeze with the panel. Once you’ve completed your cut, click “Export Timeline” (Premiere says, “Export Sequence”) in the MediaSilo Panel. The “Export Sequence/Timeline” window opens up. You can choose your encoding preset based on your needs. Sometimes, you need the highest quality version to go up, and sometimes, you just need a lower-resolution version for quick approval. Choose the whole sequence or just from the In/Out points. You can specify a title and add a description that will appear in MediaSilo.
“Upload Location” is the next option. Start typing the project name, folder or asset with which this upload should be associated. This step is important because an editor may work on projects with different security levels.
The “Recipients” field saves you the hassle of waiting for an upload to complete before notifying reviewers. Enter the names of the individuals who need to receive a review link, and they will be notified once the asset is ready for viewing.
Create a new version of your timeline
Typically, when I’m ready to output a new version of an edit, I export it from the timeline. If the service I’m using for review and approval (non-MediaSilo) keeps track of versions, I usually just cross my fingers and hope it picks up on the new file coming in. Most of the time, I just append a “v2” or “v3,” and then manually identify it as a new version once the upload has completed. Then, I send a message to alert the reviewer.
The MediaSilo panel takes a different, more efficient approach. This feature is so simple that it took me a moment to understand how it works.
This process applies if you have already exported your timeline once and you need to export another version after some changes have been made. Select the clip in the panel and click on the button to share a new version.
This will bring up the export window. Rather than simply exporting the asset, all these options are designed to help you streamline creating a new version of the asset. This way, you can give the new version its own title, and MediaSilo will keep it associated with the initial version. This means the links that you have previously sent out will continue to work.
You can even change the access on the new version, and reviewers will be notified when it is ready. You’ll also receive a notification when they view it. This little box saves so many steps in the process of exporting compared to the process I outlined at the beginning of this section.
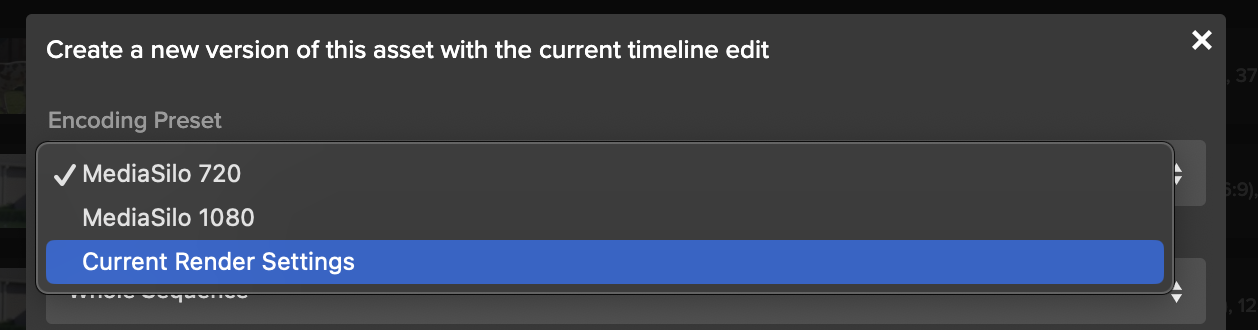
Encoding Presets
The encoding presets section allows you to choose the resolution for your upload. Sometimes, you need to get a change up quickly or share a low-quality version with a collaborator. So you can choose a lower-resolution setting. If you need to upload at a higher quality, choose your “current render settings.”
Watermarking and security
If you have watermarking turned on with your project, that will get automatically applied in MediaSilo. This is really helpful for editors because they don’t need to turn on and off a watermark within their NLE. In addition to the visible watermark, MediaSilo supports forensic watermarking with SafeStream. This technology ensures that any leaks can be traced back to their source.
MediaSilo also supports the ability to use your own custom email server for email notifications and 2-factor authentication — to ensure an even higher level of security.
Support articles
MediaSilo offers support articles for Resolve, Premiere and After Effects that show you how to install and use the panels in detail.
Conclusion
The MediaSilo panels in DaVinci Resolve Studio and Adobe Premiere Pro will save you time and energy. They help to make collaboration, review and approval a much more streamlined process.
*Note: The MediaSilo + DaVinci Resolve Studio integration is only available on the DaVinci Resolve Studio paid tier. You can find their pricing here.
Please complete the form below and we’ll get in touch!
When you send large video files, you can encounter all sorts of challenges. When your team is collaborating on a video project, you often have to send multiple versions, track review and approval comments, and make sure everything is secure. However, video collaboration workflows are more demanding than your typical cloud-based file-sharing workflows. This can be even more challenging when the creative team and the IT team propose different solutions for sharing video files.
Here are 10 of the top ways to share large video files and their pros and cons. I’ll also share things I wish IT knew about the unique demands of video review and approval processes. So, let’s dig in to find out which solution is best for your video collaboration workflow.
WeTransfer
WeTransfer’s simple interface makes it easy to share files up to 2GB. To upload larger files, you’ll need to upgrade to Pro or Premium.
WeTransfer uses a web browser interface for uploading. With some browsers, like Safari, you can run into an issue where the browser will time out before your large upload is complete. This isn’t the case when apps feature an app that installs on your local machine.
While WeTransfer Pro does a great job of sharing your final exports in the delivery phase of your project, it lacks review and approval features, so it might not be the right tool for collaborating during the post-production phase.
The other major drawback is that WeTransfer does not recover well from an interrupted file transfer. You’ll need to re-initiate if your transfer is interrupted (maybe due to a bad WiFi connection). If your upload is a large file, this can mean a significant amount of lost time, and you still won’t know if it will complete on a second go-around.
Dropbox
Dropbox is well known for its ability to sync files between the cloud and your various devices. But since DropBox Business Plus caps file sizes at 250GB, it runs into similar constraints as WeTransfer Pro. DropBox does feature “Replay,” which allows for commenting on videos, but it is not available on the least expensive plan. Additionally, the replay feature is limited to 10 file uploads on their top plan.
While Dropbox offers reliable syncing, it can be confusing when working with two different organizations. It tends to demand that both parties upgrade. That makes it confusing when you are trying to figure out who is hosting which files. A common question that arises is, “If I delete this file on my computer, will it vanish from yours?”
Post-production professionals need to know that they can deliver files without confusing mismatched subscription tiers between vendors. So, if you find yourself dealing with multiple projects and multiple clients, getting everyone to collaborate through Dropbox is a tall order.
Box
Box enjoys a solid reputation for handling lots of smaller files well. Their lowest tier caps file sizes at 250MB. (The highest tier caps out at 150GB per file). This gives you an idea of where their emphasis lies. There are no review or commenting features associated with videos.
Box is a great example of the difference between typical workflows that IT supports vs. media workflows. While an IT team may be accustomed to supporting petabytes of small files, this is different from workflows that have a smaller overall footprint, but the individual files are larger.
Google Drive
Google knows how to sync and send large files. Google Drive is inexpensive and reliable. Google offers a web interface and a downloadable app that syncs locally. The downloadable app is more reliable than the web interface for large transfers.
However, by many accounts, Google Drive is slower than Dropbox. My personal experience is that Google will eventually get your file uploaded. But sometimes, you can run into a frustrating scenario where interrupted syncs hang. This causes Google to stall out until Google Drives figures out that a file has been moved or renamed. This can put a halt to your other uploads.
Google also changed how sharing works between paying and free users.
If everyone within an organization is on a paid tier, then file sharing works well. But if you are sharing between organizations, Google will basically push both sides to upgrade. It is frustrating because you cannot know whether the person on the other side of the share has a paid account. I just ran into this a couple of weeks ago. I had a paid version, and the other team had free accounts (but I didn’t know this). The other team had to get their CEO to join the shared folder to accept my shared folder because he had a paid account.
Post-production pros need to know that the delivery of their assets is friction-free. You don’t want your client hit with promotional “nag-ware” when you are trying to deliver your final assets.
OneDrive
Microsoft enjoys a solid reputation with IT teams for good reason. Their products cater to the needs of corporate users. Microsoft places an emphasis on security and integration with Windows.
However, OneDrive is not oriented toward post-production. It lacks features oriented toward video review and approval and version tracking. This makes it a good solution for sharing graphics and project files, but it isn’t great for managing video projects.
Vimeo
Vimeo has been the champion for preserving video quality for films delivered to the web. Vimeo is a great tool for the distribution of assets online, where video quality trumps workflow efficiency. It works well for embedding your finished project on your website. In the past few years, Vimeo has also been adding collaboration, AI, and live-streaming features.
However, in my personal experience, I have found uploading to Vimeo painfully slow. Transcoding also seems to take longer than other services. It will be interesting to see if Vimeo’s performance can keep pace with their aspirations.
Resilio
Resilio uses P2P technology to facilitate the syncing of large files between multiple collaborators. This is a powerful technology, but it does require the app to be installed on the computers of both the sender and the recipient. This means Resilio is a nice solution for frequent collaborators. However, it’s really a no-go for client work where somebody just wants to click a link, quickly compare versions, and leave some comments.
Frame.io
Adobe’s frame.io platform is a popular solution for review and approval. It features integration into popular NLEs, and tools for managing versions. Adobe is working to incorporate AI features into frame.io as well.
However, my experiences with frame.io over the past year have been challenging. They’ve acknowledged these challenges and reported that they are working on an overhauled version of their software.
Infrastructure solutions: Aspera, Signant, and EditShare EFS
IBM Aspera and Signant Media Shuttle are robust solutions that integrate your team’s IT infrastructure. They’re often used by broadcasters to move large files. However, many teams are finding challenges with these solutions. And they are expensive.
EditShare EFS has built-in file acceleration for large transfers from one EFS system to another. This can be particularly advantageous to customers who have multiple facilities and the transfer software is included in the standard EFS license – no additional costs are involved.
MediaSilo
MediaSilo delivers a platform designed specifically to tackle the challenges of video collaboration. It integrates right into Adobe Premiere Pro and DaVinci Resolve. This allows editors to save huge amounts of time when exporting, uploading, and versioning.
MediaSilo allows users to upload through the browser or the desktop app. MediaSilo’s robust uploader gives you real-time feedback on the speed and progress of your uploads. If you’re connection is interrupted, MediaSilo does a great job of completing the transfer when you are reconnected. It is also easy to cancel an upload and clear the queue. This avoids the hangs and syncing issues that other solutions run into.
The SafeStream technology ensures that assets can be forensically tracked to individual users, and watermarks deter IP theft.
MediaSilo’s review and approval tools allow for easy commenting and versioning. This helps everyone on the team to know if specific notes have been addressed. It is easy to send your collaborators a MediaSilo link, and they don’t have to worry about having an account, what tier they are on, or sync settings. MediaSilo’s strength is wrapping powerful features in a simple interface. If you need to send a collaborator a video file for review, it doesn’t get easier than MediaSilo.
Conclusion
Moving around massive video files is a challenge without the right tool. Sometimes, you just need to send someone a file, but other times, you need to gather notes, compare versions, and intelligently group assets. Video files present challenges that are different from syncing a bunch of documents. Tools like MediaSilo, and EditShare EFS can smooth out your workflow and simplify remote collaboration.
Data breaches are costly – creatively and financially. Trust your content to a product that values data security. With just a few clicks, you can easily protect pre-released or confidential content, ultimately protecting creative impact and revenue potential.
Users can now watermark images and documents with email, name and/or custom text with SafeStream technology at the Workspace, Project or Review Link level. Whether you’re trying to protect scripts, key art, screenplays or call sheets, we help keep your projects safe and sound. Sleep better knowing you don’t have to worry about waking up to a catastrophic content leak.
Apply Watermarking Requirements to Your Workspace
As an administrator, you can require visible image and document watermarking for every new project created in your workspace.
Start by clicking the gear icon in the left-side navigation bar, which will take you to the Administration page. In the SafeStream tab, select Watermark Settings from the menu to open your workspace-level watermark settings. Now, toggle on Apply Visible Image and Document Watermarking.
Next, use the dropdown menus under Image Template and Document Template and select your default watermark template to apply to new projects. You can choose a template that displays a viewer’s full name and email address, the viewer’s email address only or a custom template created for your workspace.
On all templates, the watermarks will be displayed in a “wallpaper” format, which repeats diagonally across the entire image or document.
Apply Watermarking to a Project
You can apply visible image and document watermarking to all images and documents inside a project, provided the files match our list of supported file types.
From the project settings, a project owner or administrator can find watermarking options in the SafeStream tab. Simply toggle on the Apply Visible Image and Document Watermarking tab and use the dropdown menu to select the template you want to apply to the images and documents in this project. Whichever template you choose, the viewer’s identifying information will be displayed in a “wallpaper” format, which repeats diagonally across the entire image or document.
Apply Watermarking to Unwatermarked Files in a Review Link
Applying watermarks to images and documents at the Review-Link level allows you to protect select items you’re sending without using those watermarks on the entire project.
Click the Advanced button in the bottom left in the Share for Review window, and toggle on the Apply Visible Image and Document Watermarking tab in the Watermarking section. The default templates chosen by your administrator will display automatically. You can keep these selections or choose a different template. Whichever template you choose, the viewer’s identifying information will be displayed in a “wallpaper” format, which repeats diagonally across the entire image or document.
If these watermark templates display a viewer’s identifying information, you must enter link recipients in the Audience tab on the left side of the share window.
Your choice of watermark template can affect the link’s Access setting.
If a watermark displays the viewer’s name, you must select Workspace users and enter workspace users as recipients.
If a watermark only shows the viewer’s email address, then you have the additional access options of Public and Password protected. When you select Public or Password protected, you can enter any email address in the recipients field, even if that email does not belong to your MediaSilo workspace.
For more detailed information, please visit our support page or contact us at sales@mediasilo for a demo.
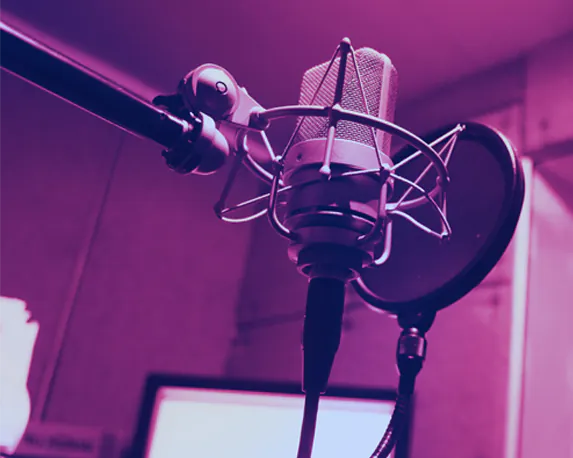
You already know how important good audio and sound is for a film. When was the last time you watched through the entirety of a video with bad-quality audio? As an audience, we can deal with a certain level of poor video quality, provided the sound quality is still good. However, as soon as the sound is bad, we’ll stop watching.
While filmmaking is a visual medium for storytelling, it’s undeniable that audio plays a huge role in the process. To create great films and videos, you need to produce great audio and sound. Let’s take a look at 8 tips to achieve great film audio production.
Microphone choices
First things first, let’s talk about microphones. Yes, every camera nowadays comes fitted with its in-built microphone, but let’s be honest…these simply don’t cut it.
If you’re serious about capturing great audio and sound, you must invest appropriately. Just as we invest in cameras to achieve beautiful visuals, we need to invest in microphones and develop professional microphone techniques to capture stunning audio.
For video production, there are two main microphones to consider:
Shotgun mics
Long and cylindrical, the shotgun microphone is directional. It picks up sounds directly in front of the mic while rejecting and toning down ambient sounds to the rear and sides.
Shotgun microphones are highly versatile, allowing you to capture all kinds of sound, from actor dialogue to room noise and wild sound. Because of its directional nature, you will need to think about where you place a shotgun microphone and how you use it. We’ll take a look at how to do this below.
Some of the broadcast-grade shotgun mics you may want to consider:
Lavalier microphones, often termed “lav mics” or “lavs” in the industry, are the classic small-form clip-on microphones you’ll see used frequently in interview videos or where a presenter is talking to the camera.
Unlike their shotgun counterparts, lavalier microphones are very small and designed to be lowkey and unobtrusive. Because of this, Lav mics don’t really pick up that much background noise. Lavs are much more about capturing quality, clear audio from the person they’re attached to.
Some of the broadcast-grade lavalier mics you may want to consider:
To boom, or not to boom? That’s a common question when tackling how to capture great audio during video production. As discussed above, there’s a clear difference between shotgun and lav mics. To capture really high-quality audio and sound for your film project, you need to consider the following:
Which one you’re going to use
When you’re going to use it
Where you’re going to use it
With a lavalier microphone, you’ll capture clear, crisp human speech from the actor. However, it can create a sense of closeness for the audience, which may feel a little jarring or strange if we’re watching a wide shot. This is where you need to think about the microphone perspective.
Shotgun microphones can be attached to a boom pole, which then gives you the freedom to experiment with the microphone perspective. If you’re looking for closeness, you can bring the boom in closer to the actor. Equally, if you’re going for a wider shot and want to capture a bit more of the room tone or environment, you can bring that boom away so that the audio recording feels more natural with what you see on screen.
Stop and listen
When you’re in the middle of production, firing on all cylinders and juggling ten things at once, it can be easy to forget to check your audio before hitting record. However, it’s an essential part of any professional production.
When you take the time to listen to your audio before each shot, you’re allowing yourself to catch any potential mistakes or errors. You may notice that you can hear the traffic from a distant highway or planes from a nearby flight path. All these details help you to adjust and rethink the way you shoot this particular scene. Or perhaps (I’ve experienced this plenty of times), you realize you need to switch on your microphone!
By taking the time and slowing down to listen and double-check things, we save ourselves a lot of pain further down the line in post-production.
Invest in necessary accessories
Again, just like with cameras, where we buy different lenses and ND filters for specific scenarios, along with tripods, lights and whatever else you can think of, you need to invest in additional accessories and gear for your audio-capturing gear.
Noise-canceling headphones
On the topic of listening to audio before shooting, it’s well worth purchasing a high-quality pair of noise-canceling headphones. These will eliminate all the background noise on set and enable you to focus on the actual sound of the film. This approach often helps you detect any potential mistakes that need to be smoothed out. When the guy with the headphones on set says do it again, you do it again.
Some of the best noise-canceling headphones you may want to consider are:
It’s advisable always to avoid filming in windy conditions at all costs. However, that’s sometimes easier said than done. As filmmakers, we can’t control the weather; therefore, it’s well worth ensuring all your microphones (lavaliers and shotguns) have deadcats. These fluffy mic buffs will shield the condenser from any unwanted noise, such as wind or even a sharp exhale of breath, that could cause the audio to clip and create all kinds of issues in the edit.
Compressors and limiters
Making use of compressors and limiters can help you to smooth out an audio signal. On many higher-end microphones, you may well find that they already come with an in-built option for limiting. Employing a limiter prevents the amplitude of a signal from exceeding a predetermined value. In other words, you hopefully stop any potential clipping from happening.
Meanwhile, a compressor will reduce the volume of louder sounds while amplifying quieter sounds. This effectively compresses the audio signal’s dynamic range, making it “smoother” and easier to work with.
Think about your location
When you’re location scouting in pre-production, don’t just analyze a space from a visual perspective. Think about location in terms of audio.
How does your voice carry in a certain location – is it bouncing off walls and echoing? Are you on a busy flight path? What elements of the environment can you control, and what can you not?
Developing location-sound strategies will help you immensely later in post. Ideally, the more things you control, the better.
Room tone
On the topic of location, it’s a great idea to pick up room noise and ambient sound from the places you shoot in. Think of this as Foley on set.
When you’re in post-production working on your film sound design (more on that below), it can be very difficult (often impossible) to recreate the exact ambiance and match it with the scene you’re working with. Sometimes called “room tone,” this process helps you precisely capture the tone of your room.
For this, you may want to invest in an audio recorder, or you can use something like a shotgun microphone. However, you do it, it’s a really useful habit to have, giving your sound designer much more to work with in the edit.
Clean dialogue
Depending on the type of video or film you’re making, you may want “clean dialogue” capture.
Even if two actors are interacting with each other, going back and forth in a scene, it’s a good idea to have them redo their lines afterward, just one actor at a time. Capturing these lines crisply and clearly, with no interference from anyone else, gives you much more to work with in post-production. Clean dialogue can allow you to speed up lines, cut them out, overlay them elsewhere, and perform many other little tricks in the edit.
Post-production
Typically, the phrase “we’ll fix it in post” should cause you to run for the hills. As a professional filmmaker, you should never rely on post-production as a surefire way to patch up bad production. However, certain elements of post-production audio are essential when it comes to quality audio and sound.
For example, don’t be afraid of SFX. Great filmmakers understand that not everything can be captured during production. When you’re editing your film, you need to work closely with SFX to help build out your environments with sound design, helping to bring the visuals to life and make the audience feel like they’re truly there. This is where capturing things like room tone and ambiance can lend a helping hand.
Additionally, if working with actors, you may also need to capture ADR (audio dialogue replacement) to ensure you’ve got the best-sounding edit possible.
Wrapping up
So, there are 8 great tips to help you capture great audio and sound in your next video. It’s a challenging part of the filmmaking process to perfect, and many filmmakers can shy away from it. However, as this arti
Large nearline server nodes directly connected to live production system
Boston, MA, January 16, 2024 – MTV Oy, the leading commercial television company and production house in Finland, recently relocated to a new center in the suburbs of Helsinki, seizing the opportunity for a major technical refresh. The facility serves multiple channels and streaming services, and a key part of the project was to migrate its extensive news and sport archive from tape, a task accomplished with EditShare providing the latest storage technology.
Central storage for all live production is provided by four nodes of EditShare EFS 60NL nearline storage, with a total capacity at present of eight petabytes. The EditShare storage is directly accessed by journalists and producers via their workstations, which are connected to production servers and asset management provided by EVS. The open architecture of EditShare EFS storage makes the integration seamless and transparent.
“It was important that journalists don’t have to care where the material is,” said Tommi Tynys, Head of Broadcasting Technology at MTV Oy. “Whereas getting content from the tape archive could take 30 minutes or more, now users search directly for what they need and it is instantly available to them. We need to take the fight to our competitors, to be first with the news, so performance is vital to us.”
The facilities at the new center are managed for MTV by NEP Finland, and the companies collaborated on designing the new architecture. The complete center was built by Broadcast Solutions Nordic, with Pipeline Media providing continuing support for the systems.
“One of the great things about EditShare is that the storage network is completely scalable,” said Jukka Keski-Loppi of Pipeline Media. “Our estimate is that the MTV archive will grow by 350 TB a year, and we can add storage as we need it without taking the system offline.”
MTV’s Tynys added that the system was also extremely reliable and resilient. “It took a while to transfer all our archive into EditShare,” he said. “But now it is running we have had zero downtime, even with a lot of users demanding simultaneous access.”
Stephen Tallamy, CTO at EditShare added “In demanding environments like MTV, nearline means virtually instant. We designed the EFS 60NL as an ultra-high density storage node for media that needs to be accessible, but does not need the performance of an online production workflow.
“That transforms the architecture of the news and sport facility: the complete archive can be online thanks to the very high storage density of our solution, and at the same time it’s available to all users, when they need it.”
The EditShare EFS 60NL is built for high performance media applications. It uses native erasure coding, eliminating the need for hardware-based RAID while providing complete resilience. The standard chassis holds 60 enterprise-grade disk drives, all hot swappable from the front of the rack.
EditShare is an Emmy Award-winning technology leader, supporting storytellers through collaborative media workflows across on-premise, cloud and hybrid architectures. The market-leading open software solutions and robust APIs improve workflow collaboration, third-party integrations and content sharing across the entire production chain. Designed specifically for media applications, the high performance line-up provides shared storage, archiving and backup, and intelligent media asset management.
Through a merger with Shift Media, EditShare now also integrates tools for content review and distribution, the creation of customised and branded pitch reels, and secure preview of high-value pre-release content.
About MTV Oy
MTV Oy is Finland’s leading commercial television company and video content house. MTV’s media family includes the MTV Katsomo streaming service, the TV channels MTV3, MTV Sub and MTV Ava, as well as MTV Uutiset, which broadcasts latest news on multiple channels.
MTV is part of Telia Company, one of the largest television companies in the Nordics, which leads the way for the development of the entire media industry.
An innovative workflow for the production of sports broadcasting for the Hangzhou Asian Games
The 19th Asian Games took place in Hangzhou in September and October 2023. Guangdong Radio and Television was contracted to cover the basketball competition on behalf of the host broadcast organization.
The goal was to provide high quality, exciting coverage in 4k Ultra HD of all the games, together with informative packages and summaries around the games. That called for sophisticated post production which could turn the content around very quickly.
Guangdong Radio and Television worked with EditShare’s partner in China, ThinkTone, to develop a core shared storage production system. This was built on a network of EFS storage nodes, linked by EditShare FLOW production asset management software.
FLOW makes it easy for users to find the material they need, and system administrators can direct individual content to bins in each edit workstation to speed up the process. FLOW panels are available for all the popular edit software packages, including Adobe Premiere Pro and BlackMagic DaVinci Resolve, so editors never have to leave the familiar environment.
Online Editing
Covering a major live sporting event is a big test for any production workflow, but the EditShare system delivered against all the demands. All the camera and other feeds, as SDI or IP, were acquired onto the EFS storage network whilst FLOW created proxies on ingest to make it easy for multiple users to start editing immediately. FLOW also automatically generated all the appropriate metadata to guide users to sort material.
Because ingest is completely automatic, it eliminates tedious linking and labeling in traditional workflows. Having both the full resolution and proxy material available maximizes the bandwidth while allowing large numbers of users to work simultaneously, creating different packages as the event is taking place. Editing while recording transforms the way that content is used in live events like this competition.
The result was lively and engaging coverage and analysis of every game of the tournament, thanks to the operational efficiency of the EditShare system. Operators and editors were able to focus fully on making the best possible content by saving them from dull and repetitive tasks, which were all fully automated.
The success of the project also paid tribute to the intuitive user interface, as well as the absolute reliability, of the EFS storage platform and FLOW production asset management. The EditShare environment ensured that the operators from Guangdong Radio and Television immediately felt sufficiently comfortable to rely on it for a very high profile, technically demanding production, with a large number of live events, all seen by audiences right across the continent.
It’s no secret that Automated Dialogue Replacement (ADR) is not the most revered part of post-production. ADR mixer Greg Crawford jokes that “there are three things people don’t want to do…number one, go to the dentist. Number two, go to the DMV. Number three, do ADR.”
Despite being often shunned or feared due to the perceived complexity of ADR (not to mention the extra work involved), it is a great way to improve audio quality and clean up less-than-perfect dialogue captured during production. Nowadays, the available tools and technologies make it a more viable, easier option than ever before.
A quick recap – what is ADR?
First up, let’s recap on what exactly ADR is. Automated Dialogue Replacement refers to the process of re-recording audio in post-production – typically in a more controlled, quieter setting.
There are a few main reasons why you may want to utilize ADR. These include:
Tech issues. There could have been a problem with the audio captured on set caused by a plane flying overhead or too much bleed-through from another actor’s microphone.
You may want to replace an actor’s vocal performance. This is particularly popular for (but not exclusive to) musicals.
If you’re creating a “TV safe” cut that removes the adult language, for example, ADR is a great way to achieve this.
Creative purposes. From time to time, both actors and directors prefer ADR. There’s a particularly famous example of this: Marlon Brando confessed to mumbling on purpose during his performance in “The Godfather” (1972). He wanted to see the final edit so that he could improve his performance with the full context!
The ADR process today
While the technology has advanced, the principle of ADR is the same. In general, you’ve got two different ways to carry out ADR. First, there’s visual ADR – the process by which an actor listens to a line of dialogue and then aims to match that line of dialogue while watching the performance on screen (with no sound).
Alternatively, you have audio ADR, where the actor will listen to the line of dialogue and recite that dialogue over and over, with the audio recording playing in their headset. It’s agreed that audio ADR may give a slightly better, more accurate result, but these different processes come down to the preference of actor and director.
How to achieve great ADR
Because ADR is recorded in a “clean” environment with no interference, it will most likely feel very jarring and completely wrong if you edit it straight into a scene. Audiences will know almost immediately that this audio was not recorded on set, and it will make for awkward viewing.
Expert ADR mixer Greg Crawford (responsible for ADR on blockbusters including Avengers Infinity War and Spiderman) gave a great interview, shedding light on the process of achieving great ADR.
Ultimately, he always aims to keep as much of the original production performance as possible. Sometimes, his ADR is as nuanced as just pulling a syllable or one word to cover for a moment where there was a rustle of clothing on set. He calls this “surgical ADR.”
However, there are other scenarios where full-blown ADR is called for. Greg discusses the “three Ps” of pitch, performance and placement. He’s constantly looking to match the actor’s ADR pitch and performance with the pitch and performance they gave during production. Alongside this, he’s always looking to match the placement of the microphones on set.
To achieve this:
The same microphones used on set during production are used for ADR
The microphone placement is the same as during production
The room is as large as possible (a smaller room creates more problems with reverb and echo)
The environment reverb is matched
The first three-pointers here are self-explanatory, but the fourth requires a little more work and begins on set.
Matching reverb with Adobe Audition
Reverb is a small detail, but it can make the difference between good ADR and great ADR. Considering you’re already recording room tone anyway, this isn’t too much extra hassle, as the folks at The Film Look expertly demonstrate on YouTube.
ADR recording software to consider
Naturally, when it comes to recording ADR, you’ll need to decide which software you will use for recording, editing and syncing the new dialogue. While the example of Adobe Audition is used above, there are plenty of others to consider:
Pro Tools is a popular, versatile DAW (digital audio workstation) offering plenty of features and plugins for ADR, including Revoice Pro, VocALign, EdiCue and EdiPrompt. You can record multiple takes, edit and refine the dialogue, sync it with video and export in various formats.
Nuendo is another specialized DAW with a dedicated ADR module. Processes such as spotting, cueing, recording, editing and syncing are all simplified here in an easy-to-use interface.
Meanwhile, Fairlight is a DAW integrated into the DaVinci Resolve suite. Its comprehensive ADR toolset enables you to record, edit and sync dialogue, all within the same interface as the video.
ADR recording hardware
Alongside software, there’s hardware. Greg Crawford touches on it briefly in his interview, confirming what you should already know. If you can, use the same microphones as used in production. It will make your job that much easier. When it comes to microphones, here are a few great choices to consider:
The Neumann U87 (mentioned in the interview with Greg)
The Sennheiser MKH 416
The Rode NT1-A
Meanwhile, the quality and compatibility of your hardware will undoubtedly impact the quality of your ADR. You may consider looking at intuitive controllers that adjust sound levels, sync and playback during your ADR session. Here are a few:
Avid S1
Steinberg CC121
Blackmagic Fairlight Desktop Console (great when paired with the Fairlight DAW)
Of course, a great pair of noise-canceling headphones will be needed, too. Popular throughout the industry are:
Beyerdynamic DT 770 Pro
Sony MDR-7506
AKG K240
Remote ADR collaboration tools
Post-covid (and in general, in modern times), it’s not always feasible to get everyone together in the same place at the same time. This is one of the most challenging aspects of ADR – coordinating and communicating with multiple people in different parts of the world and different time zones. Fortunately, there are some great tools out there that can enable you to carry out ADR remotely.
Source Connect effectively takes your studio global, allowing you to stream high-quality audio over the internet and record or monitor your ADR sessions remotely. You can integrate with other DAWs or even video conferencing platforms such as Zoom and Skype.
SessionLinkPRO is a web-based service where you can conduct ADR sessions using your browser and microphone. You’ll find an array of features, including video playback, chat, file transfer and encryption.
Meanwhile, cloud-based ipDTL offers video sync, ISDN bridging, multi-track recording and live streaming.
The future of ADR
In the past few years, AI has been a hot topic of discussion, advancing at a blistering pace and infiltrating just about every part of the filmmaking process. ADR is no exception. What has typically been a long, painstaking process of refinement, requiring many takes and long hours, could soon get a whole lot easier and shorter.
Check out this astonishing example of TrueSync in the movie “Fall” (2022).
Using AI, TrueSync analyses and tracks the performance of Virginia Gardener, recreates her face with a 3D model, removes her original dialogue, and then replaces it flawlessly with language that can take the scene from R-rated to PG13. You just watched the future of ADR.
This example demonstrates a new and exciting way of conducting ADR – one that could save hours of time, as well as money and resources. Lengthy processes in software such as Adobe Audition, where you have to sync up multiple tracks and experiment with impulse response recording files, could be rendered unnecessary. Things could be achieved with a few clicks.
While we’re not quite there yet, it’s clear that lip-synced dubs with custom-made AI-recreated voices could become commonplace in the next five to ten years. TrueSync is not the only example of how AI is starting to make its mark on the ADR space.
Lovo.AI, for example, now offers the ability to clone any voice and create high-quality custom voice content. Similarly, Murf.AI offers the tools to “clone once. Use forever” – a foreboding phrase that would make any SAG-AFTRA member rightly shudder. When you listen to the examples on these sites, they’re not quite there yet. But they are pretty impressive and, in some cases, definitely usable.
Other notable AI technologies doing a similar thing include Respeecher, which uses deep learning and neural networks to transform one voice into another (again, without requiring the original actors). And then there’s Lyrebird, which creates a digital copy of your voice using a few minutes of audio samples. Then, you can generate a totally new dialogue or alter the existing dialogue with different emotions, tones and effects.
The writing is on the wall here. This technology is only going to advance, and as we’ve already seen, the rate of that advance is extremely fast.
Wrapping up
So, that’s the rundown on the state of ADR today and where it’s headed tomorrow. It’s no secret that ADR has often been a laborious, tedious process (remember Greg Crawford’s joke about ADR being one of the only three things people hate to do). However, there are many great tools out there that ensure you can get the job done to the high-quality standards we expect from all big blockbusters.
As we move forward into a new post-production landscape in which AI increasingly dominates, we can expect to see drastic changes to how ADR is conducted in the future. If you told the folks experimenting with ADR in early 1930s Hollywood that one day, ADR may be an almost irrelevant, minuscule aspect of the post-production process, they may have fallen off their chairs.
MediaSiloallows for easy management of your media files, seamless collaboration for critical feedback, and out-of-the-box synchronization with your timeline for efficient changes. See how MediaSilo is powering modern post-production workflows with a 14-day free trial.
Josh is a filmmaker and storyteller based in Indonesia. He is passionate about travel and shares and documents adventures and stories through his films because he is a firm believer that travel is the greatest education tool out there. If you want to do anything in life, the experiences travel offers you can set you up with the perfect foundation on which to succeed.