Learn how to organize, review, secure and publish your content in MediaSilo by EditShare.
Have more questions? You can reach out to Product Support for technical issues or our Customer Success team for more information about your specific account.
MediaSilo’s panels for Adobe Premiere Pro, After Effects and DaVinci Resolve Studio* make uploading a breeze
Sometimes, at the end of a long editing session, you just want to hit “export” and call it night. But everyone has experienced waiting for exports to complete, then initiating an upload to a review platform, and then waiting for that to complete. Then, you have to wait for the transcode to complete. Then, you have to ensure it plays right and the watermark is applied. Then, you have to send emails to producers and directors. Next, you wait for their comments.
The next day, editors try to figure out how to match the comments from emails back into their timelines. Then, you have to be careful because making changes affects the timecode, which throws off another set of comments where a reviewer typed in the timecode in a Slack message. And so on.
MediaSilo’s Panels for Premiere Pro, After Effects and DaVinci Resolve Studio solve this whole mess for editors. Let’s investigate the panels and see how they can save you time and grief.
MediaSilo Panel for Premiere Pro and Resolve
The MediaSilo panel gives you access to assets in MediaSilo right within your NLE. It also allows you to export a timeline with a single click and have it uploaded into the right project folder on MediaSilo. You can choose your upload settings and identify the people who need to be notified. Once the team has made notes in MediaSilo’s review mode, you can immediately import those comments as markers into your sequence.
Those features streamline so many manual steps in the review and approval process. Basically, the MediaSilo panel gets you home in time for dinner.
DaVinci Resolve Studio
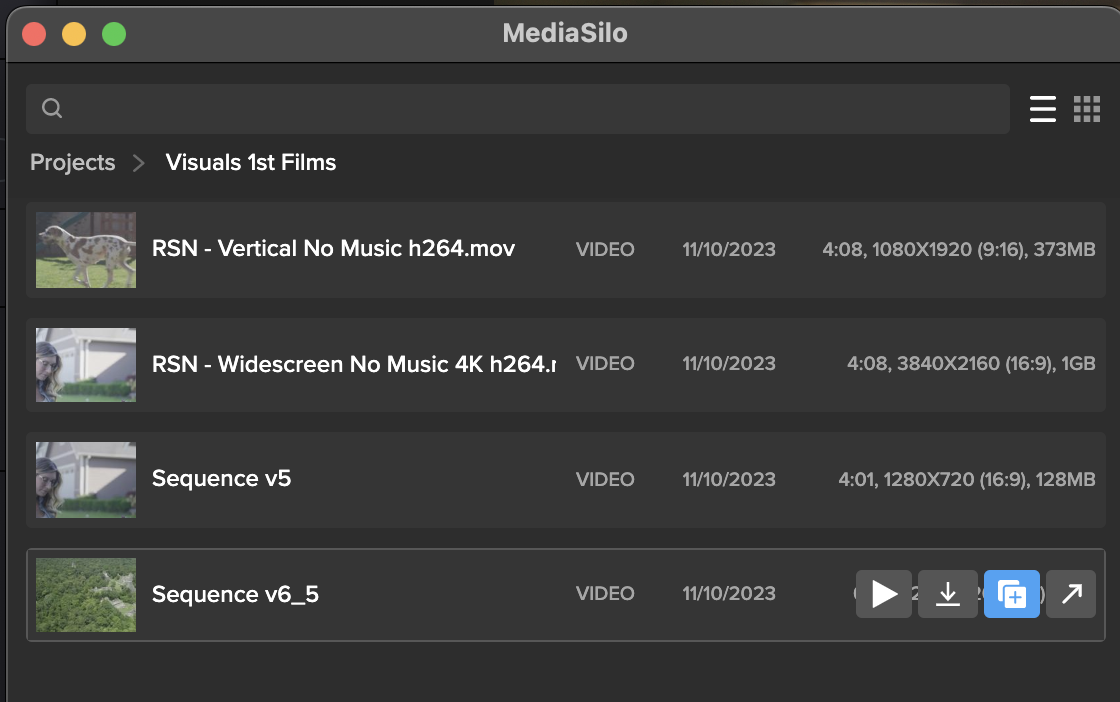
Once the panel is installed, Open DaVinci Resolve Studio and go to Workspace -> Workflow Integrations -> MediaSilo. A floating window appears with your projects. It uses a helper app called “Electron,” so don’t quit it. Your assets appear in the projects. When you float your mouse over each asset, you can preview (Resolve only), download, create a new version, or Open in MediaSilo.
Premiere Pro
Install the MediaSilo Panel from the Creative Cloud desktop app. Go to “Stock & Marketplace” and search for MediaSilo. Once the extension is installed in Premiere, open the Window menu > Extensions > MediaSilo.
After Effects
Install the MediaSilo Panel from the Creative Cloud desktop app. Go to “Stock & Marketplace” and search for MediaSilo. Once the extension is installed in After Effects, open the Window menu > Extensions > MediaSilo.
Downloading assets into your project
If you want to include one of your MediaSilo assets in your local project, just drag it into the media. If you prefer to download a proxy version, click the download icon and select “Proxy” from the drop-down menu. Proxies are smaller, lower-resolution versions of the original footage. They are handy when you are putting together a rough cut. And when your project is ready for color grading, you “conform” it to the original, high-resolution clips.
Exporting your timeline directly to MediaSilo is a breeze with the panel. Once you’ve completed your cut, click “Export Timeline” (Premiere says, “Export Sequence”) in the MediaSilo Panel. The “Export Sequence/Timeline” window opens up. You can choose your encoding preset based on your needs. Sometimes, you need the highest quality version to go up, and sometimes, you just need a lower-resolution version for quick approval. Choose the whole sequence or just from the In/Out points. You can specify a title and add a description that will appear in MediaSilo.
“Upload Location” is the next option. Start typing the project name, folder or asset with which this upload should be associated. This step is important because an editor may work on projects with different security levels.
The “Recipients” field saves you the hassle of waiting for an upload to complete before notifying reviewers. Enter the names of the individuals who need to receive a review link, and they will be notified once the asset is ready for viewing.
Create a new version of your timeline
Typically, when I’m ready to output a new version of an edit, I export it from the timeline. If the service I’m using for review and approval (non-MediaSilo) keeps track of versions, I usually just cross my fingers and hope it picks up on the new file coming in. Most of the time, I just append a “v2” or “v3,” and then manually identify it as a new version once the upload has completed. Then, I send a message to alert the reviewer.
The MediaSilo panel takes a different, more efficient approach. This feature is so simple that it took me a moment to understand how it works.
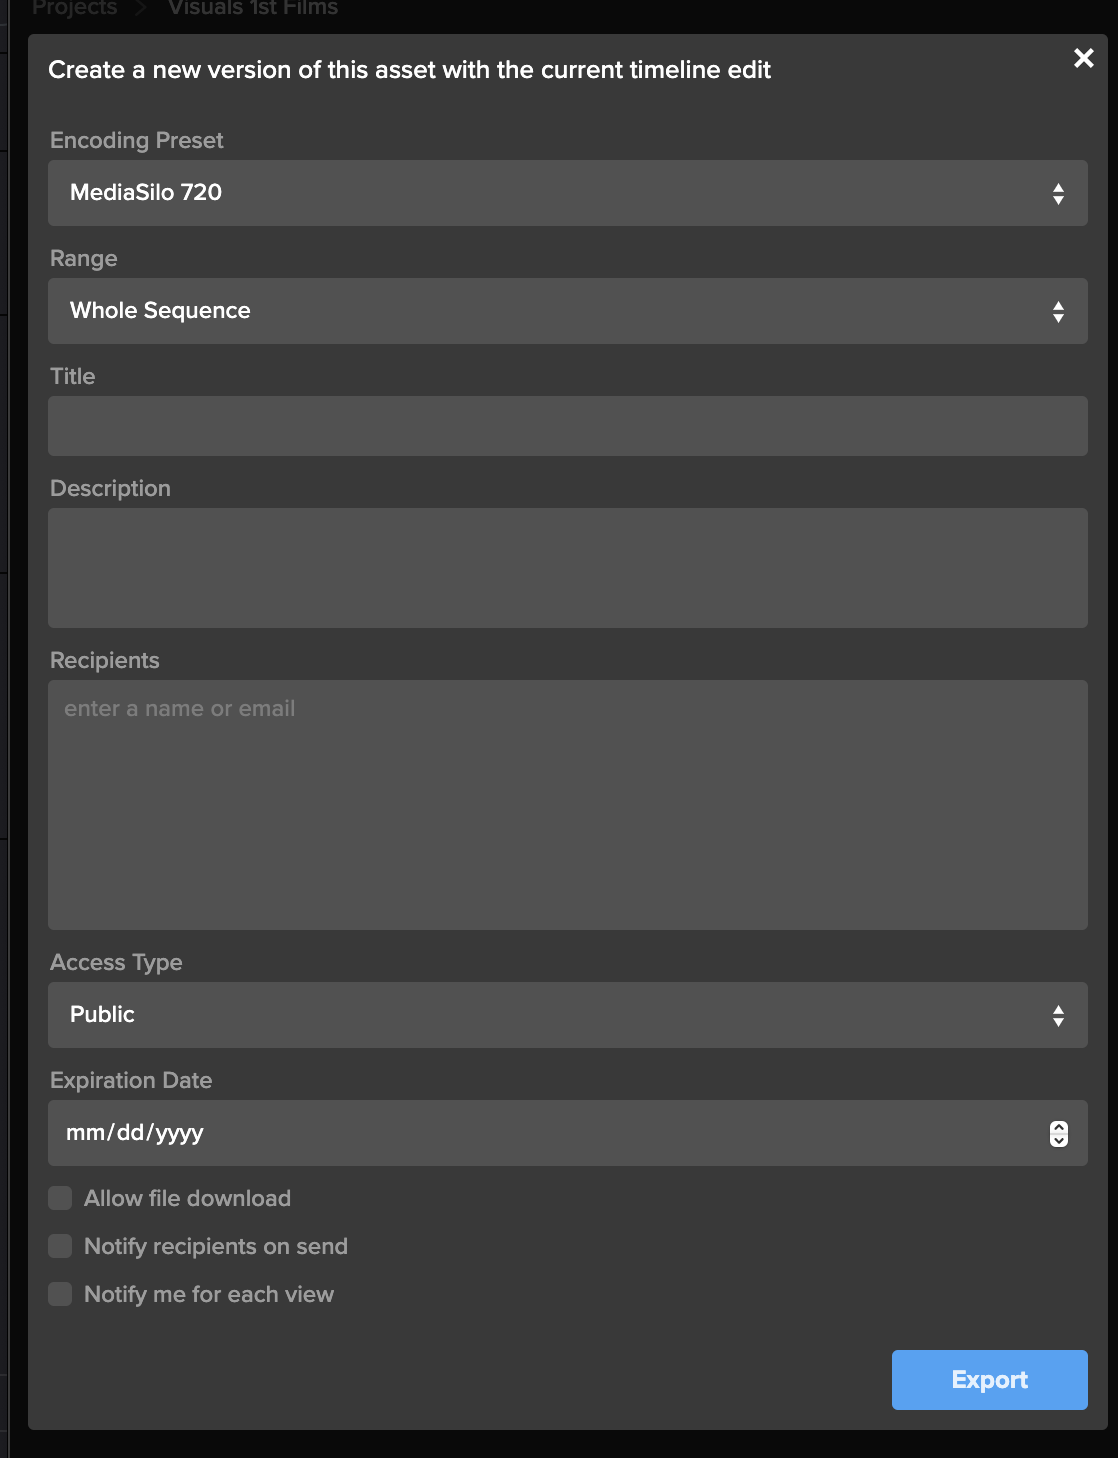
This process applies if you have already exported your timeline once and you need to export another version after some changes have been made. Select the clip in the panel and click on the button to share a new version.
This will bring up the export window. Rather than simply exporting the asset, all these options are designed to help you streamline creating a new version of the asset. This way, you can give the new version its own title, and MediaSilo will keep it associated with the initial version. This means the links that you have previously sent out will continue to work.
You can even change the access on the new version, and reviewers will be notified when it is ready. You’ll also receive a notification when they view it. This little box saves so many steps in the process of exporting compared to the process I outlined at the beginning of this section.
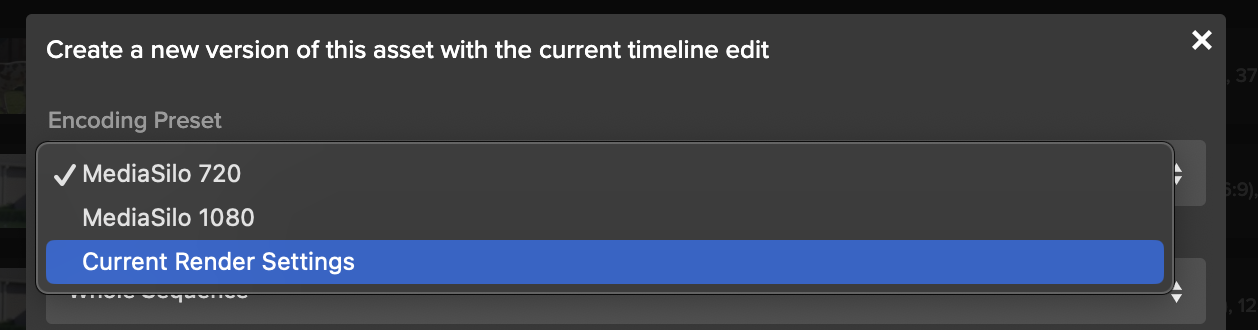
Encoding Presets
The encoding presets section allows you to choose the resolution for your upload. Sometimes, you need to get a change up quickly or share a low-quality version with a collaborator. So you can choose a lower-resolution setting. If you need to upload at a higher quality, choose your “current render settings.”
Watermarking and security
If you have watermarking turned on with your project, that will get automatically applied in MediaSilo. This is really helpful for editors because they don’t need to turn on and off a watermark within their NLE. In addition to the visible watermark, MediaSilo supports forensic watermarking with SafeStream. This technology ensures that any leaks can be traced back to their source.
MediaSilo also supports the ability to use your own custom email server for email notifications and 2-factor authentication — to ensure an even higher level of security.
Support articles
MediaSilo offers support articles for Resolve, Premiere and After Effects that show you how to install and use the panels in detail.
Conclusion
The MediaSilo panels in DaVinci Resolve Studio and Adobe Premiere Pro will save you time and energy. They help to make collaboration, review and approval a much more streamlined process.
*Note: The MediaSilo + DaVinci Resolve Studio integration is only available on the DaVinci Resolve Studio paid tier. You can find their pricing here.
Please complete the form below and we’ll get in touch!
When you send large video files, you can encounter all sorts of challenges. When your team is collaborating on a video project, you often have to send multiple versions, track review and approval comments, and make sure everything is secure. However, video collaboration workflows are more demanding than your typical cloud-based file-sharing workflows. This can be even more challenging when the creative team and the IT team propose different solutions for sharing video files.
Here are 10 of the top ways to share large video files and their pros and cons. I’ll also share things I wish IT knew about the unique demands of video review and approval processes. So, let’s dig in to find out which solution is best for your video collaboration workflow.
WeTransfer
WeTransfer’s simple interface makes it easy to share files up to 2GB. To upload larger files, you’ll need to upgrade to Pro or Premium.
WeTransfer uses a web browser interface for uploading. With some browsers, like Safari, you can run into an issue where the browser will time out before your large upload is complete. This isn’t the case when apps feature an app that installs on your local machine.
While WeTransfer Pro does a great job of sharing your final exports in the delivery phase of your project, it lacks review and approval features, so it might not be the right tool for collaborating during the post-production phase.
The other major drawback is that WeTransfer does not recover well from an interrupted file transfer. You’ll need to re-initiate if your transfer is interrupted (maybe due to a bad WiFi connection). If your upload is a large file, this can mean a significant amount of lost time, and you still won’t know if it will complete on a second go-around.
Dropbox
Dropbox is well known for its ability to sync files between the cloud and your various devices. But since DropBox Business Plus caps file sizes at 250GB, it runs into similar constraints as WeTransfer Pro. DropBox does feature “Replay,” which allows for commenting on videos, but it is not available on the least expensive plan. Additionally, the replay feature is limited to 10 file uploads on their top plan.
While Dropbox offers reliable syncing, it can be confusing when working with two different organizations. It tends to demand that both parties upgrade. That makes it confusing when you are trying to figure out who is hosting which files. A common question that arises is, “If I delete this file on my computer, will it vanish from yours?”
Post-production professionals need to know that they can deliver files without confusing mismatched subscription tiers between vendors. So, if you find yourself dealing with multiple projects and multiple clients, getting everyone to collaborate through Dropbox is a tall order.
Box
Box enjoys a solid reputation for handling lots of smaller files well. Their lowest tier caps file sizes at 250MB. (The highest tier caps out at 150GB per file). This gives you an idea of where their emphasis lies. There are no review or commenting features associated with videos.
Box is a great example of the difference between typical workflows that IT supports vs. media workflows. While an IT team may be accustomed to supporting petabytes of small files, this is different from workflows that have a smaller overall footprint, but the individual files are larger.
Google Drive
Google knows how to sync and send large files. Google Drive is inexpensive and reliable. Google offers a web interface and a downloadable app that syncs locally. The downloadable app is more reliable than the web interface for large transfers.
However, by many accounts, Google Drive is slower than Dropbox. My personal experience is that Google will eventually get your file uploaded. But sometimes, you can run into a frustrating scenario where interrupted syncs hang. This causes Google to stall out until Google Drives figures out that a file has been moved or renamed. This can put a halt to your other uploads.
Google also changed how sharing works between paying and free users.
If everyone within an organization is on a paid tier, then file sharing works well. But if you are sharing between organizations, Google will basically push both sides to upgrade. It is frustrating because you cannot know whether the person on the other side of the share has a paid account. I just ran into this a couple of weeks ago. I had a paid version, and the other team had free accounts (but I didn’t know this). The other team had to get their CEO to join the shared folder to accept my shared folder because he had a paid account.
Post-production pros need to know that the delivery of their assets is friction-free. You don’t want your client hit with promotional “nag-ware” when you are trying to deliver your final assets.
OneDrive
Microsoft enjoys a solid reputation with IT teams for good reason. Their products cater to the needs of corporate users. Microsoft places an emphasis on security and integration with Windows.
However, OneDrive is not oriented toward post-production. It lacks features oriented toward video review and approval and version tracking. This makes it a good solution for sharing graphics and project files, but it isn’t great for managing video projects.
Vimeo
Vimeo has been the champion for preserving video quality for films delivered to the web. Vimeo is a great tool for the distribution of assets online, where video quality trumps workflow efficiency. It works well for embedding your finished project on your website. In the past few years, Vimeo has also been adding collaboration, AI, and live-streaming features.
However, in my personal experience, I have found uploading to Vimeo painfully slow. Transcoding also seems to take longer than other services. It will be interesting to see if Vimeo’s performance can keep pace with their aspirations.
Resilio
Resilio uses P2P technology to facilitate the syncing of large files between multiple collaborators. This is a powerful technology, but it does require the app to be installed on the computers of both the sender and the recipient. This means Resilio is a nice solution for frequent collaborators. However, it’s really a no-go for client work where somebody just wants to click a link, quickly compare versions, and leave some comments.
Frame.io
Adobe’s frame.io platform is a popular solution for review and approval. It features integration into popular NLEs, and tools for managing versions. Adobe is working to incorporate AI features into frame.io as well.
However, my experiences with frame.io over the past year have been challenging. They’ve acknowledged these challenges and reported that they are working on an overhauled version of their software.
Infrastructure solutions: Aspera, Signant, and EditShare EFS
IBM Aspera and Signant Media Shuttle are robust solutions that integrate your team’s IT infrastructure. They’re often used by broadcasters to move large files. However, many teams are finding challenges with these solutions. And they are expensive.
EditShare EFS has built-in file acceleration for large transfers from one EFS system to another. This can be particularly advantageous to customers who have multiple facilities and the transfer software is included in the standard EFS license – no additional costs are involved.
MediaSilo
MediaSilo delivers a platform designed specifically to tackle the challenges of video collaboration. It integrates right into Adobe Premiere Pro and DaVinci Resolve. This allows editors to save huge amounts of time when exporting, uploading, and versioning.
MediaSilo allows users to upload through the browser or the desktop app. MediaSilo’s robust uploader gives you real-time feedback on the speed and progress of your uploads. If you’re connection is interrupted, MediaSilo does a great job of completing the transfer when you are reconnected. It is also easy to cancel an upload and clear the queue. This avoids the hangs and syncing issues that other solutions run into.
The SafeStream technology ensures that assets can be forensically tracked to individual users, and watermarks deter IP theft.
MediaSilo’s review and approval tools allow for easy commenting and versioning. This helps everyone on the team to know if specific notes have been addressed. It is easy to send your collaborators a MediaSilo link, and they don’t have to worry about having an account, what tier they are on, or sync settings. MediaSilo’s strength is wrapping powerful features in a simple interface. If you need to send a collaborator a video file for review, it doesn’t get easier than MediaSilo.
Conclusion
Moving around massive video files is a challenge without the right tool. Sometimes, you just need to send someone a file, but other times, you need to gather notes, compare versions, and intelligently group assets. Video files present challenges that are different from syncing a bunch of documents. Tools like MediaSilo, and EditShare EFS can smooth out your workflow and simplify remote collaboration.
You already know how important good audio and sound is for a film. When was the last time you watched through the entirety of a video with bad-quality audio? As an audience, we can deal with a certain level of poor video quality, provided the sound quality is still good. However, as soon as the sound is bad, we’ll stop watching.
While filmmaking is a visual medium for storytelling, it’s undeniable that audio plays a huge role in the process. To create great films and videos, you need to produce great audio and sound. Let’s take a look at 8 tips to achieve great film audio production.
Microphone choices
First things first, let’s talk about microphones. Yes, every camera nowadays comes fitted with its in-built microphone, but let’s be honest…these simply don’t cut it.
If you’re serious about capturing great audio and sound, you must invest appropriately. Just as we invest in cameras to achieve beautiful visuals, we need to invest in microphones and develop professional microphone techniques to capture stunning audio.
For video production, there are two main microphones to consider:
Shotgun mics
Long and cylindrical, the shotgun microphone is directional. It picks up sounds directly in front of the mic while rejecting and toning down ambient sounds to the rear and sides.
Shotgun microphones are highly versatile, allowing you to capture all kinds of sound, from actor dialogue to room noise and wild sound. Because of its directional nature, you will need to think about where you place a shotgun microphone and how you use it. We’ll take a look at how to do this below.
Some of the broadcast-grade shotgun mics you may want to consider:
Lavalier microphones, often termed “lav mics” or “lavs” in the industry, are the classic small-form clip-on microphones you’ll see used frequently in interview videos or where a presenter is talking to the camera.
Unlike their shotgun counterparts, lavalier microphones are very small and designed to be lowkey and unobtrusive. Because of this, Lav mics don’t really pick up that much background noise. Lavs are much more about capturing quality, clear audio from the person they’re attached to.
Some of the broadcast-grade lavalier mics you may want to consider:
To boom, or not to boom? That’s a common question when tackling how to capture great audio during video production. As discussed above, there’s a clear difference between shotgun and lav mics. To capture really high-quality audio and sound for your film project, you need to consider the following:
Which one you’re going to use
When you’re going to use it
Where you’re going to use it
With a lavalier microphone, you’ll capture clear, crisp human speech from the actor. However, it can create a sense of closeness for the audience, which may feel a little jarring or strange if we’re watching a wide shot. This is where you need to think about the microphone perspective.
Shotgun microphones can be attached to a boom pole, which then gives you the freedom to experiment with the microphone perspective. If you’re looking for closeness, you can bring the boom in closer to the actor. Equally, if you’re going for a wider shot and want to capture a bit more of the room tone or environment, you can bring that boom away so that the audio recording feels more natural with what you see on screen.
Stop and listen
When you’re in the middle of production, firing on all cylinders and juggling ten things at once, it can be easy to forget to check your audio before hitting record. However, it’s an essential part of any professional production.
When you take the time to listen to your audio before each shot, you’re allowing yourself to catch any potential mistakes or errors. You may notice that you can hear the traffic from a distant highway or planes from a nearby flight path. All these details help you to adjust and rethink the way you shoot this particular scene. Or perhaps (I’ve experienced this plenty of times), you realize you need to switch on your microphone!
By taking the time and slowing down to listen and double-check things, we save ourselves a lot of pain further down the line in post-production.
Invest in necessary accessories
Again, just like with cameras, where we buy different lenses and ND filters for specific scenarios, along with tripods, lights and whatever else you can think of, you need to invest in additional accessories and gear for your audio-capturing gear.
Noise-canceling headphones
On the topic of listening to audio before shooting, it’s well worth purchasing a high-quality pair of noise-canceling headphones. These will eliminate all the background noise on set and enable you to focus on the actual sound of the film. This approach often helps you detect any potential mistakes that need to be smoothed out. When the guy with the headphones on set says do it again, you do it again.
Some of the best noise-canceling headphones you may want to consider are:
It’s advisable always to avoid filming in windy conditions at all costs. However, that’s sometimes easier said than done. As filmmakers, we can’t control the weather; therefore, it’s well worth ensuring all your microphones (lavaliers and shotguns) have deadcats. These fluffy mic buffs will shield the condenser from any unwanted noise, such as wind or even a sharp exhale of breath, that could cause the audio to clip and create all kinds of issues in the edit.
Compressors and limiters
Making use of compressors and limiters can help you to smooth out an audio signal. On many higher-end microphones, you may well find that they already come with an in-built option for limiting. Employing a limiter prevents the amplitude of a signal from exceeding a predetermined value. In other words, you hopefully stop any potential clipping from happening.
Meanwhile, a compressor will reduce the volume of louder sounds while amplifying quieter sounds. This effectively compresses the audio signal’s dynamic range, making it “smoother” and easier to work with.
Think about your location
When you’re location scouting in pre-production, don’t just analyze a space from a visual perspective. Think about location in terms of audio.
How does your voice carry in a certain location – is it bouncing off walls and echoing? Are you on a busy flight path? What elements of the environment can you control, and what can you not?
Developing location-sound strategies will help you immensely later in post. Ideally, the more things you control, the better.
Room tone
On the topic of location, it’s a great idea to pick up room noise and ambient sound from the places you shoot in. Think of this as Foley on set.
When you’re in post-production working on your film sound design (more on that below), it can be very difficult (often impossible) to recreate the exact ambiance and match it with the scene you’re working with. Sometimes called “room tone,” this process helps you precisely capture the tone of your room.
For this, you may want to invest in an audio recorder, or you can use something like a shotgun microphone. However, you do it, it’s a really useful habit to have, giving your sound designer much more to work with in the edit.
Clean dialogue
Depending on the type of video or film you’re making, you may want “clean dialogue” capture.
Even if two actors are interacting with each other, going back and forth in a scene, it’s a good idea to have them redo their lines afterward, just one actor at a time. Capturing these lines crisply and clearly, with no interference from anyone else, gives you much more to work with in post-production. Clean dialogue can allow you to speed up lines, cut them out, overlay them elsewhere, and perform many other little tricks in the edit.
Post-production
Typically, the phrase “we’ll fix it in post” should cause you to run for the hills. As a professional filmmaker, you should never rely on post-production as a surefire way to patch up bad production. However, certain elements of post-production audio are essential when it comes to quality audio and sound.
For example, don’t be afraid of SFX. Great filmmakers understand that not everything can be captured during production. When you’re editing your film, you need to work closely with SFX to help build out your environments with sound design, helping to bring the visuals to life and make the audience feel like they’re truly there. This is where capturing things like room tone and ambiance can lend a helping hand.
Additionally, if working with actors, you may also need to capture ADR (audio dialogue replacement) to ensure you’ve got the best-sounding edit possible.
Wrapping up
So, there are 8 great tips to help you capture great audio and sound in your next video. It’s a challenging part of the filmmaking process to perfect, and many filmmakers can shy away from it. However, as this arti
Large nearline server nodes directly connected to live production system
Boston, MA, January 16, 2024 – MTV Oy, the leading commercial television company and production house in Finland, recently relocated to a new center in the suburbs of Helsinki, seizing the opportunity for a major technical refresh. The facility serves multiple channels and streaming services, and a key part of the project was to migrate its extensive news and sport archive from tape, a task accomplished with EditShare providing the latest storage technology.
Central storage for all live production is provided by four nodes of EditShare EFS 60NL nearline storage, with a total capacity at present of eight petabytes. The EditShare storage is directly accessed by journalists and producers via their workstations, which are connected to production servers and asset management provided by EVS. The open architecture of EditShare EFS storage makes the integration seamless and transparent.
“It was important that journalists don’t have to care where the material is,” said Tommi Tynys, Head of Broadcasting Technology at MTV Oy. “Whereas getting content from the tape archive could take 30 minutes or more, now users search directly for what they need and it is instantly available to them. We need to take the fight to our competitors, to be first with the news, so performance is vital to us.”
The facilities at the new center are managed for MTV by NEP Finland, and the companies collaborated on designing the new architecture. The complete center was built by Broadcast Solutions Nordic, with Pipeline Media providing continuing support for the systems.
“One of the great things about EditShare is that the storage network is completely scalable,” said Jukka Keski-Loppi of Pipeline Media. “Our estimate is that the MTV archive will grow by 350 TB a year, and we can add storage as we need it without taking the system offline.”
MTV’s Tynys added that the system was also extremely reliable and resilient. “It took a while to transfer all our archive into EditShare,” he said. “But now it is running we have had zero downtime, even with a lot of users demanding simultaneous access.”
Stephen Tallamy, CTO at EditShare added “In demanding environments like MTV, nearline means virtually instant. We designed the EFS 60NL as an ultra-high density storage node for media that needs to be accessible, but does not need the performance of an online production workflow.
“That transforms the architecture of the news and sport facility: the complete archive can be online thanks to the very high storage density of our solution, and at the same time it’s available to all users, when they need it.”
The EditShare EFS 60NL is built for high performance media applications. It uses native erasure coding, eliminating the need for hardware-based RAID while providing complete resilience. The standard chassis holds 60 enterprise-grade disk drives, all hot swappable from the front of the rack.
EditShare is an Emmy Award-winning technology leader, supporting storytellers through collaborative media workflows across on-premise, cloud and hybrid architectures. The market-leading open software solutions and robust APIs improve workflow collaboration, third-party integrations and content sharing across the entire production chain. Designed specifically for media applications, the high performance line-up provides shared storage, archiving and backup, and intelligent media asset management.
Through a merger with Shift Media, EditShare now also integrates tools for content review and distribution, the creation of customised and branded pitch reels, and secure preview of high-value pre-release content.
About MTV Oy
MTV Oy is Finland’s leading commercial television company and video content house. MTV’s media family includes the MTV Katsomo streaming service, the TV channels MTV3, MTV Sub and MTV Ava, as well as MTV Uutiset, which broadcasts latest news on multiple channels.
MTV is part of Telia Company, one of the largest television companies in the Nordics, which leads the way for the development of the entire media industry.
In my last blog, I introduced the thinking behind our new workflow management layer, EditShare One. If you have not read that yet, you can find it here. In this blog I’ll explain how it is used in a real-world production.
Footage is shot, in a studio or on location. Those files are ingested into the shared storage, along with the metadata. That may include information from a production assistant on set, about good or bad takes and other details.
Depending on the nature of the production, a producer or director may want to make another decision on preferred takes, or an edit assistant will need to build bins making it clear to the editor which is likely to be the best material.
The editor then cuts the scene and hands it on for review. That may lead to rework later, or the scene may be locked ready for final assembly and finishing. In parallel, the sound designer will be mixing and sweetening the audio to match the cut.
The producer will be monitoring progress at all times and will be commenting on scenes as they are cut, giving notes to the editor and sound designer. The final cut will be passed to the colorist, and again the producer and director will make comments on the grade.
There may be other people taking note of the progress too. For marketing, there may be a second editorial team creating trailers and teasers, for example. Where an independent company is making programmes for a broadcaster, the executive producer will want to check progress.
The huge advantage of collaborative file-based workflows is that every stage is non-destructive. You can go back and tweak any stage of the post production until everyone is happy, because all of the material is still available in the shared storage.
EditShare One and the Produce Tool provide access to the material throughout the process. There is a single sign-on to all the content and metadata, but each user has different requirements, and will be presented with different tools, different media and metadata, and different capabilities.
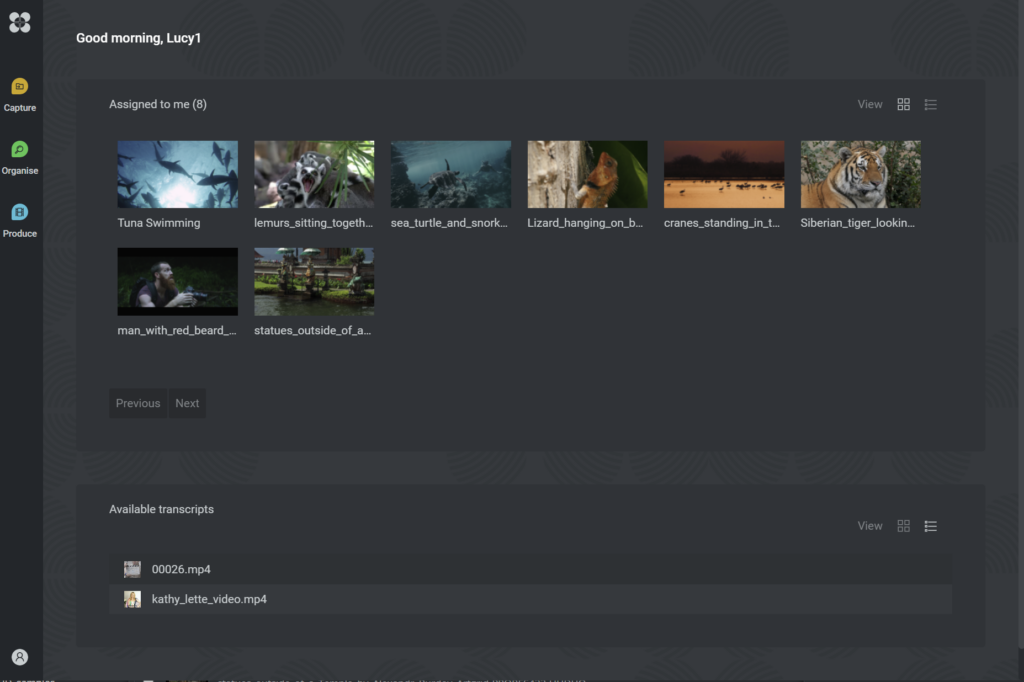
A producer could be alerted to new cuts that need to be reviewed and signed off. The user interface would simply offer the new material, a player, and a text tool for comments. No need to know how the underlying technology works, or even where the content is at that moment: just focus on the job at hand.
More generally, the Produce tool is a simple dashboard that saves time and potential confusion in searching through media spaces and folders. It is completely independent of all the other tools, so users simply see what is relevant to them.
For the editor, the EditShare One intuitive interface appears as a panel within the edit software itself. Editors are, of course, free to choose whichever software package works best for them, but within the Adobe or DaVinci user interface is a panel or integration tool which is linked to EditShare FLOW asset management and its management tools.
Producers can highlight interest points in transcriptions through EditShare One’s web-based UI, which editors can then import using the FLOW panel. Services, like AI speech-to-text transcriptions, can also be seen in the FLOW panel to speed up work even further. This automated process creates rough cuts or integrates selected clips into Adobe Premiere sequences, enhancing overall efficiency in the editing process.
Once the sequence or program is completed, the same simple user interface exports it as new material in the shared storage and drives it to other EditShare One users who need to see it.
The goal is to make it simple to create and expedite collaborative workflows, wherever the individuals are, by offering just the functionality and material each needs, at the time they need it. By simplifying everyone’s working environment, more time is available to concentrate on making great content.
Production workflows have become way more complicated than they used to for all sorts of reasons, but there are ways to keep the complexity under control.
The move from film or tape to files has had the incidental effect of massively increasing shooting ratios. It is simply easier to do more takes with more cameras, and keep them all, when they are “just” digital files.
It wasn’t that long ago when holiday-makers had to take one or maybe two rolls of 36-exposure film on a vacation and carefully choose the moments they wanted to capture. Now our cameras and phones get filled with hundreds, maybe thousands of pictures which we later need to sort out. The same has happened for the movie and television industry.
While shooting ratios have gone up, timescales have often been reduced. The goal is to get from set to screen as quickly as possible, especially to start recouping production costs.
More material; less time. We have to find a better way to work.
Many production workflows are still rooted in old, linear methods. Which is understandable: if you are trying to complete a project, then having proven and comfortable practices can be very reassuring. But it is definitely time to rethink the way we work.
The idea of having a central place for all the assets that make up a production is not new. All the material comes into a single server, and everyone who needs to access it can log in. Completed work gets written back to the same server, making the process convenient and streamlined.
This is great. But the challenge is that this “single server” might actually be a distributed set of storage nodes, on location, in a post house, at the production company, or in the cloud. The system that is tracking all the material needs a single database that covers all these locations.
Also, the content might come in different formats: the camera resolution (and there may be more than one camera type); the edit format (perhaps with a proxy for remote editing); and the delivery packages. Metadata needs to track not only formats and resolutions, but also the points at which value judgements are applied: quality control; editorial decisions.
But our main goal is to create the best possible television programme or movie, which means everyone, at every stage, needs to devote their energies on their part of the production without getting bogged down in the complexities of the underlying media management system.
The goal, then, is to have a high functionality, agile storage infrastructure that can handle multiple formats (and converting between them), is geographically diverse, and can manage metadata. That is exactly what EditShare FLOW was designed for.
But on top of that you need a simple, intuitive, role-appropriate user interface, so that each person in the creative team sees the information and content they need: no more; no less.
That is why we have developed EditShare One: the next generation of workflow management. One single sign-on; one place for capture, edit, review and deliver; one platform for production collaboration.
What makes this possible is a single user interface concept that is infinitely customizable. Every user has their own dashboard, showing them just the content and features they need. These dashboards are dynamic, so tasks can be assigned as needed, with all resources available.
We think EditShare One is a transformative leap forward in workflow management. It makes collaborative production environments practical and productive, and leaves creative people free to get on with creative tasks.
In my next blog I’ll look at a typical workflow, using the Produce Tool within EditShare One.