The MediaSilo by EditShare team designed this guide to cover the major factors affecting post-production for each of the major camera platforms currently popular in production.
With so many different types of cameras on the market, it’s difficult to keep up with the specific features of each. The MediaSilo by EditShare team designed this guide to cover the major factors affecting post-production for each of the major camera platforms currently popular in production. Our goal with this guide was to help you know what questions to ask and what to expect when coming on to a production shooting on any of these systems.
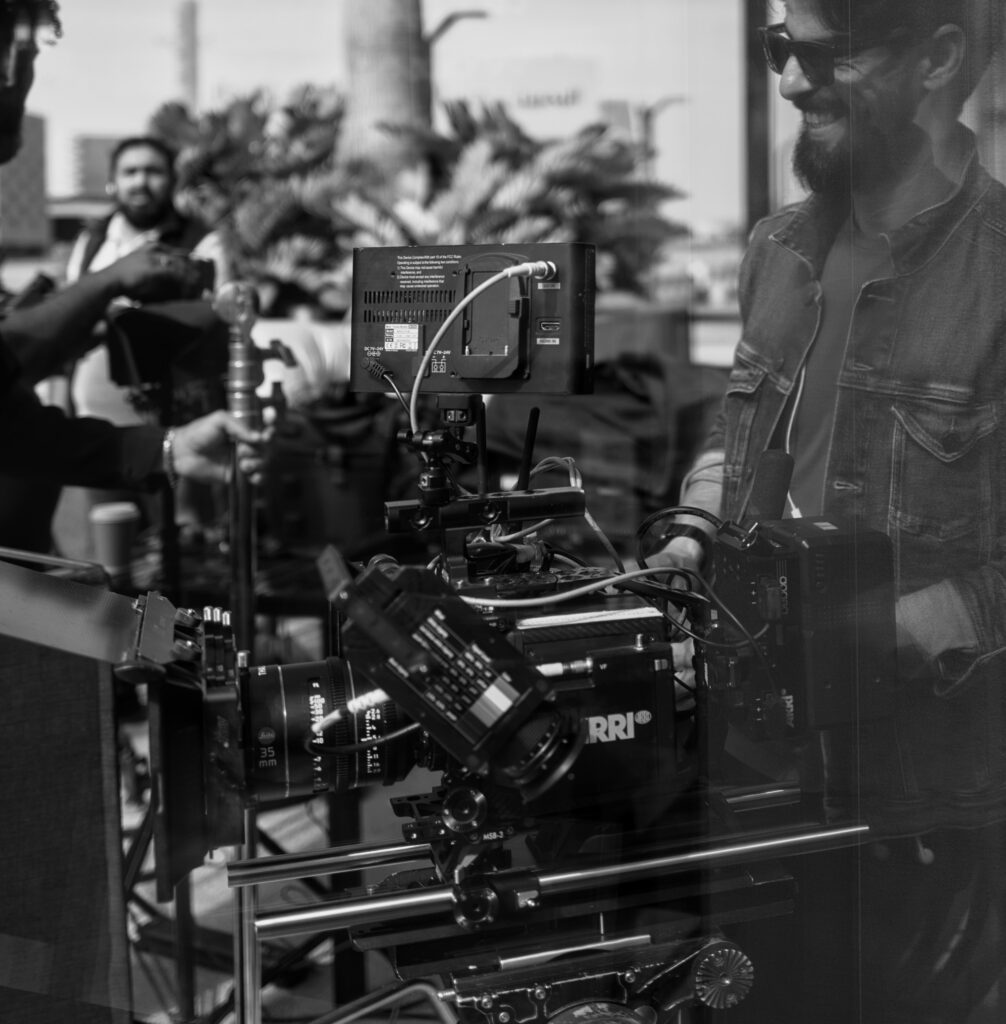
ARRI ALEXA
ARRI has been a dominant camera maker for going on 100 years now, and the ARRI ALEXA platform is a widespread capture format across motion pictures, television, commercials and music videos.
The ALEXA platform can shoot into both video files (in either ProRes or DNx formats, depending on your workflow) in either the .mxf or .mov wrappers) or into RAW. For a long time, RAW was less common on ALEXA jobs since it required renting an accessory recorder that significantly raised costs, but for several years now .ARRIRAW capture has been built into the system.
RAW isn’t the default on mid or low-budget projects, as the files are massive. Working with RAW requires a lot of post-processing to handle and more hard drive space for downloading and backup. The larger productions default to .ARRIRAW, but many smaller productions will shoot video files in Log.
The ARRI Log format is known as Log C, and there is a LUT available on the ARRI website to support it. Currently, there are two versions of the Log C LUT in common use: LogC3, which is the newest LUT for earlier generations of the ALEXA, and LogC4, which is used for the new color science that came with the ALEXA 35 and that is supported with the LF and Mini LF. ALEXA Log C color (both 3 and 4) is also fully implemented in the ACES workflow and Resolve Color Management. In fact, the ALEXA implants a flag in the video files so that Resolve can auto-detect if it was shot in Log C, in which version, and automatically transforms it to linear video when working in Resolve Color Management.
The ALEXA platform doesn’t typically support recording simultaneously to RAW and video proxies, though that isn’t recommended anyway when working with a single-card camera like the ALEXA lineup. Doing simultaneous RAW and proxy recording to a single card increases data management time and hard drive expense.
The ALEXA has a common timecode input standard for the industry, 5-pin LEMO. It also reputationally has one of the better internal timecode clocks that seems to drift less than others, but there is still some drift, and timecode should be jammed at least twice a day.
While it seems like the ALEXA lineup has everything a post team might want, the lineup does have some hiccups that post teams should be aware of, especially around the area of audio. The most notable is that the full-sized ALEXA LF only has a 5-pin XLR input (instead of the normal 3-pin) and the Mini LF uses the obscure and pricey 6-pin LEMO connection. This special connector is for a single-cable connection to bring 4 tracks of audio into the cable the simplest way possible, which is a noble goal, but of course, requires the sound team to have the cable. In addition, while many cameras allow audio to be input at either mic or line level, the ALEXA lineup traditionally only allowed for line level, which means if you wanted to record a “scratch” audio track with a microphone on the camera for absolute backup or to hear operators comments, you needed a mic to line converter. The newest bodies, the Mini LF and the ALEXA 35, now have built-in microphones to serve this purpose.
ALEXA bodies put out the filename over SDI, so you can use something like a Teradek Cube to make proxies with a filename match for later relinking.
If you are encouraging the production team to run a scratch mix to the camera, they might well enough up needing to purchase a special cable or down converter to do so.
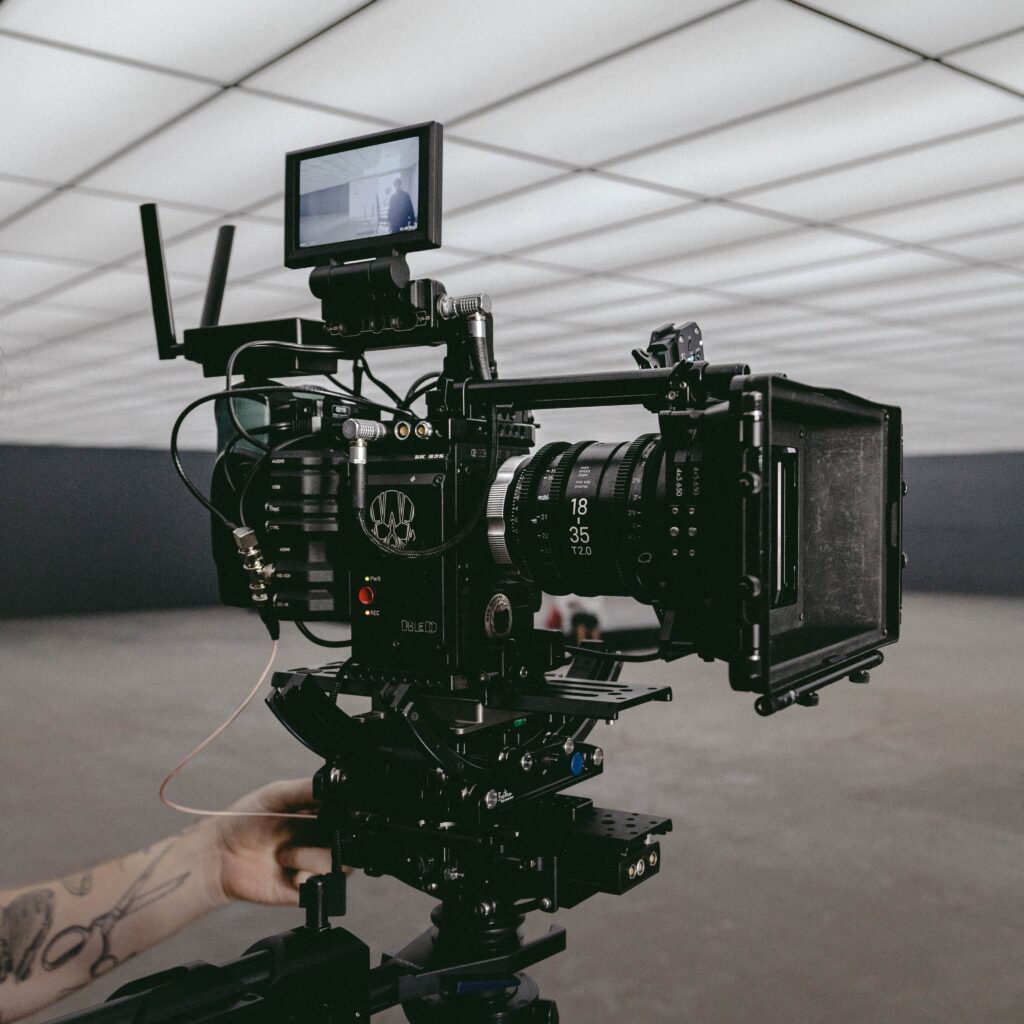
RED
The RED camera platform is widespread both on RED-native productions and also as a special-purpose camera on other productions for its flexibility. It was one of the first platforms to launch with a smaller camera form factor (the DSCM2 bodies) and was capable of high frame rates without the expense and complication of a specialty camera like the Phantom. As such, it’s incredibly common to see the RED as a second camera on an ALEXA show since the ALEXA had more limited slow-motion capture options. The ALEXA would be A and B camera for most of the heavy lifting, and then the RED would fly out on a steadicam or a gimbal for action sequences.
RED camera as a company is heavily responsible for pushing RAW image capture in motion pictures, starting with their launch at NAB 2006, and for a long time, was a true leader in the space. In the early years, there were some frustrations with their post integrations, with the company making statements like, “Kodak doesn’t tell you how to develop your film, we won’t tell you what to do with our images,” which was frustrating for many users since, in fact, Kodak did publish technical guides on development, and a camera maker having robust post software support was a good thing. RED originally pushed its own software, REDCine, for a lot of early post work.
However, RED has now fully integrated with other popular software platforms and could arguably be considered one of the most widely supported cameras in the post world. Native support for RED RAW .r3d file processing is built into every major NLE, and when RED updates its firmware with new image parameters, the updates flow into other software like Resolve with rapid speed.
One thing to remember with RED RAW is that it is live debayering the images, which can be processor intensive. If your editor will be working on a lower-power machine, it is still highly recommended that you render video dailies into a format like ProRes or DNx for editing. RED does offer the ability to change your debayer quality, which can make for easier processing on your system, but that comes with image quality tradeoffs.
While RED does have a Log format, it is very uncommonly used, as the default and most common format to capture when shooting RED is straight to RAW in .r3d files.
RED cameras offer the ability to shoot natively to both .r3d RAW files and .mov or .mxf video files at the same time. However, most users find that this fills cards up more quickly, increases download time and increases the complication and expense of on-set downloads. While there are occasional jobs where this might make sense (a tight turnaround job that requires both the flexibility of RAW and the immediacy of dailies), it’s very uncommon. Another solution to that same problem would be using a proxy box like the Teradek Cube to make immediate proxies. The filename passes over SDI with the RED cameras for later relinking to your RAW file.
RED cameras use the common 5-pin DIN timecode format. Reputationally RED cameras don’t keep the best internal timecode, and many recommend re-jamming often or using an external timecode box to feed more stable timecode into the system.
RED camera bodies have both on-body microphones for scratch tracks and have industry-standard audio inputs for sending in a microphone or a mix if necessary.
Panavision
Panavision is in an interesting position in that they have a major camera platform, the DXL (or Digital-XL), that is very popular, especially in Television production.
However, as Panavision is best known for its lenses and was never particularly famous for its camera bodies, they actually built the DXL system on top of RED camera bodies. The DXL systems have their own color science baked in and use Panavision lens mounts and accessories, but the primary decisions you’ll be making with a DXL are very similar to the decisions you’ll be making with a RED camera platform.
Phantom
Phantom cameras are the current gold standard of high frame rate slow-motion capture. While traditional motion picture cameras from RED and Blackmagic are getting speeds up to 240fps, for action sequences or product work there is often a benefit in going higher, up to 480fps or even 960 and above. For those moments, most productions go with a Phantom camera.
In terms of production use, the Phantom has a bit of a reputation for being slightly high maintenance. They are made in lower volumes by a company with more of a specialization in scientific imaging, and they aren’t always ready for all the various needs of motion picture production. That issue rolls on into post-production, where support for Phantom files is occasionally hiccupy. Most of the kinks are worked out, but be sure to do extra testing and prep for phantom-heavy jobs.
Phantom shoots a file format called .cine and are RAW files recording the data coming straight off the sensor. They are a bit processor intensive, even on powerful machines, and you should absolutely make editing video proxy files as quickly as you can after production, only relinking back to the RAWs for final color.
In order to shoot to higher framerates, the Phantom shoots at lower resolutions (as is common on other cameras). This can occasionally lead to some shots coming in from Phantom at lower resolutions, like 1280 x 720, if the production wanted to shoot at 2700 fps. This has led more than one post team to worry they were getting an editing proxy but not the camera-original file. Be sure to check the camera reports to see what resolution was shot since, with high—-speed work, it is often not the original format. Another tip is that if it’s a .cine file, it’s the camera original, since you can’t make a RAW proxy file with software.
Sound and timecode aren’t really something most people worry about with high-speed work, so they aren’t a major factor when working with files from the Phantom.
Panasonic
Panasonic has long been dominant in digital video capture, and after a few years of fewer offerings, have come back in force in the last few years with the Varicam and EVA-1 cameras.
Both camera lines are primarily used for Log-based video recording, though they both support RAW to an external recorder (the Atomos lineup of ProRes RAW cameras and the Codex V-RAW system for the Varicam Pure). If the production shot V-Log (the Varicam Log format, also available on the EVA-1), LUTs are available on the Panasonic site, and ACES and Resolve Color Management support it, though there aren’t flags in the files, and you’ll need to tell RCM what camera the files were shot with.
Panasonic is excellent at interface, hardware and I/O. It uses standard audio interfaces and a timecode interface, the more affordable BNC connection, with an internal timecode clock that is considered quite stable. One nice feature on the Varicam bodies is that they feature both 5-pin XLR inputs for a stereo mixed input (as you might get from a dedicated sound mixer), and also individual 3-pin XLR inputs for a documentary or scratch workflow where you’ll want to run microphones directly into the camera.
Sony
Sony offers a wide gamut of cameras from the top-of-the-line VENICE platform (now up to VENICE 2) to the FX9, FX6 and FX3 cine-style video cameras and the A7 lineup of stills cameras that maintain their impact on motion picture production. Sony cameras are everywhere and will often show up as the B or C or “night-work” camera on productions just because the director owns one and they want to keep it in the mix.
At the top of the line is VENICE (you aren’t supposed to use the definite article “the,” like Concorde, Venice is not “the Venice,” just VENICE), their cinema camera offering that is designed to compete with the likes of ALEXA and is successfully doing so. With a full-frame sensor, the ability to shoot RAW internally to Sony’s proprietary X-OCN format, and a robust body design, VENICE has grown popular on a lot of productions at the high end of the market.
The X-OCN RAW files are full 16-bit RAW files recording the data coming off a 16-bit sensor, so they offer a high level of flexibility for your post-production grading pipeline. The other option is to shoot video files in S-Log3/SGamut3.cine, which is a popular format that is also available on the FX and A7S lineups of cameras and makes intercutting between those cameras relatively easy.
With its amazing low light and autofocus performance, the Sony A7S lineup has been a major hit for motion picture image capture, but it has some drawbacks that make it less ideal for larger productions. There is a motion-picture-focused version of the camera, the FX3, that is very similar internally in terms of sensor and processor but adds more robust inputs, including timecode, though a special adapter cable needs to be purchased.
One thing to be aware of is that Sony cameras have many more picture profiles than competitors, with more arguments for why you might use one or another. DPs will frequently have arguments around issues like, “I use S-Log3 for everything, except for night scenes, then it’s S-Log2.” Each of these formats has a different LUT or transform for converting them back to property viewing space, so you’ll need to watch the camera reports closely to be sure you have a handle on what you need to apply to each shot.
Another issue to be aware of in post-production on Sony is that there is often proprietary software that will require you to sign up for a Sony account to purchase, and is required for post-production on the footage. X-OCN support is built into Resolve and other platforms natively, but if you are having an issue, downloading the dedicated Sony software can help troubleshoot problems. Even with that support for traditional workflows, some of their more unique features that require special software. For instance, the A7S3 has an accelerometer built-in and can record that data in the video file. This is useful in post if you want to use post stabilization; the software can extract stabilization info from the shot and use it to help make the shot appear smooth. To do that, however, requires Sony-specific software.
In the FX and VENICE lineups, timecode inputs exist and audio I/O is quite robust. The A7S lineup lacks those integrations, making it more frustrating and often requiring more work in post for audio and multi-camera syncing.
The A7S lineup shoots to an AVC-Intra format that doesn’t need to be reconnected for final finishing; you can take those files, transcode them directly to ProRes4444, and treat those files are your new master files. If someone has chosen to shoot that format on the FX line, you can do the same.
Blackmagic
Blackmagic makes a lineup of cameras from the small “Pocket” lineup through the larger URSA bodies that shoot up to 12k resolution. One of the key benefits of Blackmagic is that there is a lot of similarity across the camera lineup; all feature real audio inputs (full-sized XLR on the bigger URSA, Mini XLR on the pocket), timecode, video output and more. All shoot straight to SSD hard drives like the Samsung T7 lineup. All shoot Blackmagic RAW, prores or DNx. It makes for a very simplified lineup, with the main benefits of the larger camera bodies being more robust input and output features and higher resolutions.
Blackmagic RAW is not a full RAW format, it’s actually been partially debayered, but you can still correct your ISO and White Balance in post with the power of the camera’s original settings. The design of Blackmagic RAW makes it a relatively lightweight format for post-processing, and some productions edit it natively, though of course, it’s still always the best bet to crunch out some ProRes or DNx video dailies where possible.
Unsurprisingly, Blackmagic Camera footage integrates exceptionally well with Blackmagic DaVinci Resolve if you are using that for your dailies creation. For an RCM workflow, it will auto-detect not just what camera shot the footage but also what settings were in the camera in terms of gamma and color space.
One interesting feature of the Blackmagic Pocket camera is that it is the only major “small handheld DSLR form factor” camera with a robust timecode input. The audio input ⅛ inch jack will auto-detect if you run timecode into it. Most competitors’ cameras will accept timecode over that port but then record it as LTC (linear timecode, as audio data) that needs to be extracted with special software. With the Blackmagic Pocket 6k, it just comes in as timecode.
Audio inputs are robust, and all cameras have an in-camera microphone for scratch audio.
Canon
Canon likely has the broadest array of camera options that a post team will have to deal with. There is the cinema lineup, from C100 up to C700FF, with steps in between. Some of which have features out of order from what you would expect. The C200 shoots RAW, but the C300 doesn’t (the 300 came out years before the 200).
In addition, there is the R5, their mirrorless full-frame cinema-focused camera, and the C70, their compact version of the cinema line. And you’ve got a lot of folks still doggedly hanging on to their older cameras like the 5D Mark IV, which came out in 2016 but still shows up on jobs from time to time.
Most Canon cameras shoot to H.264 or H.265, formats you should transcode to ProRes or DNx for editing. Many users transcode those files to a larger ProRes or DNx format like 4444 and then treat those new files as their new masters, never going back to the lower bandwidth camera original files.
Canon supports the Cinema RAW Light format for RAW recording, but it is not dominant in the way RAW recording is on the RED or VENICE platforms. Canon will also allow you to shoot RAW out to an external recorder from some cameras, which is increasingly popular.
Most users shoot in C-Log, with variations available, including C-Log 2 and C-Log 3, both of which remain popular. Be sure to check in with production to know which format they shot so you can apply the right LUT or Transform in your workflow.
The Cinema lineup, generally noted by the “C” at the start of the camera name, will have the timecode and audio I/O to do things right and make things easier on you in post-production. Unfortunately, you won’t get that level of integration from the other cameras, which were originally designed as still cameras, and remain focused on that world. They might shoot wonderful video images, but it will be difficult to run audio into them in a robust fashion, and they generally lack a real timecode workflow, though you can use an LTC timecode system to the audio track.
MediaSilo by EditShare can help your post production team get video projects approved faster. Contact us to learn more.
Post-production is one of the most critical and complex parts of making the creative vision come to life. But it is also one of the most administratively laden elements of production. Between dumping footage, labeling clips, managing the project file, controlling versions, and collecting feedback, the process is burdened with tasks that create friction. In this guide, the MediaSilo by EditShare team will show you how to move smoothly from raw footage all the way to final output, and even start preparing it for marketing and sales.
Remote, but connected
Over 94% of MediaSilo’s customers say they are doing their post-production work either fully remote or semi-remote. With production and post-production becoming more complex and intertwined, modern workflows have to be re-thought in order to keep up with and take advantage of new technologies. This has created the need for new tools that help manage your assets, share work-in-progress, get approvals, and even facilitate pitching and selling your projects. And those tools need to work whether on set, in the office, or at home.
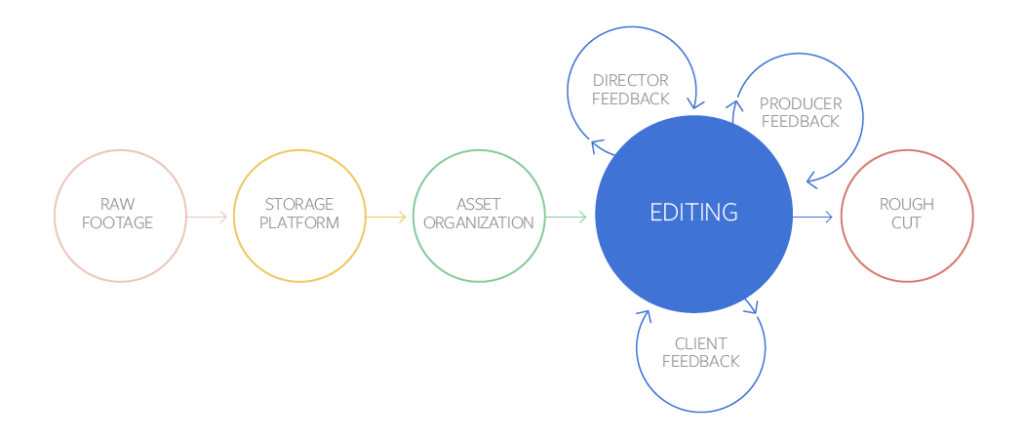
Stage 1: From Camera to Editing Bay
Lights. Camera. Action. Import.
A critical step in the post process is one of the first ones — importing shoot footage. Dailies need to be reviewed quickly and across multiple roles and departments. Often this process involves input from not only the director, but also from the producer(s), the editor, and sometimes the representatives of the studio, network, or client.
Remote viewing of dailies has become increasingly more global in the post-pandemic world. Having everyone on the team able to access the dailies as soon as they are available, whether on-set or remote, means that input can happen while there’s still time to address any issues.
Complexity in these early stages comes from more than just reviewing dailies. It is about importing footage in a way that is easy to find later, like ten versions from now when someone asks, “Remember that scene we shot and there was a take when he stepped forward and not back? Can we see that?” Being able to put your hands on this clip quickly, even weeks out from the import stage, is essential to keeping the team efficient and indispensable.
To stay organized, you need to import with purpose. You must design an organizational architecture that allows for multiple projects, clips, project files, assets, and multiple ways to search to find it all at your fingertips, in seconds. Tagging, adding meta-data, and creating naming conventions is possible when using a remote collaboration platform. And it’s not possible on less sophisticated cloud-based tools that may be cheap, free, or outdated.
“I think most people realized that as long as you can receive the footage in some way, you don’t need to be face-to-face to be able to create a finished video.”
— MediaSilo Customer
Along with the footage itself, there are often camera logs and script supervisor notes that correspond to the footage. Keeping all of these assets where anyone on the team can review them is invaluable and can save enormous amounts of time throughout the life of the project when key documents are constantly referenced and needed.
Using a platform like MediaSilo allows you to upload dailies directly into your account and instantly share files with your collaborators, while allowing commenters to leave feedback directly on the files, or send private links for more contained review sessions.
With a robust asset management and storage solution, relevant files can be organized in one place, allowing producers, project managers and anyone on the team to add, revise, delete, and update any documents as needed so that the entire team is always working from the most current version of the materials.
Stage 2: From Raw Footage to Rough Cut
Ready. Set. Rough.
The rough cut or offline edit is where your show, commercial, or film starts to come together as a story. Typically, this is a complicated process as the editor needs to review all the footage and determine how to best tell the story while maintaining the vision of the team. Carefully logged and tagged footage helps in this stage as it makes the work of the editor more efficient. With less time spent searching for clips and director’s notes, the editor has time to think creatively about the story arc.
In some cases, there may even be more than one editor working on a project, with various scenes divided up amongst several cutters and assistants. Having multiple editors can create issues staying on the same page while handling review and input from stakeholders. As with any collaborative project, clear communication and organization is key.
After the first pass is created, often using smaller low-quality files called proxies, the editor and director may collaborate to create a “director’s cut.” Easily being able to share project files for review with the director is essential so he or she has a broader view of the footage available.
Once the rough cut is complete, it is sent to other team members to review. At times, the team reviewing the cut can be large, and global. Using a tool that allows collaborators to make timestamped comments ensures smoother communication. All of the comments and input need to be collected and tracked, so that revisions can be made efficiently and in a way that takes all feedback into account.
“By creating proxies and sharing material internally, we were able to work remotely having great results. Then, we shared rough cuts to directors and clients for a more secure way to get feedback.”
— MediaSilo Customer
Finding a place for placeholder assets
The rough cut phase is also where temporary or placeholder graphics, sound elements, music, visual effects, and color correction are introduced for reference. These assets can be sourced from font libraries, stock footage collections, music libraries, and sound effects catalogs. Keeping track of these assets is critical to the success of the rough cut.
As all editors know, every cut has versions that use different assets, takes, or edits to achieve the ideal finished product. Versioning can be a challenge, as keeping track of subtle changes is tricky and often requires diligence and attention to detail.
A well-thought-out naming convention is a crucial, albeit complicated, aspect of any post-production workflow. While it’s sometimes seen as superstitious, many post-production veterans will tell you that you should never name a version “final” — nothing guarantees another round of edits more reliably. But there is also a practical reason for that. Small errors are caught and changes must be made, making it very difficult to tell which final version is actually final.
“Collaboration platforms make it easy to access files between teammates especially in remote conditions because it makes sending files more efficient.”
— MediaSilo Customer
Instead, using a naming convention that incorporates dates, revision numbers, and sometimes even colors, can help manage a project that has had a large number of changes made to it.
Finally, when all of the elements are in place and agreed upon in the rough cut, the cut is locked. This “picture lock” stage means that there will be no more changes made to the overall structure of the edit, and that it’s time to move on to finishing.
With MediaSilo’s versioning features, you can keep track of all of a file’s versions easily in one place. Shared links automatically update with the newest file, and reviewers can easily toggle between old and new versions to see changes and resolve comments.
Stage 3: The Post Production Team
Who’s Who
While getting to picture lock in the offline edit or rough cut is a huge part of the post-production process, there is still a lot of work to be done before the project is completed. Many details still need to be finalized, and finishing touches need to be applied to various aspects of the piece to create a finished work. Imagine an art gallery, in which all of the pencil sketches on the walls will soon be replaced with real paintings.
To create the final masterpiece, many people and players fall in and out of the workflow. It takes a village to make a movie! When watching the credits roll at the end of a film or TV show, you’re reminded of all the human touchpoints within the post-production process. Keeping track of all of them and assigning user roles at this stage is critical to ensuring that the appropriate people have access to the correct cuts at the right time.
Editors / Finishing Team / Artists – The online editing process, or “conform”, is usually when the original, full-size footage files are accessed again, and inserted into the cut in place of the smaller proxies. Close collaboration between the offline editor and the finishing and online artists is critical. When working remotely, everyone will need access to the same elements in order to accurately transition from locked rough cut to final online conform.
VFX – The creation of visual effects is a detail-oriented process that may require working on each frame of the footage individually. Tiny details, such as shadow and lighting, can throw off the realism of the effect for even the most casual viewer. And often a particular visual effect, or piece of CGI work, will go through multiple rounds of revisions and approvals before being inserted into the online edit.
Graphic Designers – The online phase of post-production is when the final type treatments are discussed, fonts and logos are designed and chosen, and overall composition is determined for any graphic elements. Often an entirely separate company may be in charge of the titles and graphics. They will provide options for the graphics work to the entire team and input will be given by the team, just as in the other phases of the cut. Once reviewed and approved, usually remotely, the finished elements will be placed in the final piece.
“Clients and directors are adapting and trusting the post-production process more and more every day. They are using technology to their advantage and shortening reviewing time by getting the videos right in their phones and computers having the opportunity to watch them anytime, anywhere.”
— MediaSilo Customer
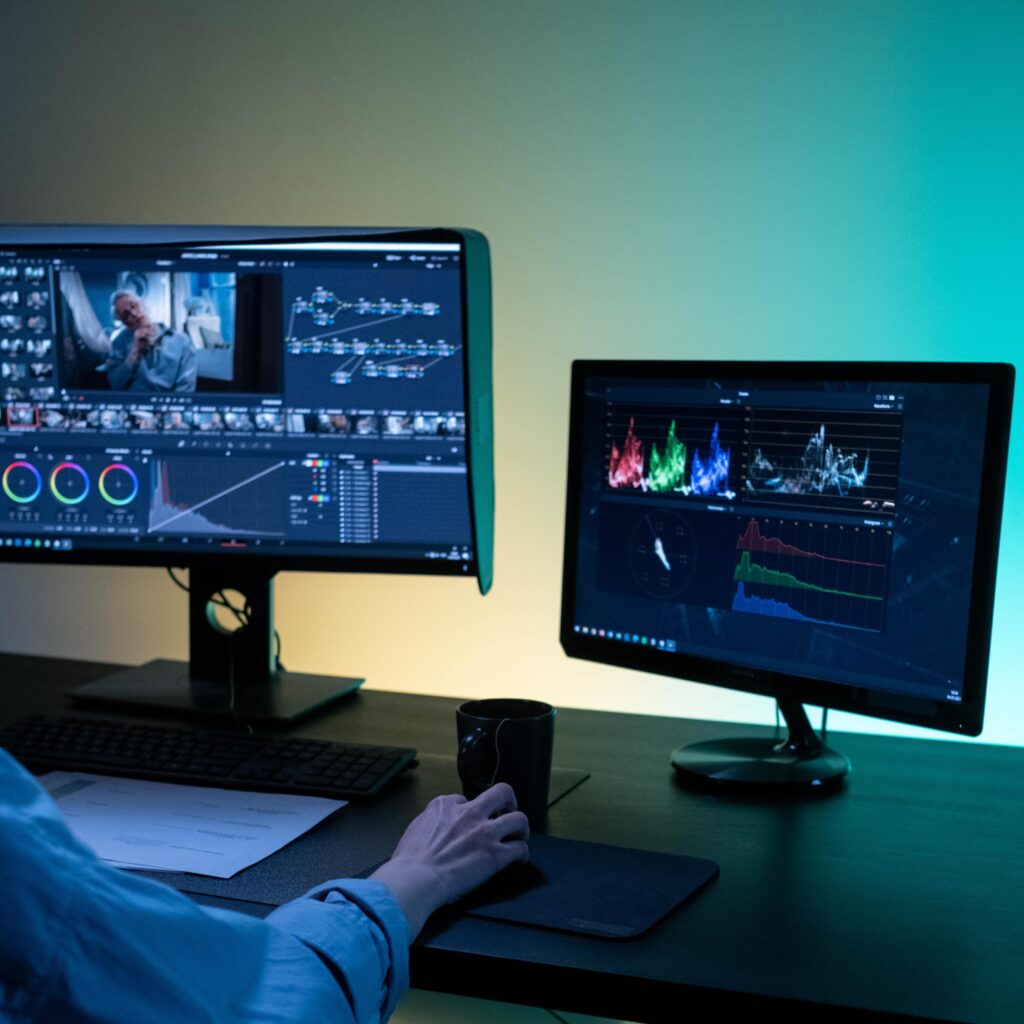
Colorists – Careful color grading makes a film more cohesive by better matching footage from different days and places, and under different lighting conditions. This helps the finished piece feel more like a uniform whole and sets the mood and tone for the entire film. It’s always a good idea to view the work on a variety of monitors of all sizes and qualities, to simulate the experience of different viewers using all kinds of personal devices. What might seem pleasantly dark and moody on one device, may simply be impossible to see on another.
Musicians and Composers – Music is one of the most powerful components of a film, tv show, or ad. When the editor first starts composing the rough cut, temporary music or a “scratch track” is often used to give a general sense of how the scene will feel with music in place. But once the picture is locked, final music needs to be locked down, too. If stock music or an existing song is to be used, the rights must be secured. If original music is to be created, the composer will begin scoring to the picture. This process can often include several rounds of compositions and revisions for each piece or scene, and tracking the versions is key, as is sharing files remotely.
Sound Editors – Sound design can play an important element in bringing a film, television show, or commercial to life. Sound design can be as simple as enhancing or adding footsteps to a scene in which a character is walking, or as complex as creating an entire auditory language for a cinematic world. Naturally, no two filmmakers will choose the same elements for a particular sound, so choosing sounds is quite a creative endeavor, and having the team review and agree on them is also an important part of the post-production workflow.
During the finishing process, an entire ecosystem of different users can focus their energy on specific elements of the ad, show, or movie — but they must all be seamlessly integrated into the process in order for the end product to be effective. Keeping track of versions, examining minute details, and providing access to those who need it (when they need it) is crucial in creating an elegant and seamless workflow.
MediaSilo’s user permissions allow you to easily control who has access to your content and exactly what they can do with it. Use one of our standard user roles, or create your own custom roles for each team member.
Stage 4: After the Final Cut
One for Me, One for You
Once the picture is locked and the masterpiece has been fully developed, it feels like the end of the line. But, wait, there is still more. Two important final steps are needed to complete the finished piece: delivery to a host of other teams, departments, and vendors who need to begin the sales and distribution process, and archiving in a media storage system.
Delivery
When post production ends, a whole new phase of the process begins. Before signing off on a project, an editor or post production supervisor must ensure that the project is delivered to any other team that might need it. This could include internal departments or outside vendors, depending on the size and scope of the production.
Marketing and distribution teams will need to generate promotional materials, that may include trailers and promos, photographic assets, printed posters and artwork, or press kits. While many of these will have been in the works throughout the post process, they are often subject to versioning and team approvals just like the film. Because the content is so closely intertwined with the film, the versions and input need to be centralized where team members can always access the latest materials.
Captioning and localization is often handled by a third-party vendor, who will need full access to audio and video files to complete their work. For an international release, the film or tv show may need to be captioned in a variety of languages, dubbed, or even reformatted entirely to fit the specifications of international distribution platforms.
Traffic managers or broadcast business managers might oversee the process as the piece gets sent to networks, studios, theaters, digital portals, or other final users. And each is likely to have his or her own preferred specifications. Some will request files in a particular file size, format, or compression algorithm that is best suited to their own systems. Security will have to be maintained for any projects that might be proprietary or attractive to eager fans or competitors.
The threat of content leaks and piracy is a huge concern for pre-release materials. MediaSilo has built-in SafeStream technology for both visual and forensic watermarking, keeping your content safe while you share to all of your vendors.
Archiving
In addition to outputs, all of the elements that went into making the piece, including the original camera footage, camera logs, XML files of metadata, sound elements, visual effects elements, graphics, and any versions of the masters will all need to be prepared for storage and archiving, so they can be found and accessed later if needed. A cataloging and naming convention is a good idea, since it’s often difficult to remember all the little things that were done months or even years later. A versatile and robust storage platform is critical to being able to find what you need for later revisions, and to create future files as needed.
Non-Traditional Workflows
While we’ve talked about how things are typically done, each project has its own unique needs, and post-production workflows can be created based on the way a particular project comes together. Today’s increasing use of remote collaboration makes non-traditional workflows even more common, and adds new challenges to designing them. Flexibility is often critical in making things happen efficiently. In some cases, a phase of post-production may start before the typical preceding ones are complete. For example, time-consuming visual effects may have to be underway before the picture is locked. Or music may be composed before the shoot is even complete, so that it can be played on set and the characters can react specifically to it. The key to managing an unconventional workflow is organization. Without it, a huge amount of time and work can be wasted. So it becomes even more important to have a well-synchronized team and a solid post-production structure when using a non-traditional workflow.
Conclusion
Today’s post-production workflows bear almost no resemblance at all to how things were done
20-30 years ago in the days of tape-to-tape editing and processing actual film. And post-production continues to change every day, as new technologies and needs arise. With an increasing percentage of production being done with all or part of the team operating remotely, up-to-date sharing solutions and digital collaboration are more important than ever.
“I think this will be the way to work from now on. I don’t think we will ever go back to the way it was.”
— MediaSilo Customer
We can already see significant changes coming, such as dumping footage from cameras to post tools, VR and AR formats, new finishing considerations for virtual production, and finishing platforms that seamlessly combine offline, online, and color grading capabilities for users of all levels.
What will never change is the need to be organized, team-oriented, and collaborative when undergoing a post-production project. New technologies will only bring new complexities and building a foundation for an elegant workflow will serve you now, and… to infinity and beyond.
Find out how MediaSilo by EditShare can help your post-production team get projects reviewed and approved faster. Contact us to get started.
Have more questions? You can reach out to Product Support for technical issues or our Customer Success team for more information about your specific account.
MediaSilo’s panels for Adobe Premiere Pro, After Effects and DaVinci Resolve Studio* make uploading a breeze
Sometimes, at the end of a long editing session, you just want to hit “export” and call it night. But everyone has experienced waiting for exports to complete, then initiating an upload to a review platform, and then waiting for that to complete. Then, you have to wait for the transcode to complete. Then, you have to ensure it plays right and the watermark is applied. Then, you have to send emails to producers and directors. Next, you wait for their comments.
The next day, editors try to figure out how to match the comments from emails back into their timelines. Then, you have to be careful because making changes affects the timecode, which throws off another set of comments where a reviewer typed in the timecode in a Slack message. And so on.
MediaSilo’s Panels for Premiere Pro, After Effects and DaVinci Resolve Studio solve this whole mess for editors. Let’s investigate the panels and see how they can save you time and grief.
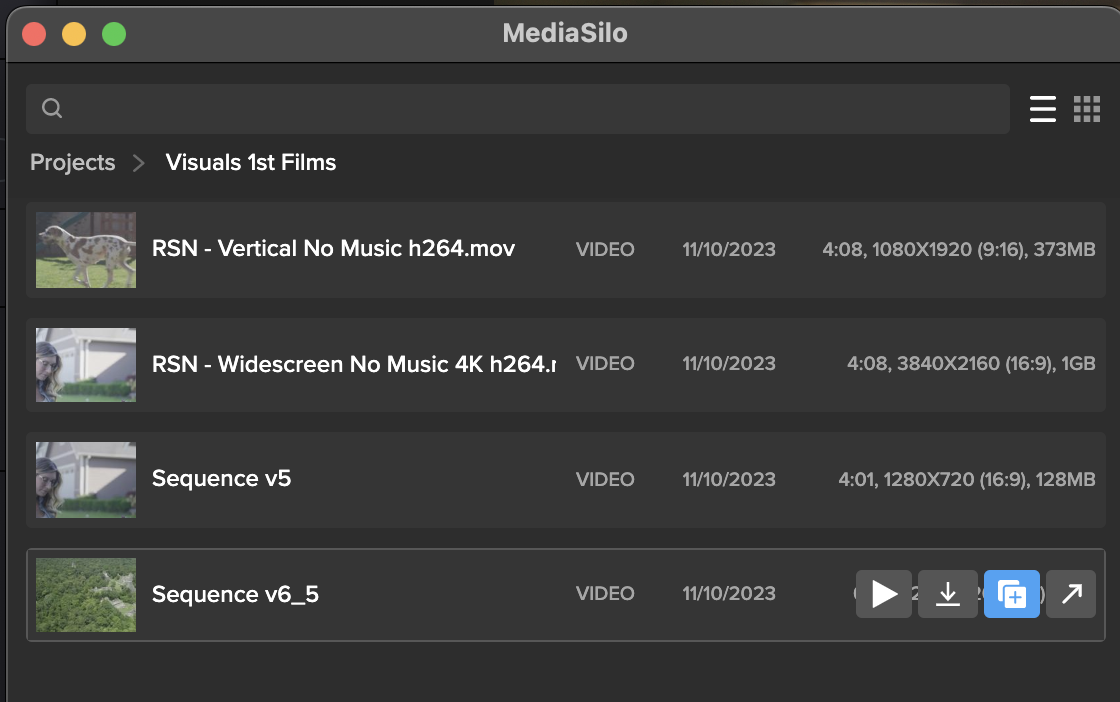
MediaSilo Panel for Premiere Pro and Resolve
The MediaSilo panel gives you access to assets in MediaSilo right within your NLE. It also allows you to export a timeline with a single click and have it uploaded into the right project folder on MediaSilo. You can choose your upload settings and identify the people who need to be notified. Once the team has made notes in MediaSilo’s review mode, you can immediately import those comments as markers into your sequence.
Those features streamline so many manual steps in the review and approval process. Basically, the MediaSilo panel gets you home in time for dinner.
DaVinci Resolve Studio
Once the panel is installed, Open DaVinci Resolve Studio and go to Workspace -> Workflow Integrations -> MediaSilo. A floating window appears with your projects. It uses a helper app called “Electron,” so don’t quit it. Your assets appear in the projects. When you float your mouse over each asset, you can preview (Resolve only), download, create a new version, or Open in MediaSilo.
Premiere Pro
Install the MediaSilo Panel from the Creative Cloud desktop app. Go to “Stock & Marketplace” and search for MediaSilo. Once the extension is installed in Premiere, open the Window menu > Extensions > MediaSilo.
After Effects
Install the MediaSilo Panel from the Creative Cloud desktop app. Go to “Stock & Marketplace” and search for MediaSilo. Once the extension is installed in After Effects, open the Window menu > Extensions > MediaSilo.
Downloading assets into your project
If you want to include one of your MediaSilo assets in your local project, just drag it into the media. If you prefer to download a proxy version, click the download icon and select “Proxy” from the drop-down menu. Proxies are smaller, lower-resolution versions of the original footage. They are handy when you are putting together a rough cut. And when your project is ready for color grading, you “conform” it to the original, high-resolution clips.
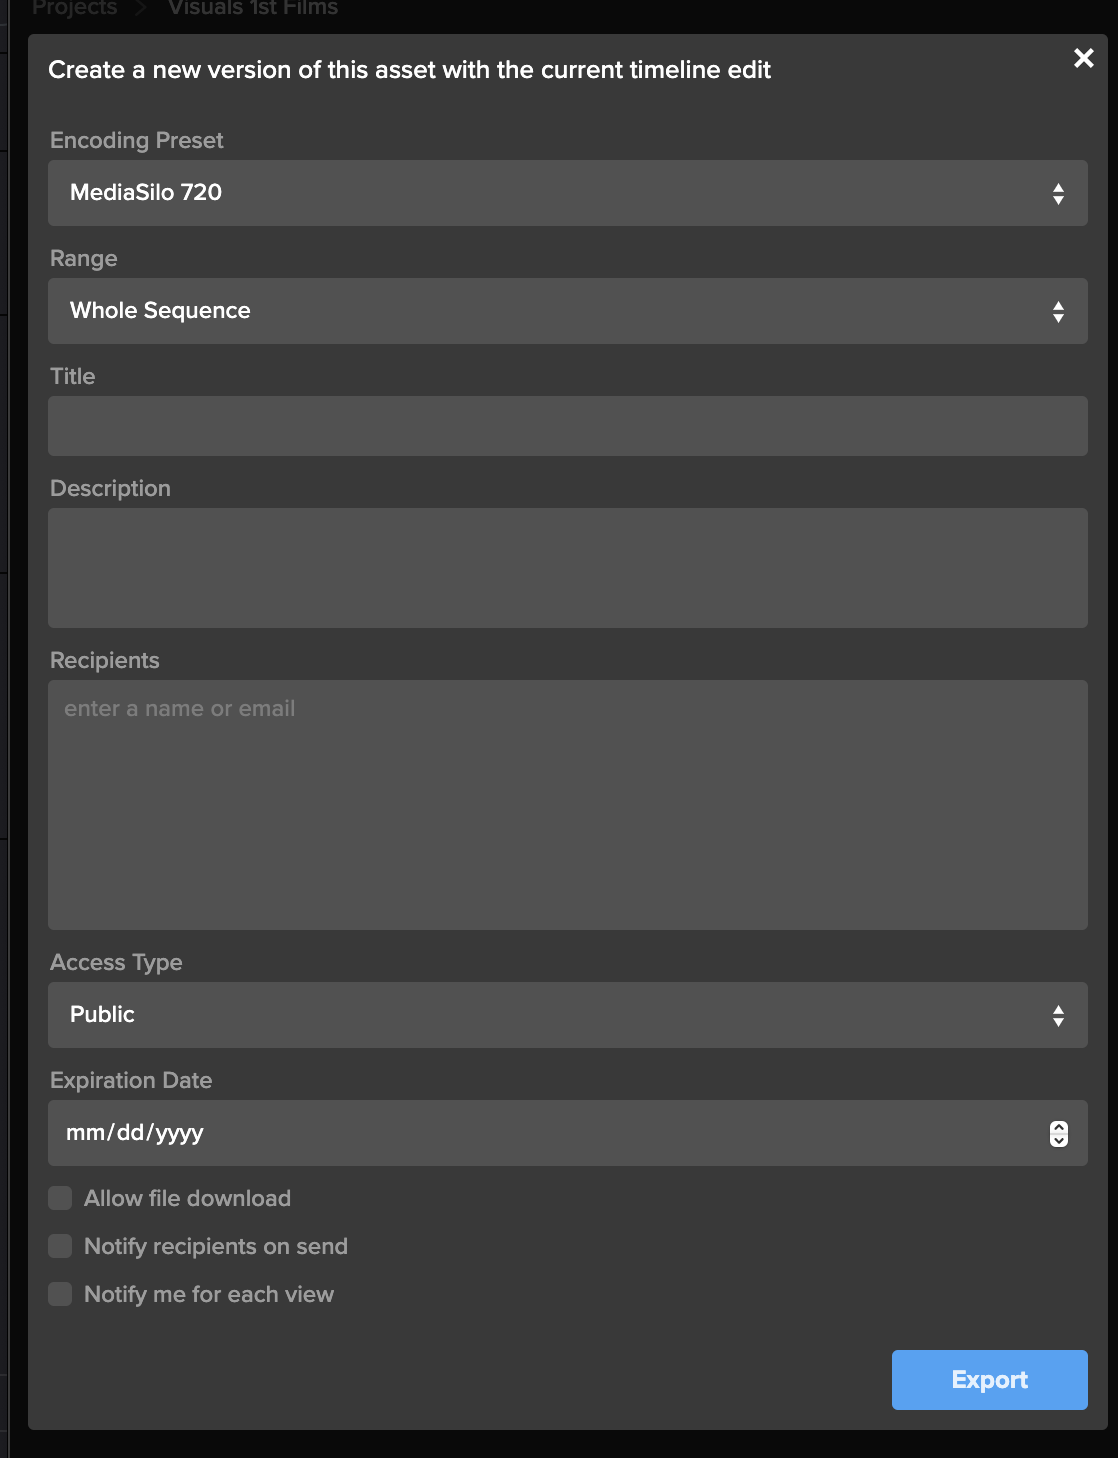
Exporting your timeline directly to MediaSilo is a breeze with the panel. Once you’ve completed your cut, click “Export Timeline” (Premiere says, “Export Sequence”) in the MediaSilo Panel. The “Export Sequence/Timeline” window opens up. You can choose your encoding preset based on your needs. Sometimes, you need the highest quality version to go up, and sometimes, you just need a lower-resolution version for quick approval. Choose the whole sequence or just from the In/Out points. You can specify a title and add a description that will appear in MediaSilo.
“Upload Location” is the next option. Start typing the project name, folder or asset with which this upload should be associated. This step is important because an editor may work on projects with different security levels.
The “Recipients” field saves you the hassle of waiting for an upload to complete before notifying reviewers. Enter the names of the individuals who need to receive a review link, and they will be notified once the asset is ready for viewing.
Create a new version of your timeline
Typically, when I’m ready to output a new version of an edit, I export it from the timeline. If the service I’m using for review and approval (non-MediaSilo) keeps track of versions, I usually just cross my fingers and hope it picks up on the new file coming in. Most of the time, I just append a “v2” or “v3,” and then manually identify it as a new version once the upload has completed. Then, I send a message to alert the reviewer.
The MediaSilo panel takes a different, more efficient approach. This feature is so simple that it took me a moment to understand how it works.
This process applies if you have already exported your timeline once and you need to export another version after some changes have been made. Select the clip in the panel and click on the button to share a new version.
This will bring up the export window. Rather than simply exporting the asset, all these options are designed to help you streamline creating a new version of the asset. This way, you can give the new version its own title, and MediaSilo will keep it associated with the initial version. This means the links that you have previously sent out will continue to work.
You can even change the access on the new version, and reviewers will be notified when it is ready. You’ll also receive a notification when they view it. This little box saves so many steps in the process of exporting compared to the process I outlined at the beginning of this section.
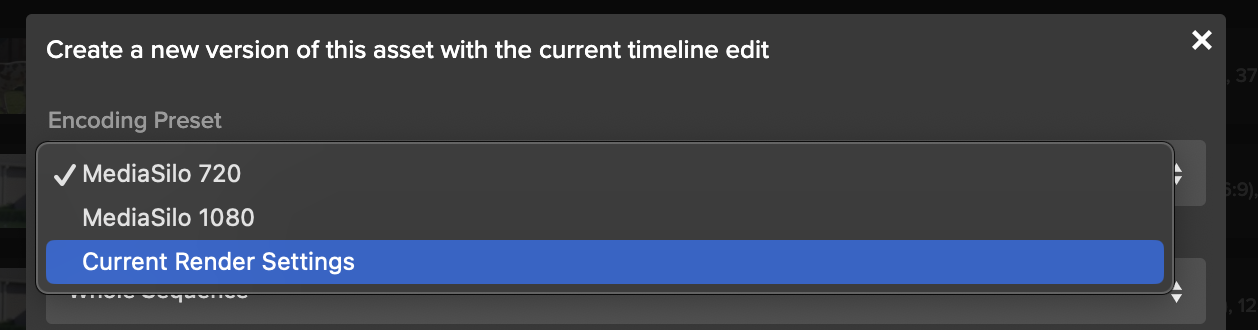
Encoding Presets
The encoding presets section allows you to choose the resolution for your upload. Sometimes, you need to get a change up quickly or share a low-quality version with a collaborator. So you can choose a lower-resolution setting. If you need to upload at a higher quality, choose your “current render settings.”
Watermarking and security
If you have watermarking turned on with your project, that will get automatically applied in MediaSilo. This is really helpful for editors because they don’t need to turn on and off a watermark within their NLE. In addition to the visible watermark, MediaSilo supports forensic watermarking with SafeStream. This technology ensures that any leaks can be traced back to their source.
MediaSilo also supports the ability to use your own custom email server for email notifications and 2-factor authentication — to ensure an even higher level of security.
Support articles
MediaSilo offers support articles for Resolve, Premiere and After Effects that show you how to install and use the panels in detail.
Conclusion
The MediaSilo panels in DaVinci Resolve Studio and Adobe Premiere Pro will save you time and energy. They help to make collaboration, review and approval a much more streamlined process.
*Note: The MediaSilo + DaVinci Resolve Studio integration is only available on the DaVinci Resolve Studio paid tier. You can find their pricing here.
Please complete the form below and we’ll get in touch!
When you send large video files, you can encounter all sorts of challenges. When your team is collaborating on a video project, you often have to send multiple versions, track review and approval comments, and make sure everything is secure. However, video collaboration workflows are more demanding than your typical cloud-based file-sharing workflows. This can be even more challenging when the creative team and the IT team propose different solutions for sharing video files.
Here are 10 of the top ways to share large video files and their pros and cons. I’ll also share things I wish IT knew about the unique demands of video review and approval processes. So, let’s dig in to find out which solution is best for your video collaboration workflow.
WeTransfer
WeTransfer’s simple interface makes it easy to share files up to 2GB. To upload larger files, you’ll need to upgrade to Pro or Premium.
WeTransfer uses a web browser interface for uploading. With some browsers, like Safari, you can run into an issue where the browser will time out before your large upload is complete. This isn’t the case when apps feature an app that installs on your local machine.
While WeTransfer Pro does a great job of sharing your final exports in the delivery phase of your project, it lacks review and approval features, so it might not be the right tool for collaborating during the post-production phase.
The other major drawback is that WeTransfer does not recover well from an interrupted file transfer. You’ll need to re-initiate if your transfer is interrupted (maybe due to a bad WiFi connection). If your upload is a large file, this can mean a significant amount of lost time, and you still won’t know if it will complete on a second go-around.
Dropbox
Dropbox is well known for its ability to sync files between the cloud and your various devices. But since DropBox Business Plus caps file sizes at 250GB, it runs into similar constraints as WeTransfer Pro. DropBox does feature “Replay,” which allows for commenting on videos, but it is not available on the least expensive plan. Additionally, the replay feature is limited to 10 file uploads on their top plan.
While Dropbox offers reliable syncing, it can be confusing when working with two different organizations. It tends to demand that both parties upgrade. That makes it confusing when you are trying to figure out who is hosting which files. A common question that arises is, “If I delete this file on my computer, will it vanish from yours?”
Post-production professionals need to know that they can deliver files without confusing mismatched subscription tiers between vendors. So, if you find yourself dealing with multiple projects and multiple clients, getting everyone to collaborate through Dropbox is a tall order.
Box
Box enjoys a solid reputation for handling lots of smaller files well. Their lowest tier caps file sizes at 250MB. (The highest tier caps out at 150GB per file). This gives you an idea of where their emphasis lies. There are no review or commenting features associated with videos.
Box is a great example of the difference between typical workflows that IT supports vs. media workflows. While an IT team may be accustomed to supporting petabytes of small files, this is different from workflows that have a smaller overall footprint, but the individual files are larger.
Google Drive
Google knows how to sync and send large files. Google Drive is inexpensive and reliable. Google offers a web interface and a downloadable app that syncs locally. The downloadable app is more reliable than the web interface for large transfers.
However, by many accounts, Google Drive is slower than Dropbox. My personal experience is that Google will eventually get your file uploaded. But sometimes, you can run into a frustrating scenario where interrupted syncs hang. This causes Google to stall out until Google Drives figures out that a file has been moved or renamed. This can put a halt to your other uploads.
Google also changed how sharing works between paying and free users.
If everyone within an organization is on a paid tier, then file sharing works well. But if you are sharing between organizations, Google will basically push both sides to upgrade. It is frustrating because you cannot know whether the person on the other side of the share has a paid account. I just ran into this a couple of weeks ago. I had a paid version, and the other team had free accounts (but I didn’t know this). The other team had to get their CEO to join the shared folder to accept my shared folder because he had a paid account.
Post-production pros need to know that the delivery of their assets is friction-free. You don’t want your client hit with promotional “nag-ware” when you are trying to deliver your final assets.
OneDrive
Microsoft enjoys a solid reputation with IT teams for good reason. Their products cater to the needs of corporate users. Microsoft places an emphasis on security and integration with Windows.
However, OneDrive is not oriented toward post-production. It lacks features oriented toward video review and approval and version tracking. This makes it a good solution for sharing graphics and project files, but it isn’t great for managing video projects.
Vimeo
Vimeo has been the champion for preserving video quality for films delivered to the web. Vimeo is a great tool for the distribution of assets online, where video quality trumps workflow efficiency. It works well for embedding your finished project on your website. In the past few years, Vimeo has also been adding collaboration, AI, and live-streaming features.
However, in my personal experience, I have found uploading to Vimeo painfully slow. Transcoding also seems to take longer than other services. It will be interesting to see if Vimeo’s performance can keep pace with their aspirations.
Resilio
Resilio uses P2P technology to facilitate the syncing of large files between multiple collaborators. This is a powerful technology, but it does require the app to be installed on the computers of both the sender and the recipient. This means Resilio is a nice solution for frequent collaborators. However, it’s really a no-go for client work where somebody just wants to click a link, quickly compare versions, and leave some comments.
Frame.io
Adobe’s frame.io platform is a popular solution for review and approval. It features integration into popular NLEs, and tools for managing versions. Adobe is working to incorporate AI features into frame.io as well.
However, my experiences with frame.io over the past year have been challenging. They’ve acknowledged these challenges and reported that they are working on an overhauled version of their software.
Infrastructure solutions: Aspera, Signant, and EditShare EFS
IBM Aspera and Signant Media Shuttle are robust solutions that integrate your team’s IT infrastructure. They’re often used by broadcasters to move large files. However, many teams are finding challenges with these solutions. And they are expensive.
EditShare EFS has built-in file acceleration for large transfers from one EFS system to another. This can be particularly advantageous to customers who have multiple facilities and the transfer software is included in the standard EFS license – no additional costs are involved.
MediaSilo
MediaSilo delivers a platform designed specifically to tackle the challenges of video collaboration. It integrates right into Adobe Premiere Pro and DaVinci Resolve. This allows editors to save huge amounts of time when exporting, uploading, and versioning.
MediaSilo allows users to upload through the browser or the desktop app. MediaSilo’s robust uploader gives you real-time feedback on the speed and progress of your uploads. If you’re connection is interrupted, MediaSilo does a great job of completing the transfer when you are reconnected. It is also easy to cancel an upload and clear the queue. This avoids the hangs and syncing issues that other solutions run into.
The SafeStream technology ensures that assets can be forensically tracked to individual users, and watermarks deter IP theft.
MediaSilo’s review and approval tools allow for easy commenting and versioning. This helps everyone on the team to know if specific notes have been addressed. It is easy to send your collaborators a MediaSilo link, and they don’t have to worry about having an account, what tier they are on, or sync settings. MediaSilo’s strength is wrapping powerful features in a simple interface. If you need to send a collaborator a video file for review, it doesn’t get easier than MediaSilo.
Conclusion
Moving around massive video files is a challenge without the right tool. Sometimes, you just need to send someone a file, but other times, you need to gather notes, compare versions, and intelligently group assets. Video files present challenges that are different from syncing a bunch of documents. Tools like MediaSilo, and EditShare EFS can smooth out your workflow and simplify remote collaboration.
Data breaches are costly – creatively and financially. Trust your content to a product that values data security. With just a few clicks, you can easily protect pre-released or confidential content, ultimately protecting creative impact and revenue potential.
Users can now watermark images and documents with email, name and/or custom text with SafeStream technology at the Workspace, Project or Review Link level. Whether you’re trying to protect scripts, key art, screenplays or call sheets, we help keep your projects safe and sound. Sleep better knowing you don’t have to worry about waking up to a catastrophic content leak.
Apply Watermarking Requirements to Your Workspace
As an administrator, you can require visible image and document watermarking for every new project created in your workspace.
Start by clicking the gear icon in the left-side navigation bar, which will take you to the Administration page. In the SafeStream tab, select Watermark Settings from the menu to open your workspace-level watermark settings. Now, toggle on Apply Visible Image and Document Watermarking.
Next, use the dropdown menus under Image Template and Document Template and select your default watermark template to apply to new projects. You can choose a template that displays a viewer’s full name and email address, the viewer’s email address only or a custom template created for your workspace.
On all templates, the watermarks will be displayed in a “wallpaper” format, which repeats diagonally across the entire image or document.
Apply Watermarking to a Project
You can apply visible image and document watermarking to all images and documents inside a project, provided the files match our list of supported file types.
From the project settings, a project owner or administrator can find watermarking options in the SafeStream tab. Simply toggle on the Apply Visible Image and Document Watermarking tab and use the dropdown menu to select the template you want to apply to the images and documents in this project. Whichever template you choose, the viewer’s identifying information will be displayed in a “wallpaper” format, which repeats diagonally across the entire image or document.
Apply Watermarking to Unwatermarked Files in a Review Link
Applying watermarks to images and documents at the Review-Link level allows you to protect select items you’re sending without using those watermarks on the entire project.
Click the Advanced button in the bottom left in the Share for Review window, and toggle on the Apply Visible Image and Document Watermarking tab in the Watermarking section. The default templates chosen by your administrator will display automatically. You can keep these selections or choose a different template. Whichever template you choose, the viewer’s identifying information will be displayed in a “wallpaper” format, which repeats diagonally across the entire image or document.
If these watermark templates display a viewer’s identifying information, you must enter link recipients in the Audience tab on the left side of the share window.
Your choice of watermark template can affect the link’s Access setting.
If a watermark displays the viewer’s name, you must select Workspace users and enter workspace users as recipients.
If a watermark only shows the viewer’s email address, then you have the additional access options of Public and Password protected. When you select Public or Password protected, you can enter any email address in the recipients field, even if that email does not belong to your MediaSilo workspace.
For more detailed information, please visit our support page or contact us at sales@mediasilo for a demo.
The Royal National Theatre – more usually referred to as the National Theatre, the National or just the NT – is one of the UK’s best known theatre venues. Founded in 1963, the reach and influence of the National has extended over the last 15 years beyond its concrete building on London’s South Bank. This is in part due to NT Live, the cinema programme of multi-camera captures of productions, distributed by satellite or DCP, to over 700 UK sites and more globally. Making the arts more accessible to a wider audience.
During the covid pandemic the National Theatre’s live performances were suspended but they adapted by creating the NT at Home streaming service. Initially it started as a program of free streams on YouTube with the full NT at Home SVOD service launching in December 2020. During this time the National Theatre discovered inefficiencies in the infrastructure when faced with a large increase in captured content, so they needed to look at the addition of post production storage. Central to this was the installation of an EditShare EFS 300 storage system, which was designed and implemented by Tyrell.
“When the pandemic hit, we were no longer able to capture new material and the cinemas were closed as well,” comments Jim Cross, Senior Post Production Manager, National Theatre. “But part of our Arts Council remit as a publicly funded organization is to bring theatre to our audiences. Because of this we started putting out productions free on YouTube, which became the NT At Home platform. To support that we went from a team of 15 to now nearly 60 people, who now work on the dual delivery of NT Live for cinema and purpose capture for NT at Home.”
Cross explains that these services along with the requirement to promote shows in the theatre, as well as the rise in the volume of work for the internal learning department meant their workload increased significantly. As a result, both the production/post-production and archiving departments realised the three legacy servers that had been used since the mid-2010s were no longer suitable for the increased demands being put on them. “It was very hard drive-based, with IT ‘non-video’ servers that weren’t specifically for media,” he says. “And these days we do less live satellite, we do more full post-production workflows in house, including editing, mixing and grading, so we needed a more dynamic, powerful and robust solution.”
This has meant there is a lot more media moving around and being worked on by the edit team, which has doubled in size in the last three years. Cross explains that by the end of 2021 the increased workload meant the NT was beginning to run out of storage. “During the covid pandemic everyone was working from home and shuttling hard drives back and forth,” he says. “We knew we were going to come back into the building, but it became very obvious we needed near-line, hot storage. A NT Live show takes on average 4 terabytes of storage and it would take three, four or five hours to ingest that. Now with EditShare EFS we can do it in just 45 minutes.”
The NT’s digital content is archived using the Preservica cloud-based platform and although that is a self-contained operation, it needed to connect to any new near-line storage set-up in a more efficient way than previously. “Historically there wasn’t such a smooth workflow process around getting material from the digital media team into the archive involved a lot of local knowledge on the part of the editors, producers and me,” comments Post-Production Archive Manager Zoe Bowers, who describes herself as sitting between the digital media team and the archive. “The move towards the new EditShare system came in tandem with thinking we all needed to know where content is so we can find it, particularly as so much more is being created.” Tyrell’s sales and marketing director, Dan Muchmore adds, “it’s a common issue that every facility hits as they grow and it’s our speciality as a technical partner to help migrate workflows away from a single source or knowledge to a way of working that benefits the business, regardless of team size and structure”.
The NT previously did not have a digital asset management system but worked on a SMB file share arrangement, with folders for short-term and long-term storage. With both Tier 1 and Tier 2 server systems nearing the end of their operational lives, Jim Cross and Zoe Bowers instigated a request for proposal (RFP) process, with EditShare being their primary choice for a new system.
“I worked with Tyrell on the installation of the system into our server room, which involved the networking and commissioning of the 256TB EditShare hardware,” Tom Rhodes, Head of IT Infrastructure explains. “But really it was all quite self-contained within the EditShare technology. It’s now utilized on our 10Gb infrastructure, which allows us to ingest material a lot quicker than before. EditShare also has its FLOW media asset management software and although we haven’t fully implemented this yet, it is something we looked at when selecting the system.”
The National Theatre has been using EditShare for 18 months and in that time, Jim Cross concludes, the new storage installation has changed the way the post-production process for the NT. “Previously the team would take material from the SANs and save content locally and on drives,” he says. “Now, the machines themselves are clear of data and we don’t use hard drives in that way anymore because of how fast it is. This means anyone can pick up a project at any point because everything is in EditShare. It has revolutionized the way we work.”
The NT has always led the way in representing the arts in the UK. Constantly evolving to find ways to make productions more accessible to wider audiences, both geographically and financially. NT Live began as a fantastic initiative and become a leader in the event cinema industry. What we love most about their hunger to evolve is that the NT team worked hard to not only maintain the value of the arts to its patrons but also the actors and production teams, who would have been impacted by the loss of work.
This evolution continues to this day, with Jim, Zoe and Tom not only identifying their post production inefficiency but also the importance of their roles as stewards of the NT archive. Inefficiencies often result in additional expenditure, which could instead be used by the arts and as we know the NT archive is important for future generations. EditShare solves both these problems whilst giving the team another opportunity to evolve again.