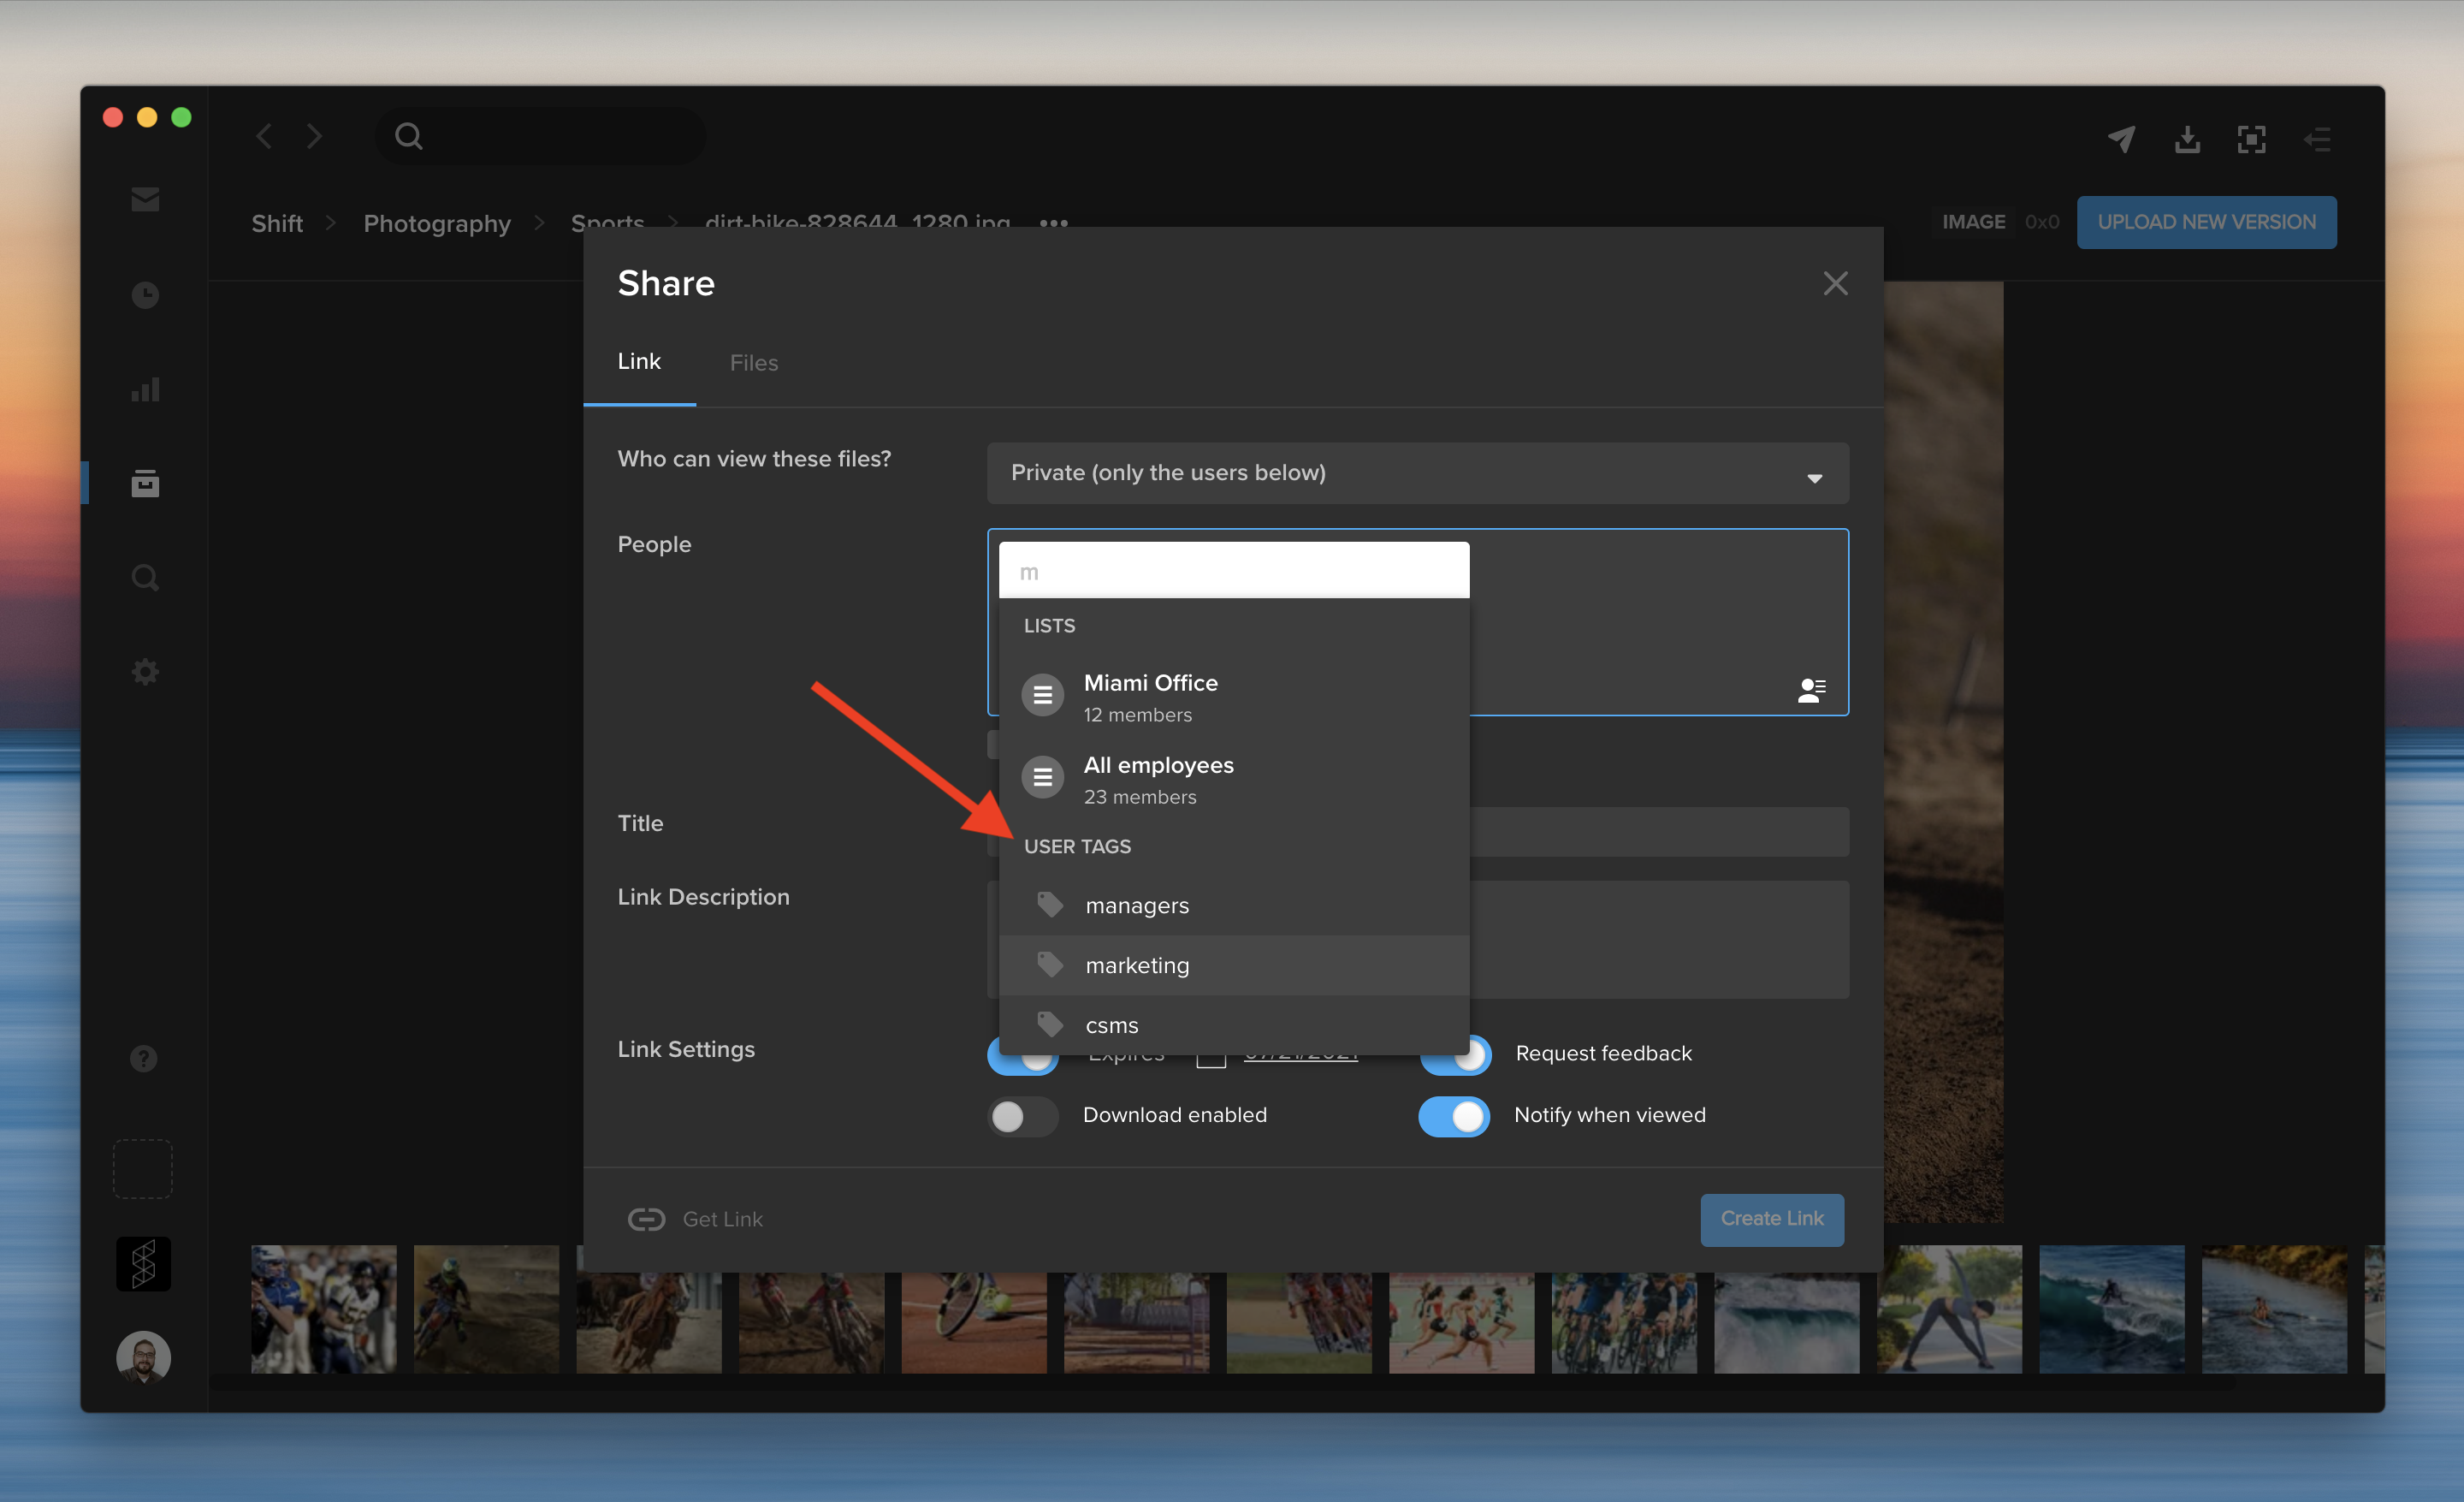
You can share content with a group of people without entering their email addresses every time. In addition to distribution lists, you can now enter a user tag to add multiple tagged users to a share. When you create a new share, start typing a user tag in the recipients field. Then, select a user tag to add all the tagged users at once.

User tags can also be used to easily filter or search for groups of users throughout the application. You can tag existing users on the Administration page by selecting “Add tags” from the Actions menu, or during the “Add Users” process for new users. User tags are listed along the left side of the Administration page.
The Administration page now offers more ways to create, manage, and share distribution lists with other users.
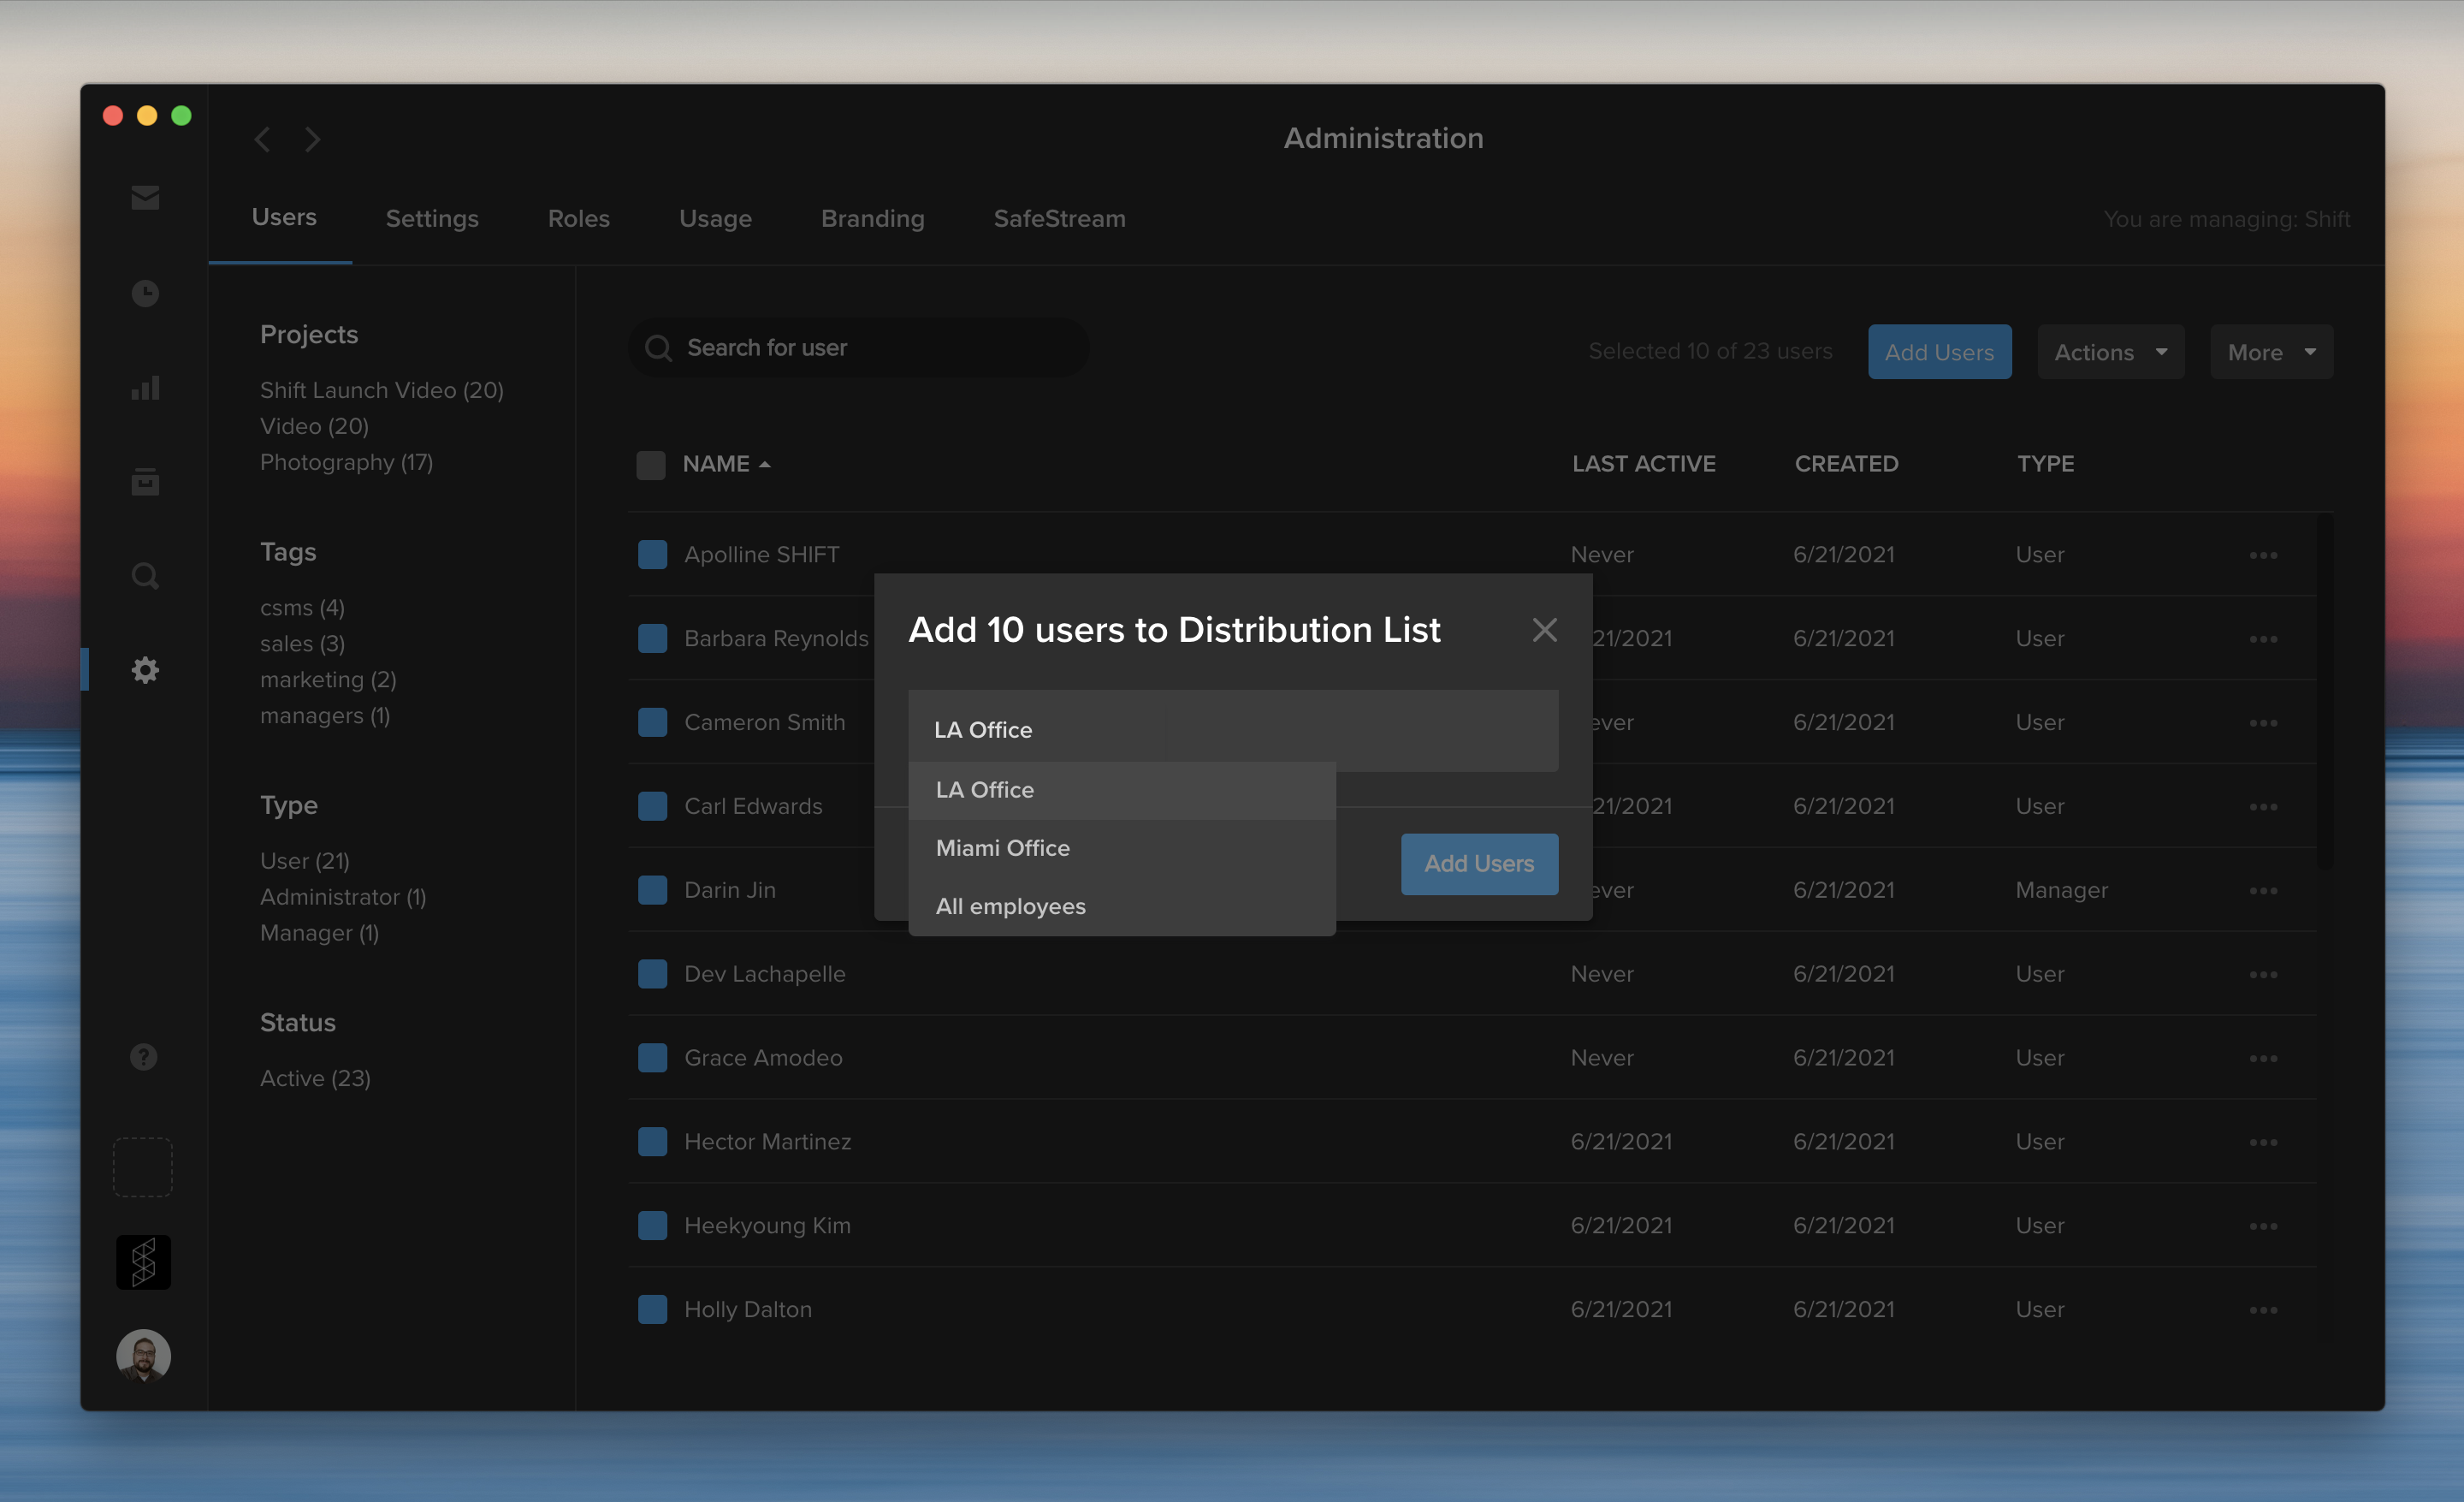
To add people to a distribution list, click the checkbox next to their names. Then, click the Actions menu on the right, and select “Add users to a Distribution List.” You can select an existing distribution list, or click “Create New” to add them to a new list.

When you create or edit a distribution list, you can now share the list with specific workspace users or make the list accessible to your entire workspace. You can still create a private list that is only accessible to you by selecting “Just me” from the sharing options.
To edit a distribution list, click the More menu on the Administration page, and select “Manage Distribution Lists.” This opens a window where you can review and make changes to your lists, such as adding or removing members and choosing a different sharing option.
In addition to emails and names, you can now enter user tags to add multiple tagged users to a distribution list. For example, if five different users are tagged with “marketing,” start typing “marketing” to add all five of these users at the same time.
Adding new users to distribution lists
When you add new users to your workspace, you can now easily include them on existing distribution lists.

Start by clicking the blue “Add Users” button on the Administration page. Then, enter the users’ email addresses and choose their project assignments. Next, you can select a distribution list to add these new users to the list. For example, add new employees to an “All Employees” distribution list as they join your team.

The last few years have presented businesses with unique challenges, leading many companies to embrace more flexibility in deciding when and where their teams work.
To make these new arrangements effective, digital platforms have become critical in ensuring businesses maintain productivity without sacrificing security.
This is especially true when it comes to keeping your content safe, no matter where it is in the post-production workflow.
Helping organizations solve problems like these is at the core of MediaSilo’s products and services. We want to provide ways to keep your valuable content safe and secure, no matter your location or industry.
So, whether you’re unfamiliar with the MediaSilo platform, or a user who has been with us for years, here are some of MediaSilo’s top security features to keep your post-production workflow on track and safe.
1. Customize user access with Project-level and workspace permissions
Sometimes your production team needs the input of freelancers, contractors, vendors, or other internal employees. MediaSilo’s multi-level user access and role-based permissions can help keep collaboration moving and limit risk.
With our simple-to-use MediaSilo Admin Panel interface, you can assign Types to each user, controlling their ability to access projects or create their own. You can then dig deeper into other permissions with customizable Roles to fit your needs. For example, you can create rules to specify which groups of users can edit, upload, download, or share content on a per-project basis, giving your team the control they need to do their jobs while keeping your workspace secure.

2. Gate externally-shared content with private links
If your team needs to send content externally, MediaSilo provides an easy and secure way to do so with our Private Link feature.
Private Links require recipients to first verify themselves as users associated with your MediaSilo workspace before they can access your content. MediaSilo’s Private Link feature works with any share in MediaSilo—whether it’s a Review Link, Presentation, or Spotlight—and generates a simple, secure URL to send to recipients.
In addition to Private Links, your team can also choose to:
- Provide Public Links with the “Allow Download” setting enabled
- Distribute Public Links, but with set expiration dates
- Use the “Public Link with the Password” sharing option
3. Protect against content theft and misuse with SafeStream
For an extra layer of protection on your content, you can leverage MediaSilo’s built-in SafeStream functionality, offering on-demand watermarking technology.

This technology can create instant visual and forensic watermarking that can be burned into any video file.
SafeStream offers two different types of watermarks:
- A visible watermark provides a unique, traceable visual deterrent that will make viewers rethink sharing valuable, confidential content.
- The watermark can be customized to include the viewer’s full name, email address, or even custom text like “Property of MediaSilo.”
- A forensic (invisible) watermark is a set of unique, invisible characters digitally embedded into a video to identify its origin.
- Forensic watermarks can be used on their own or with visual watermarks, providing a secure, uninterrupted experience to viewers.
To mandate this high level of security, SafeStream watermarking can be enforced on a Project or Admin level. or even embedded in a template for use across your organization.
4. Log in securely with Multi-Factor Authentication
Another cybersecurity best practice available in the MediaSilo platform is the ability to use multi-factor authentication (MFA) to increase the security of your post-production workflow. Combining the use of a username, password, and another method of verifying your identity adds an extra layer of security to your account or workspace. MFA is a great option for workspaces that aren’t protected with single sign-on (SSO), and it is extremely easy to implement within your MediaSilo environment.
In fact, users can set up MFA on their own using a simple two-step process in their User Profiles. Your organization can also choose to require all users to enable it before they continue to use their accounts. This second option is a feature that MediaSilo Administrators can enable at a project or organization-wide level.
5. Track and control content activity
When working with sensitive content, you need a way to confirm the access controls in your MediaSilo workspace are functioning as expected. The MediaSilo Insights dashboard can help with this.
Use MediaSilo’s real-time reporting features to access a comprehensive list of all the links you or any member of your team have ever created, as well as granular activity data related to each link. You can also use this feature to change the status or expiration date of each public or private link.
You can choose to track the number of views and downloads on each of your shared files. Or, you can identify who is viewing your content, when they accessed it, and where they are located with a geolocation map. You can even go to the next level and track the origin of a leak down to the culprit’s IP address.

Future-Proof Your Post-Production Workflow
If the last couple of years have proved anything, it’s the need to have processes and tools that help your team stay productive, no matter when and where they work.
No matter your industry, MediaSilo provides a powerful way to keep your team communicating, collaborating, and creating, just as easily and safely as before.
If you are ready to learn more about how MediaSilo can enhance your post-production workflow with additional security and productivity features, our team can help you get started.
Get started with a free 14-day trial of MediaSilo today.
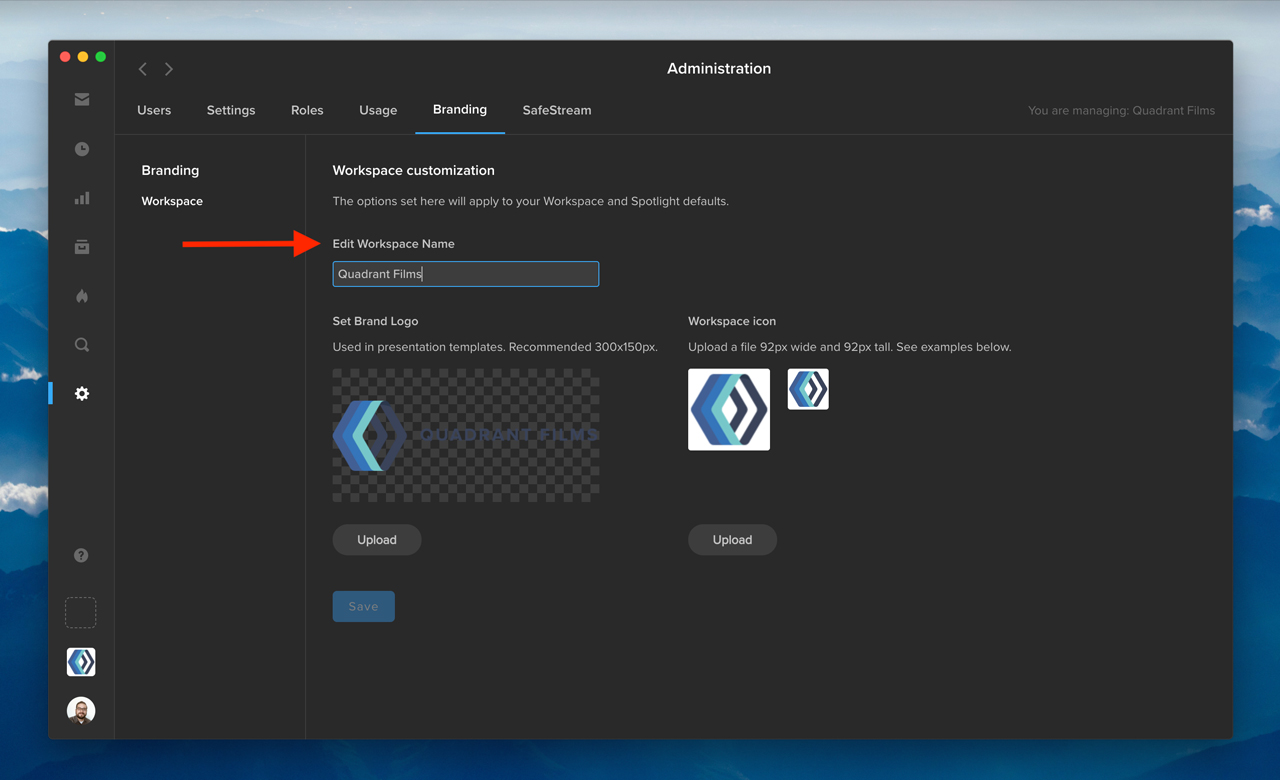
As a workspace administrator, you now have the ability to edit your workspace name. First, click the gear icon in the navigation bar to access the Administration section. Then, go to the Branding tab, and change your workspace name under “Edit Workspace Name.” Once you click “Save,” your updated workspace name will appear in the workspace switcher in the bottom left.

In addition, you can now edit the email address associated with an existing user on your Shift account. Under the Users tab in Administration, click the three-dots menu in any row, and select “Edit User.” In the “User Info” window, you can edit a user’s email address to reflect any changes to the user’s name or email domain. The user’s access to projects will remain unaffected.

When you are the creative director of a rapidly growing retail startup with a worldwide presence, relying on Slack or, even worse, email as your primary asset management tool is a recipe for chaos.
But, this was the reality that Benoit Habfast, the creative director of the French sneaker brand CAVAL, was experiencing when the company began a highly successful Indiegogo campaign to raise capital in 2019.
At any given time, Habfast was managing dozens of campaigns and a variety of products, including CAVAL’s innovative, handcrafted line of “mismatched sneakers.” CAVAL’s meteoric success has meant an increased need for marketing campaigns, online storefronts, and social media presence, with massive amounts of photo content being created for all of these different outlets.
Scalable asset management is essential to successful growth.
High demand for photos across all departments at CAVAL has created thousands of assets that need to be organized and managed on a daily basis. An image library of this size can easily get disorganized, making it difficult to ensure everyone on the team can quickly find the assets they need for a project.
Habfast and his team struggled to find media management software that solved all of their problems. As a stopgap, they were storing files on their desktops and external hard drives. “They were half on my computer, half on some hard drives, and a bit on Google Drive too,” he said. “We would share by sending through Slack or email, but it was a big pain.”
In order to keep pace with the company’s growth, Habfast needed to centralize the image library so the entire Caval team could easily search and find exactly what they needed. MediaSilo helped CAVAL create an effective asset management strategy. That’s when the brand turned to MediaSilo and its organization workflows. Habfast found MediaSilo’s project and folder-based structure, tagging features, and robust search functionality to be the exact media management solution the brand needed.

Tagging streamlines file organization.
CAVAL’s creative team started by moving all of the existing files off of their desktops and hard drives and uploading their vast library of content into the cloud-based MediaSilo platform. Although organizing the files into projects and folders was a good jumping-off point, Habfast found that using tags was the real key to unlocking the full potential of the system.
As new content was continually added to their MediaSilo account, the team established a system for uploading where tagging assets was an integral and routine part of the process. Using MediaSilo’s bulk-tagging feature, the team easily added relevant tags as new content was uploaded into their projects. After dragging and dropping batches of related content into the system, the team selected all of the new assets and labeled them with relevant tags in one easy step.

Structured tagging eliminates redundancy.
The CAVAL team was looking for a system that would eliminate overlaps while requiring as few tags as possible. Using the MECE Principle to structure image tags and guide his tagging in MediaSilo, Habfast settled on four essential tags that would effectively organize every image in their account.
“E-commerce” and “Creative” are the first tags to be added to every asset, differentiating between images intended for the online storefront and images that will be used for a creative marketing campaign. “Model” and “Packshot” are the second layer of tags, indicating whether the image has a person or model wearing the sneakers or features the sneakers alone.
With this simplified tagging strategy, Habfast’s team built an organizational structure within MediaSilo that breaks down their entire content library into those four target image categories. Supplemental tags for product name, reference number, and special campaigns such as “Valentine’s Day” are added on top of the four primary categories to further distinguish individual images and create a more robust search experience.
Intuitive, tag-driven search makes it easy to find content.
“Now, we don’t ask on email or Slack anymore, ‘Hey can you send me that file.’ We know where to find that file—there’s just one place to find everything.”
With this new, more organized tagging structure, CAVAL’s MediaSilo users can easily and intuitively search for assets in their account. Using MediaSilo’s advanced global search, users can select one or more tags from a picklist; apply additional filters, such as who uploaded the assets and when they were added; and narrow thousands of assets to a select few by searching for a handful of relevant keywords.
MediaSilo’s cloud-based media management software has enabled CAVAL to get images off of a hard drive and into a feature-rich, easy-to-navigate platform. By centralizing its asset workflow, MediaSilo allows the entire CAVAL team to securely share and access the files they need when they need them. As Habfast explained, “Now, we don’t ask on email or Slack anymore, ‘Hey can you send me that file.’ We know where to find that file—there’s just one place to find everything.”
MediaSilo empowered CAVAL to scale its asset management processes so employees are free to focus on their high-level creative projects, new campaigns, and marketing strategies.
If you’re ready to find out how MediaSilo can enable growth and drive organization workflow efficiency for your team, sign up for a free 14-day trial of MediaSilo.
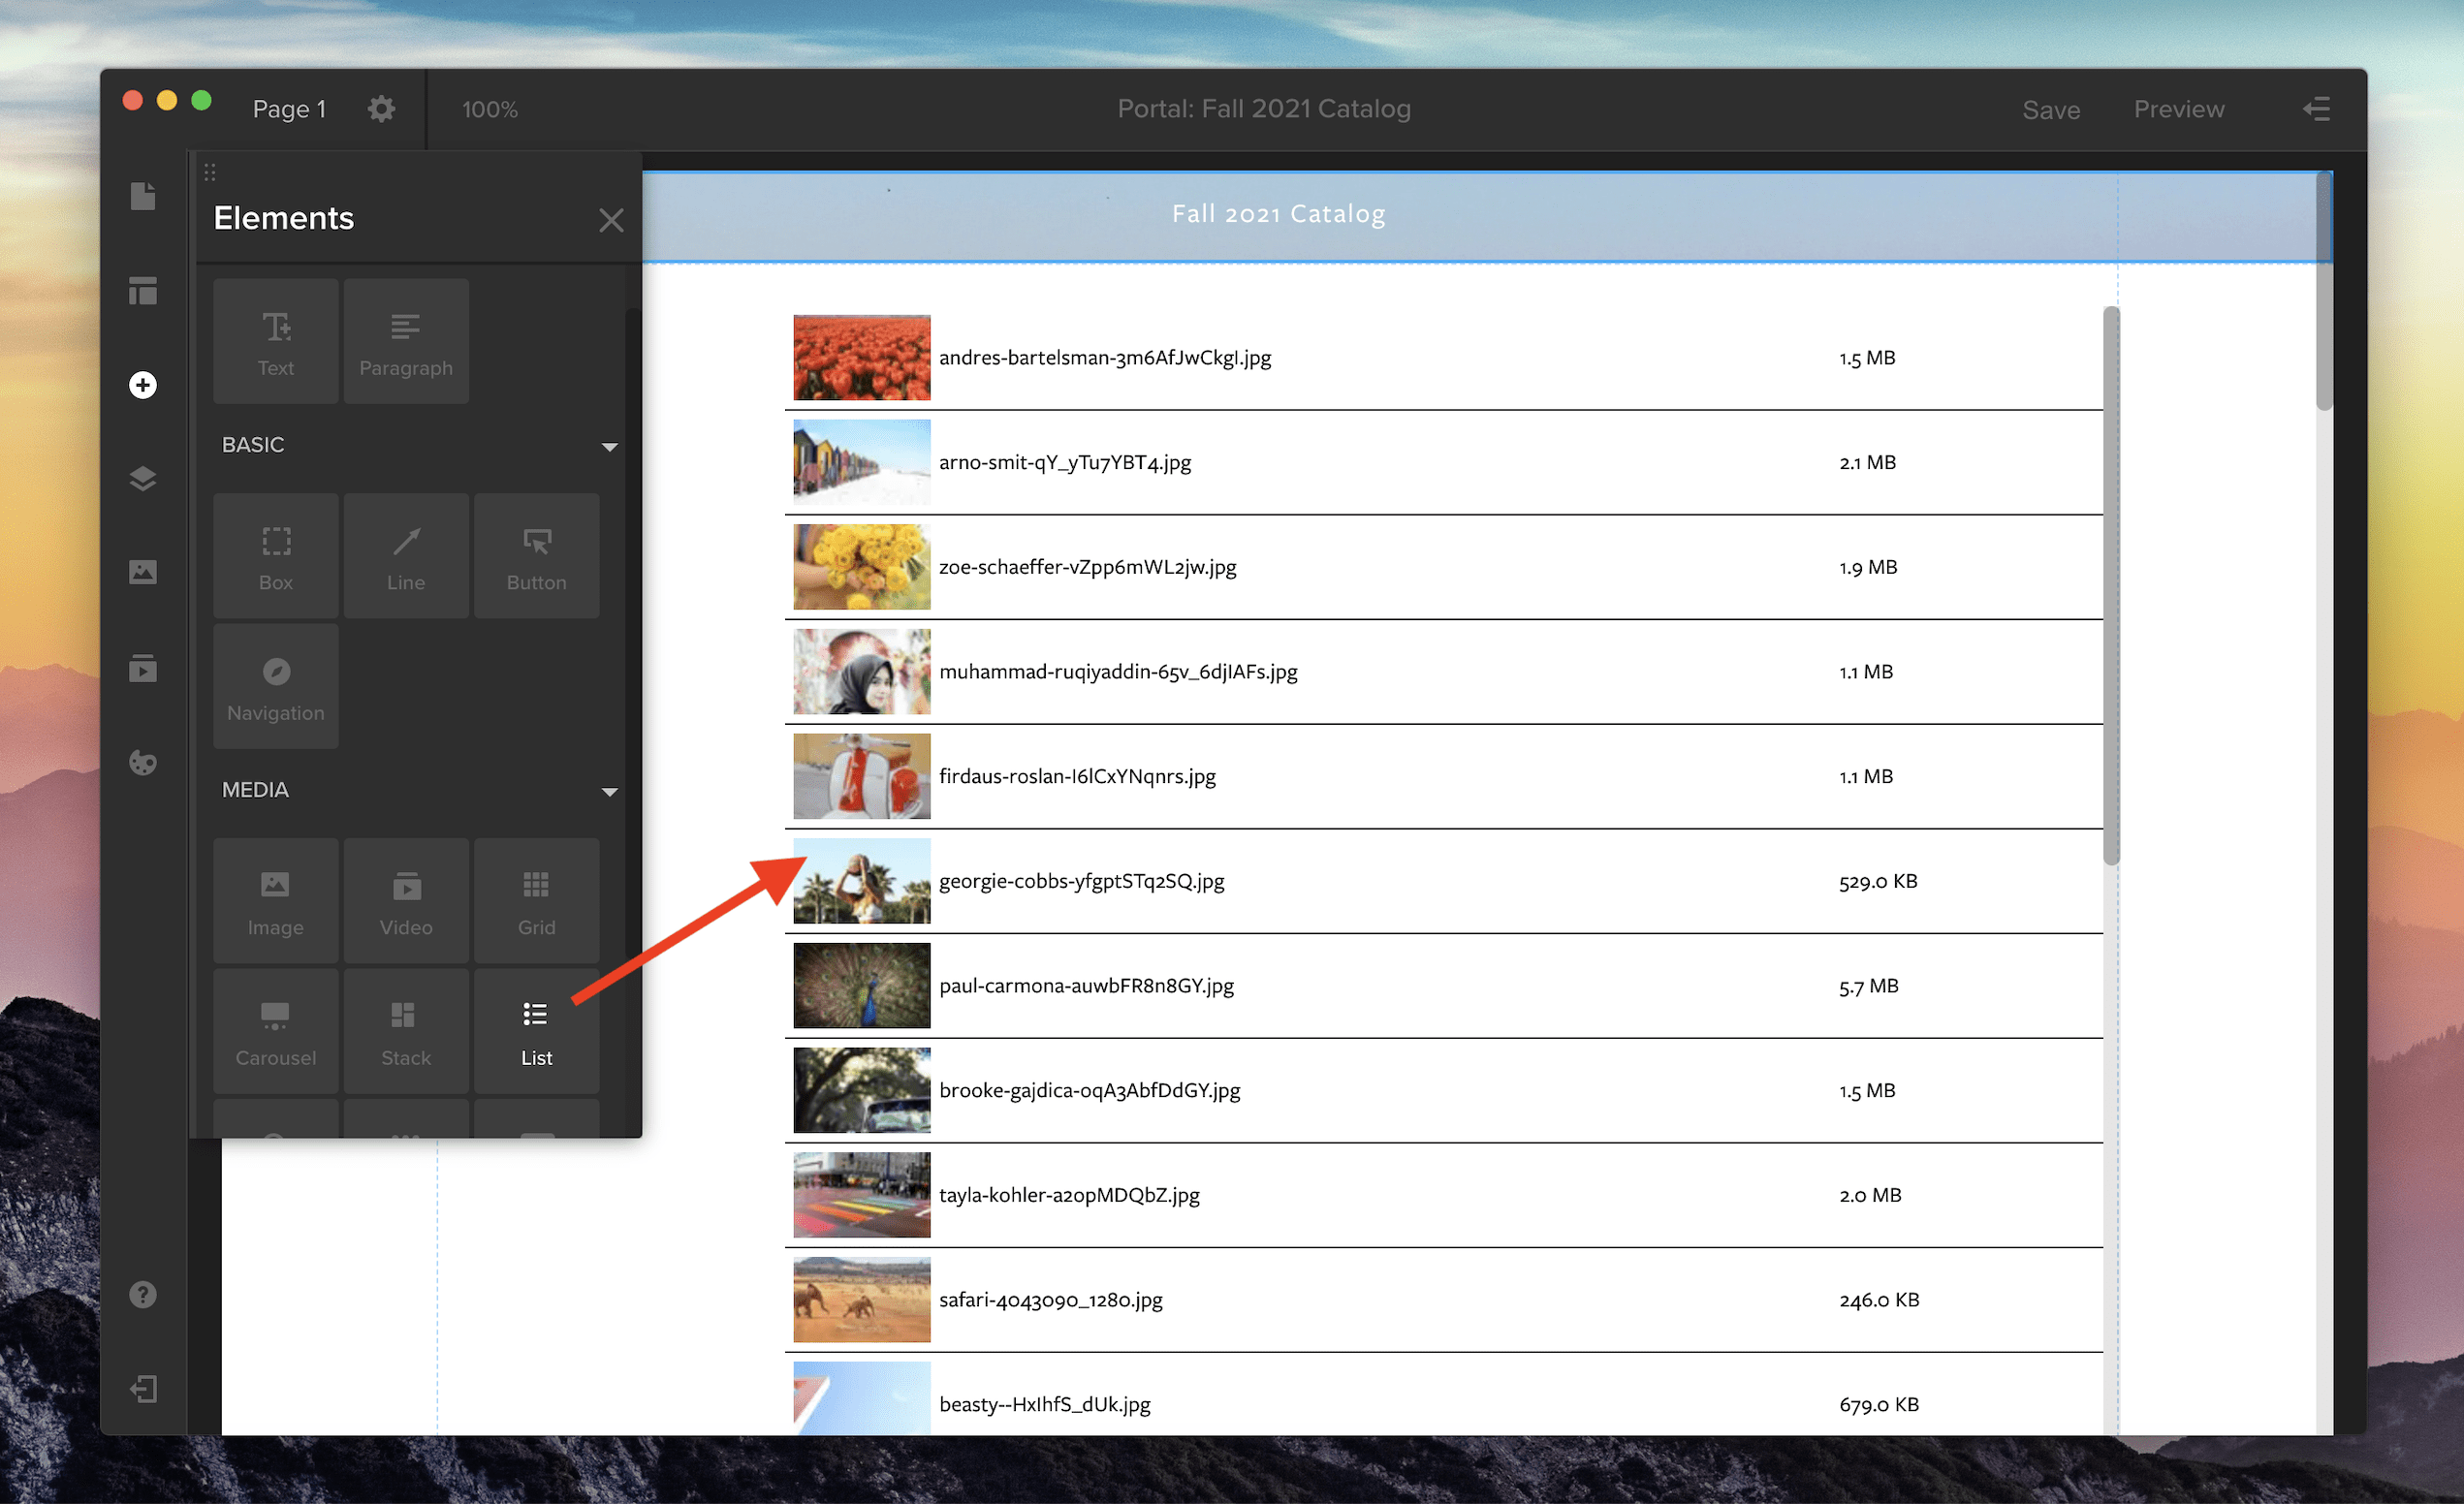
List view is now supported in Spotlight for your media galleries. To add a gallery with list view to your Spotlight template, open the Elements panel by clicking the plus icon along the left-side toolbar. Then, in the Media section, choose the List option or pick from three other media gallery views: Grid, Carousel, or Stack. Click and drag the gallery icon onto the main screen to add it to your Spotlight template.
To customize your gallery, open the properties panel in the right-side drawer. Here, you can adjust the spacing and thumbnail size in your list by changing the width and height. You can also customize the font, background color, and the divider line between each row.
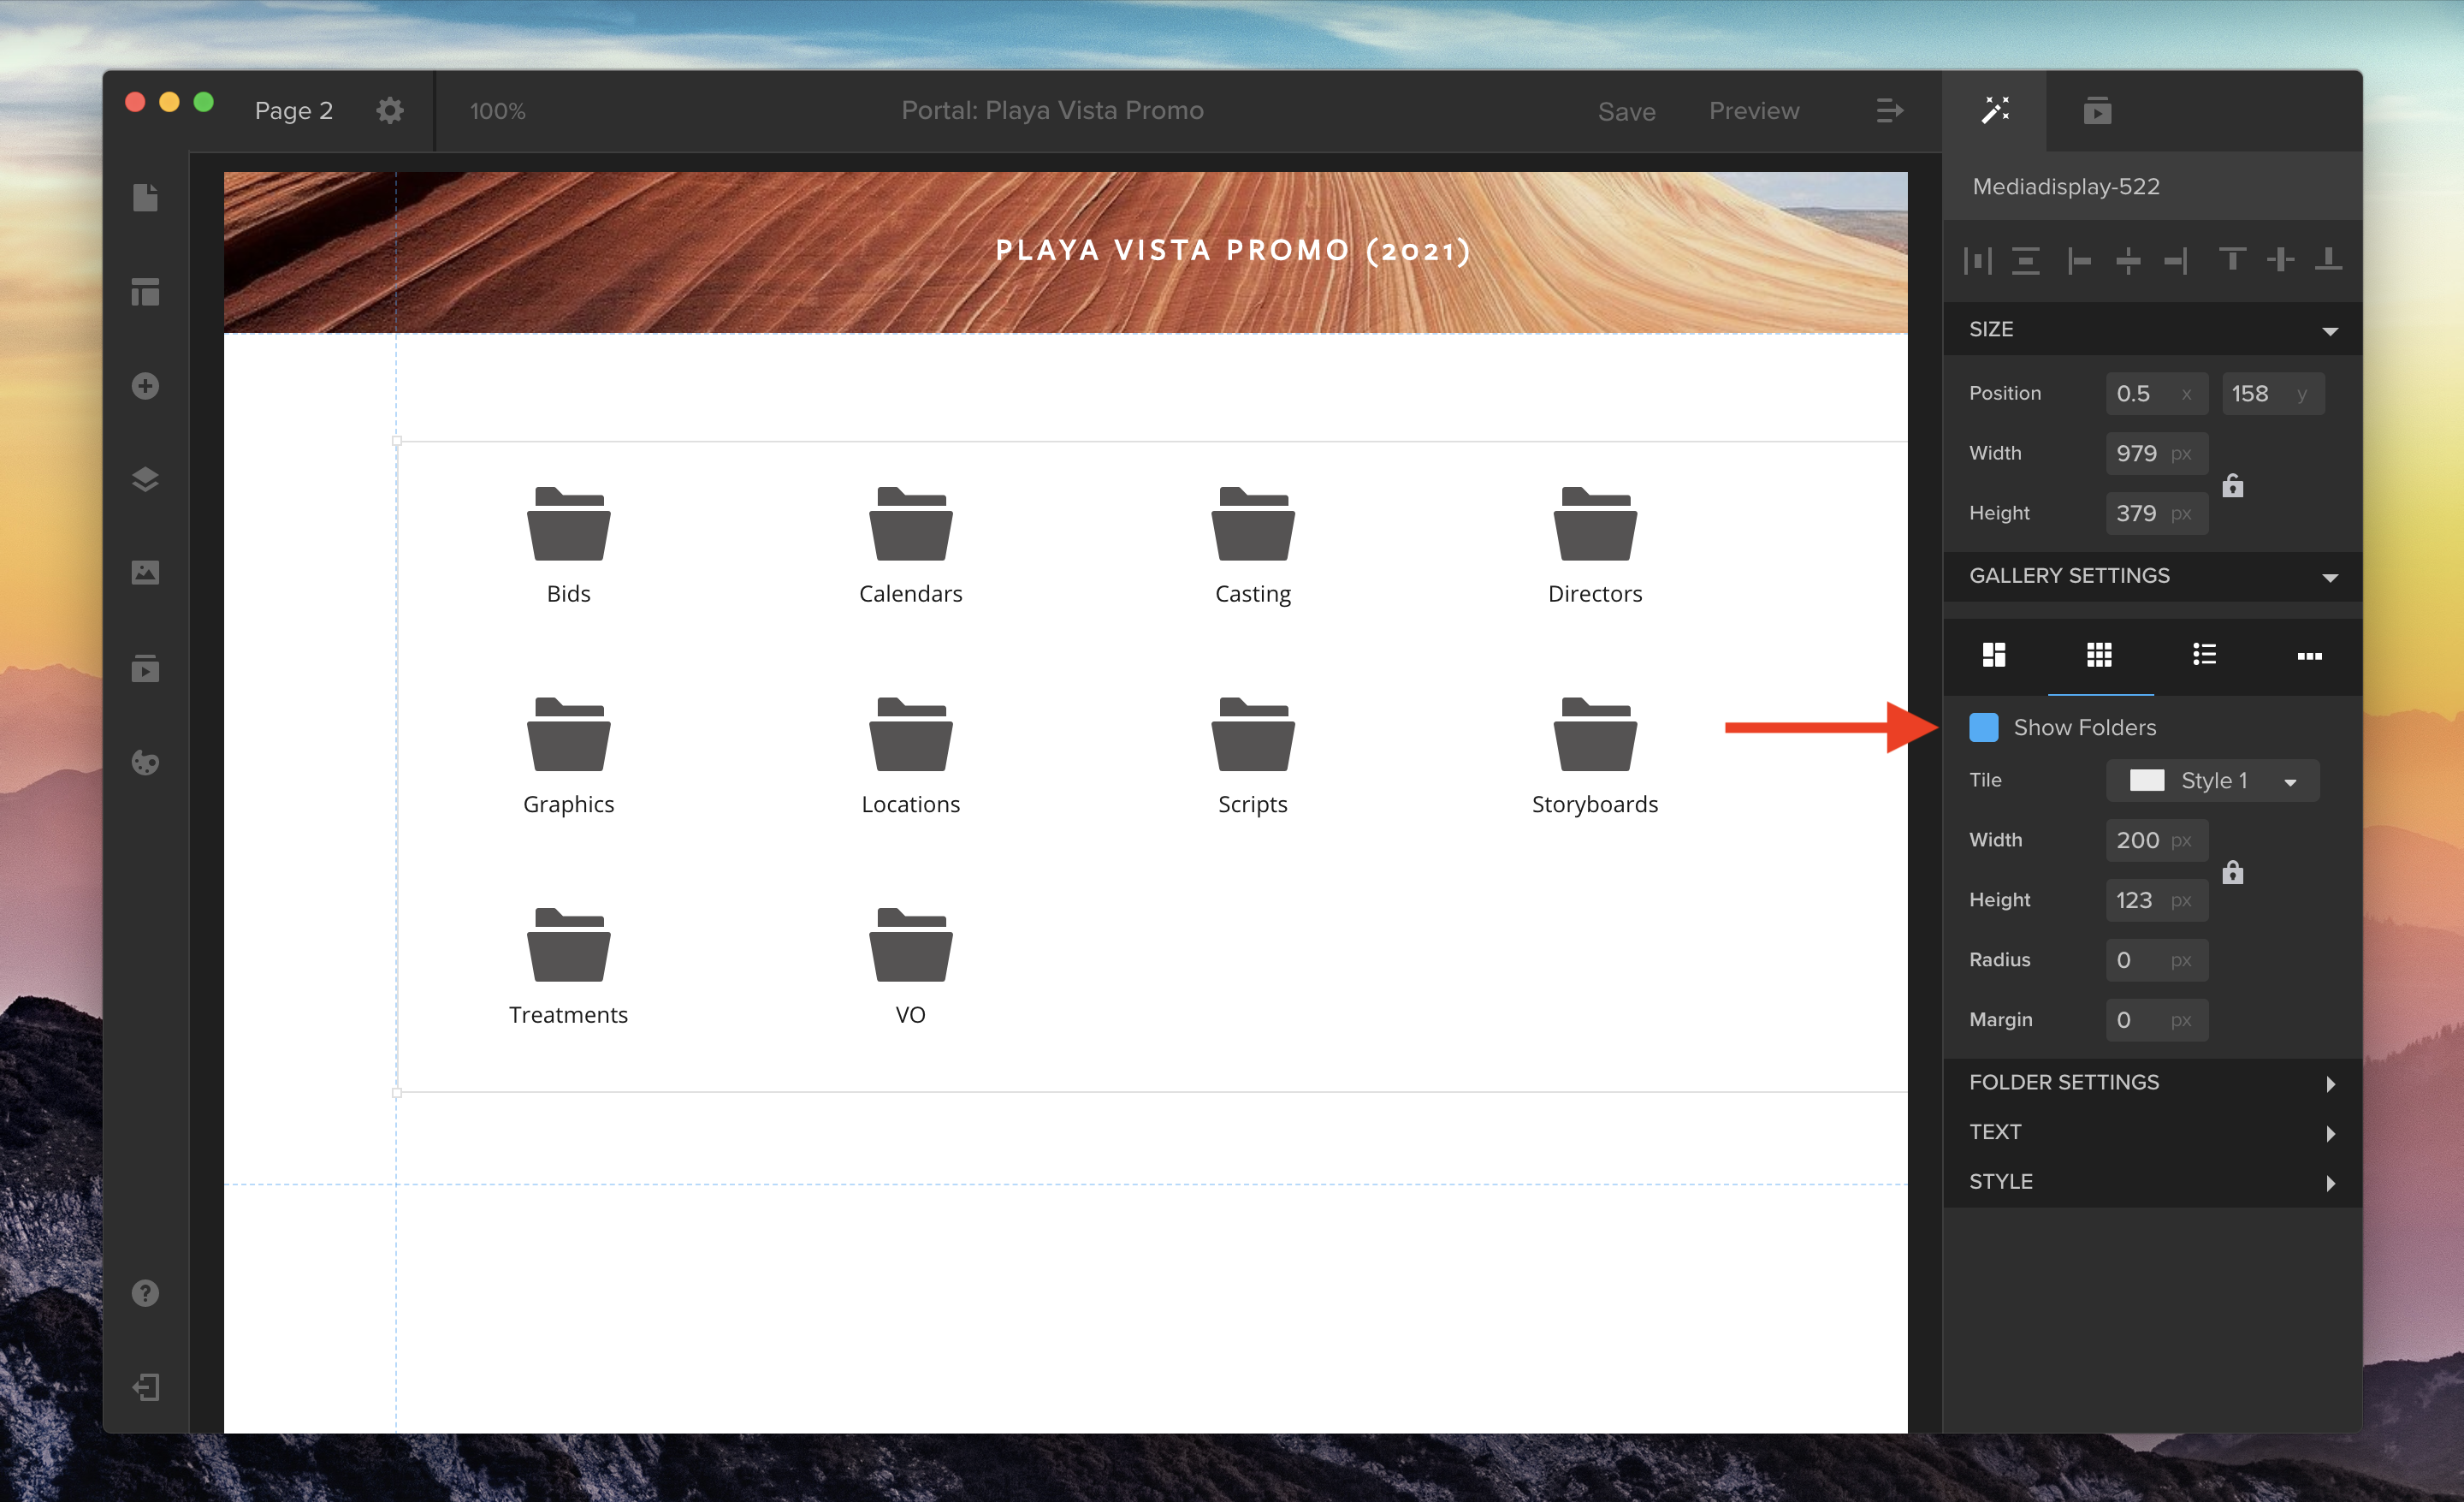
You can also now choose whether or not you’d like to hide or show playlist folders in your media galleries. Use the “Show Folders” checkbox in the properties panel to toggle this option on or off for Grid or List view.
To learn more about Spotlight galleries, please see our Knowledge Base article “Choose a Media Gallery to Display Your Work.”
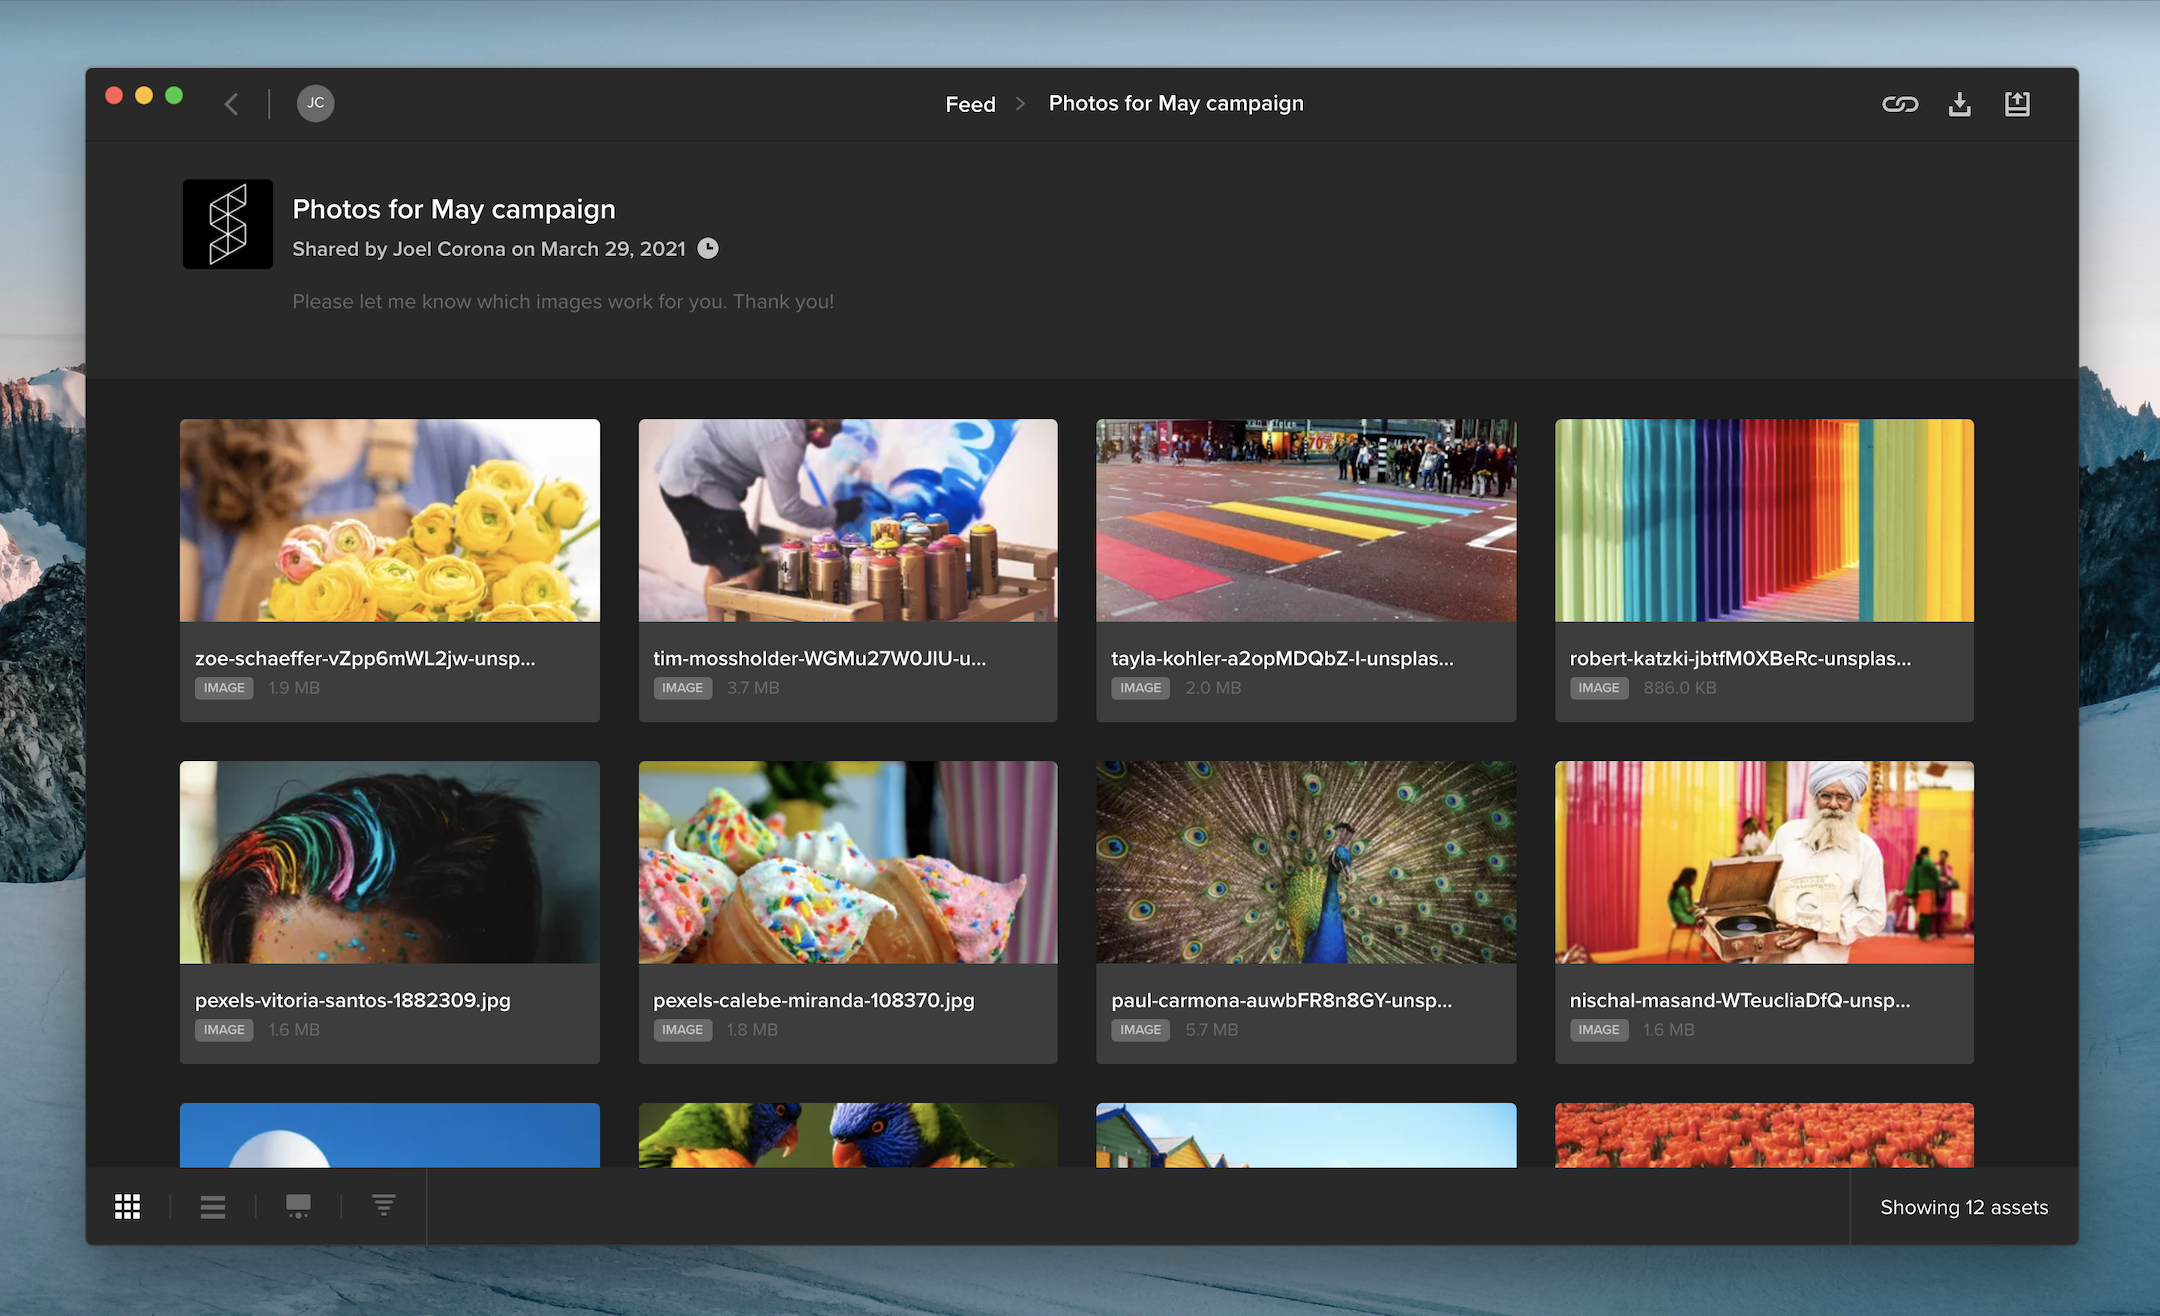
When you share multiple files in a review link, your audience can now access the files in a gallery that supports batch approval and downloading.
If you requested feedback on a review link, your audience can hover over an asset tile and click the thumbs-up icon to approve it. Viewers can also select multiple files and click the thumbs-up along the top of the page to approve multiple files at once.

When downloading is enabled on a review link, viewers can select one or more files and click the download button at the top of the page to download them. Clicking the download button without selecting any assets will download all of the files included in the review link.
In the bottom left corner of the screen, you can choose between gallery or list view, change the sort order, or open the review page with commenting and annotation tools for videos, images, and documents.


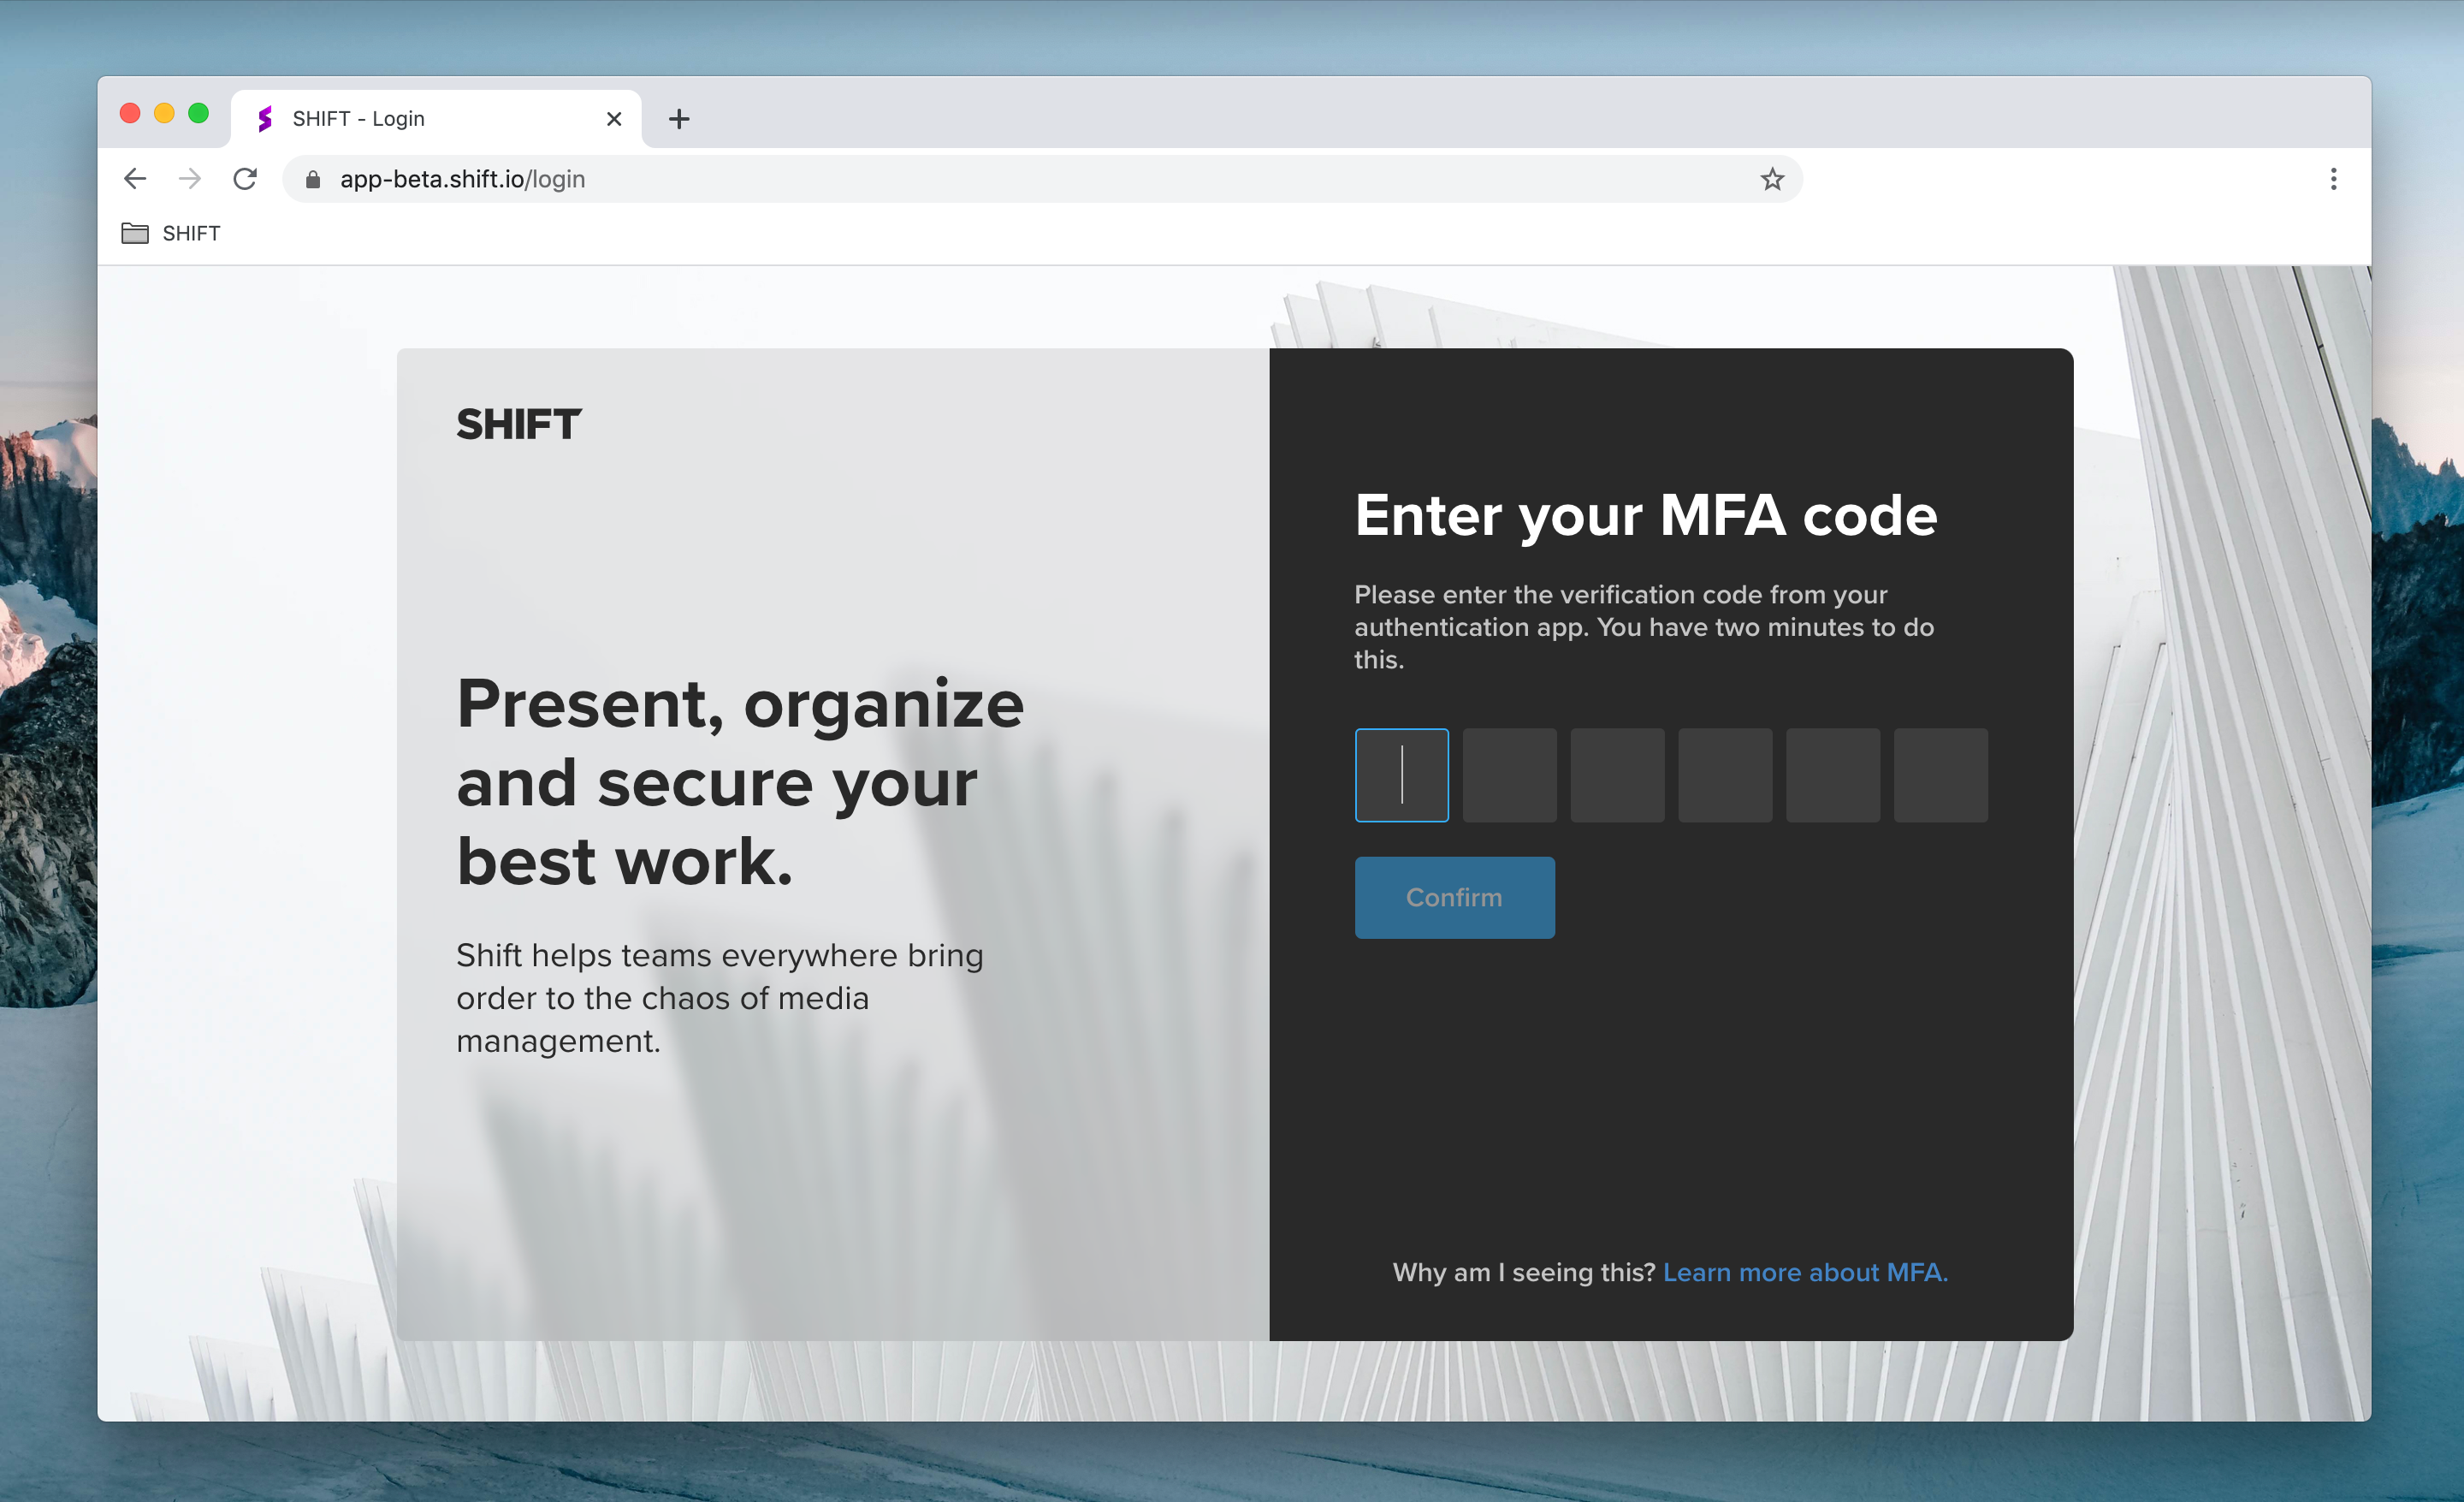
For added security, administrators can now require workspace users to log in using Multi-Factor Authentication (MFA).
To set up MFA, users link their Shift account to their phone or tablet by installing an authentication app, such as Authy or Google Authenticator. When they log into Shift, they will be prompted to enter a six-digit code provided by the authentication app.
As an administrator, you can enable MFA on your workspace by visiting the Security Settings tab in the Administration section.

Note: Shift uses the same MFA code as Screeners.com. If you already use MFA to access Screeners.com, Shift will use the same MFA code to log you in.

You now have more ways to log into your Shift account. Enter your email address to receive a login link in your inbox, or click any of the icons below the email field to log in with your Google, Slack, Apple or Microsoft account.
Additional login options are also available when you access a Review Link. To comment on a public review link, simply click “Add Comment” on the review page and log in to start leaving feedback.

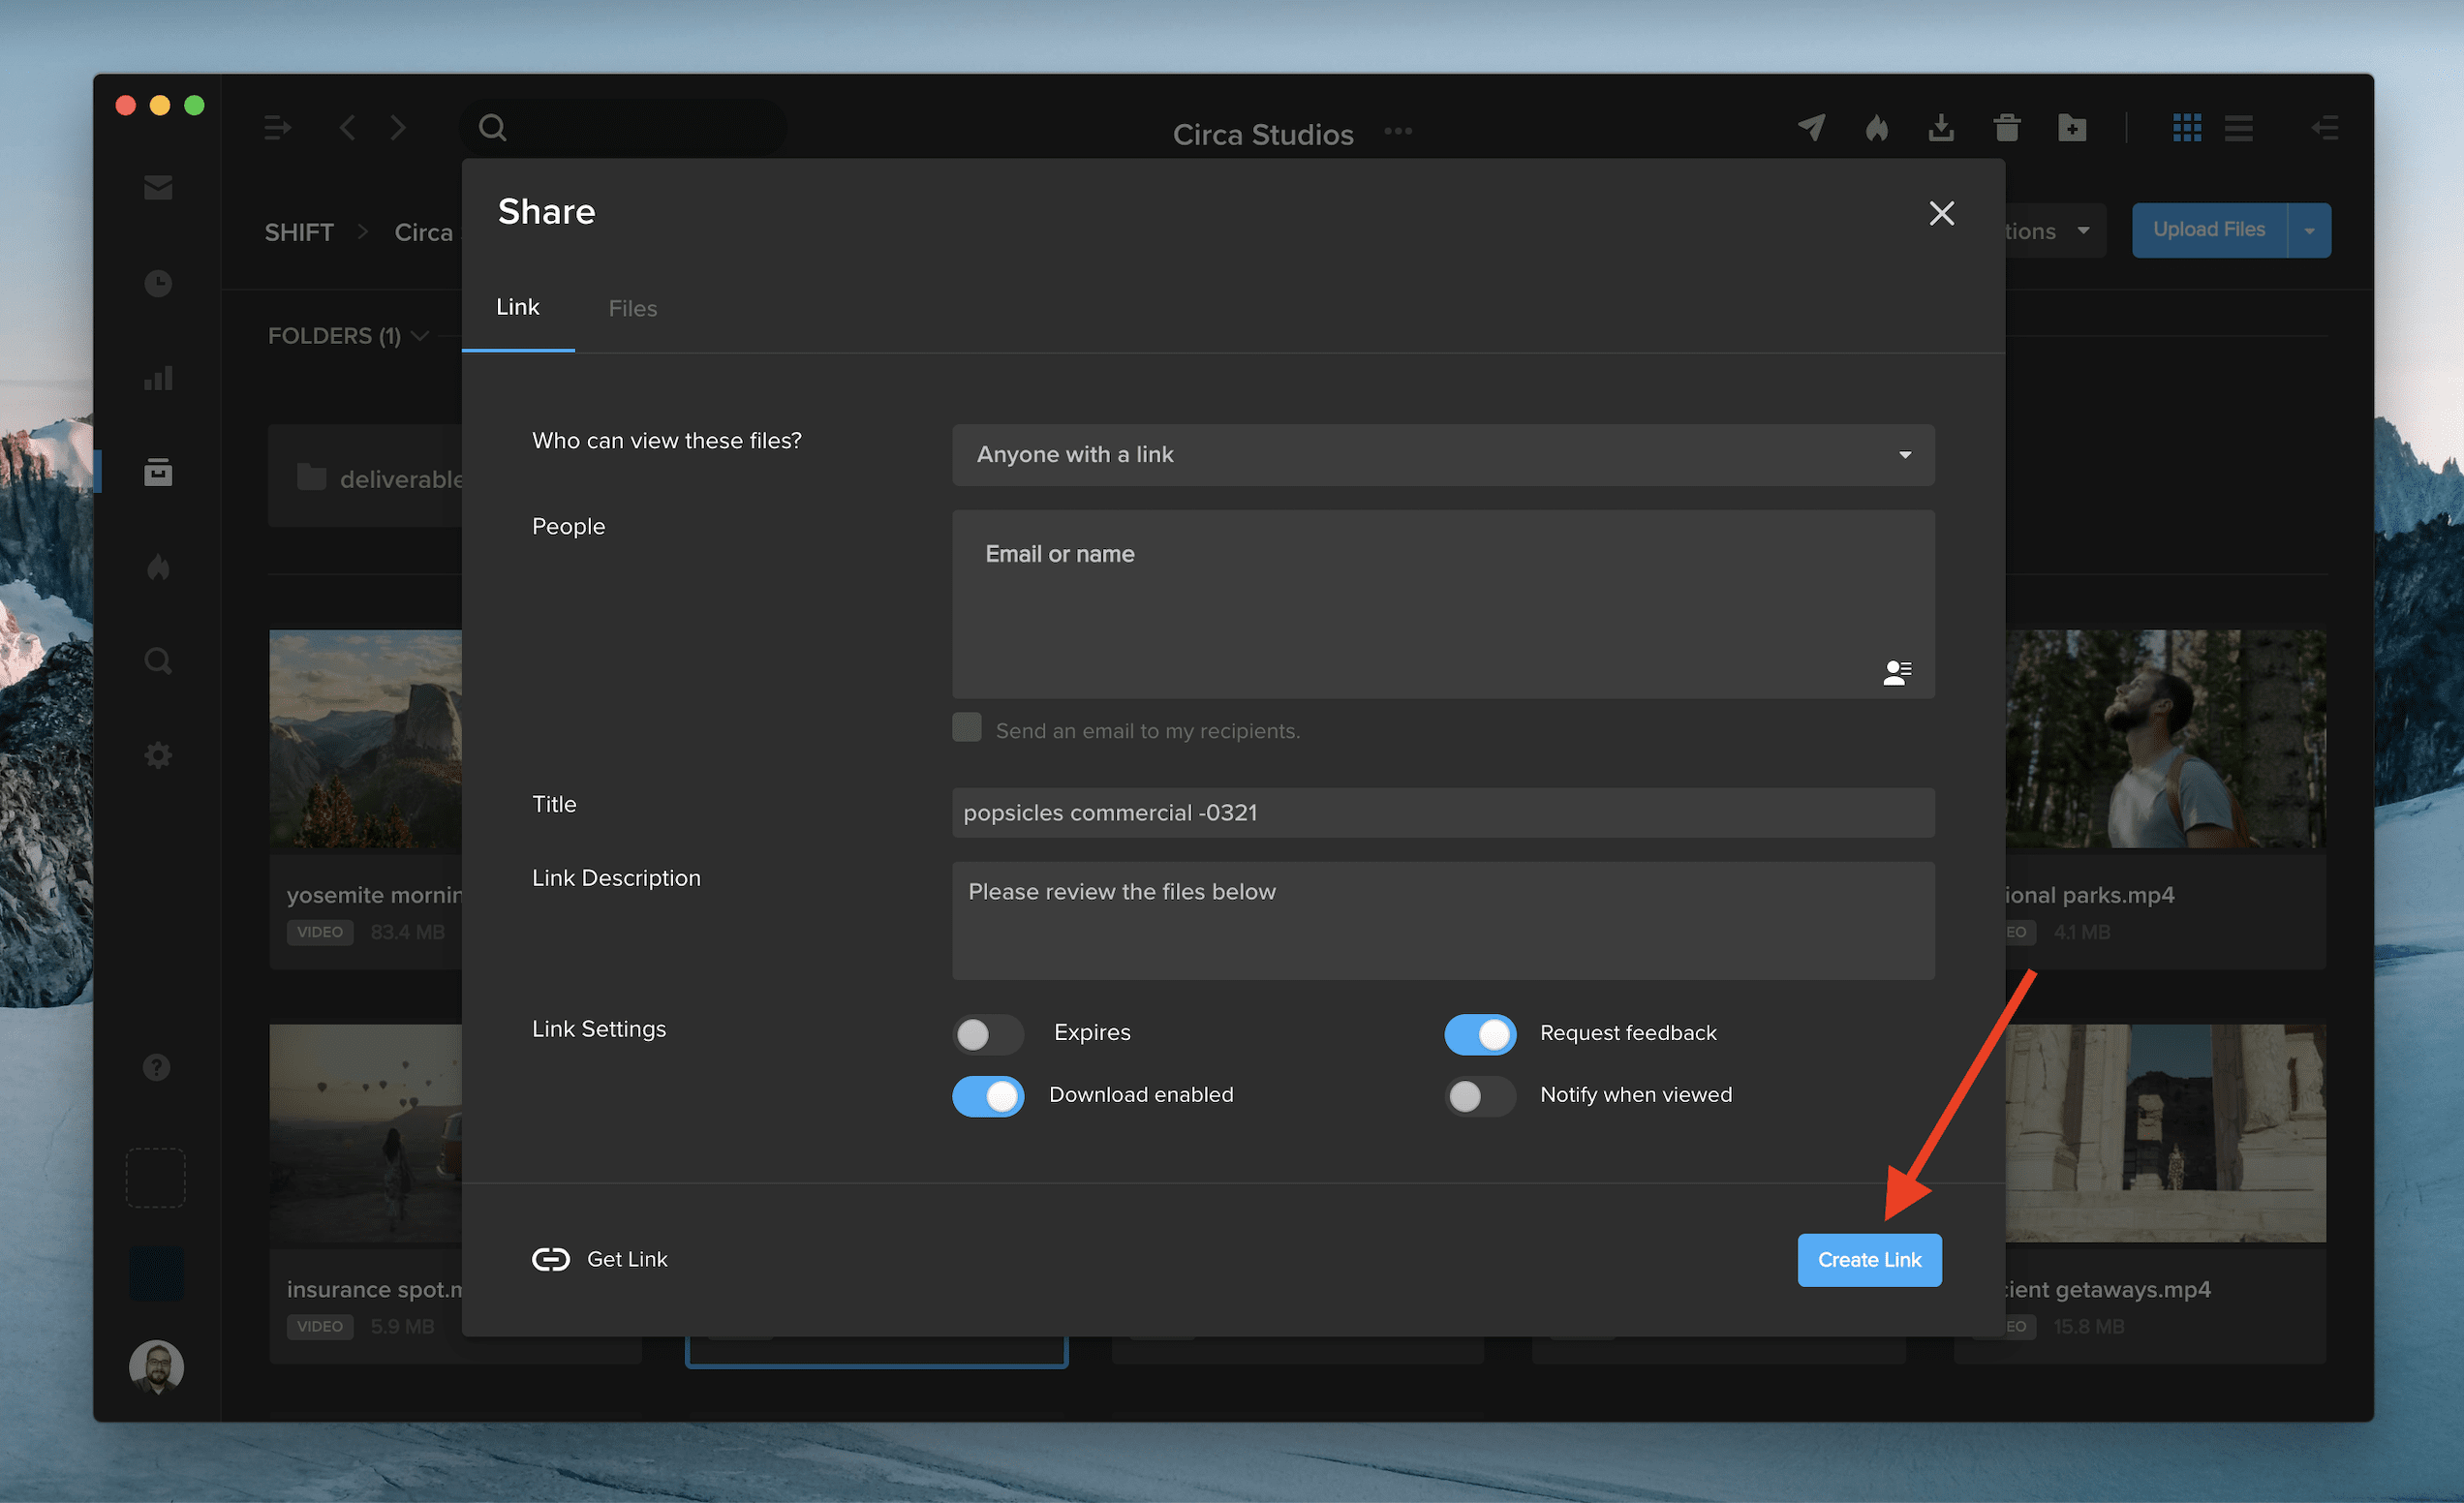
After you create a new Review Link or Spotlight Presentation link, the URL will automatically copy to your clipboard for instant sharing.
See the feature in action by right-clicking on a file in one of your projects, selecting “Share,” and picking either of the two options. Once you choose your link settings and click “Create Link,” the URL will be ready to paste elsewhere without any extra clicks.

