Creating the soundtrack for humanity with Wiredrive
Egg Music, a musician-staffed creative house, uses Wiredrive to manage tight review and approval deadlines, pitch new business, and make their mark in a rapidly evolving industry. They specialize in composing original scores and songs for films, television shows, commercials and web videos, and their music has appeared in some of the best-known campaigns of recent years for brands such as Nike, Target, Microsoft and Chevrolet.
Nailing every deadline
Egg Music works with clients who are constantly on the go and expect to view media on their mobile devices without having to download files. The team relies on Wiredrive to deliver multiple audio tracks that are often attached to large video files. These deliverables must undergo several rounds of revision within a very short timeframe. “Since we started using Wiredrive we’ve never experienced an issue that prevented us from making a delivery on time,” explains Eric Fawcett, founder and executive producer. “There have been many times where a client told us they appreciated our well-organized deliveries. How we deliver our media is as important as what we deliver, and Wiredrive helps us to do that consistently.”
“We win and retain business not just by doing great work, but by maintaining seamless workflow habits that our clients never question. Wiredrive plays a central role in that.”
Winning new business
Wiredrive also plays a critical role in pitching business for Egg Music. Since competition in the music industry is fierce, Egg Music relies on Wiredrive Library to build custom branded reels tailored to decision makers at the target company. They can present work through an Egg Music branded system, and know that the interaction is going to be seamless and easy to use.
Interface design for business success
Egg Music has been using Wiredrive since 2008. They were previously using file share tools to manage their workflow and media. Since making the switch, Egg Music has experienced improved functionality and aesthetics. “Wiredrive is elegant, flexible, and works consistently—that means everything in the industries we play in,” says Eric.
Digital Asset Management (or DAM) isn’t new. DAM solutions have been in play for years at the larger corporate level, but it is becoming more and more prevalent in smaller businesses due to the sheer volume of files being created by today’s content producers. And, with that content explosion comes a new problem facing these organizations – how do we capture and reuse all of this great stuff we’re making?Here are a few items to consider:
Not every DAM is the same
Some DAMs products provide industry specific solutions where as others focus on more generic universal capture and storage. It’s a good place to start by thinking about the particular best practices and norms in your particular industry.
Not every file is the same
It beginning your evaluation of the right DAM, start with the types of files that are most critical to your every day. For example, while you might need to store all kinds of files, certain playback or preview functionalities might be imperative, like reviewing large videos or images. This alone might limit certain DAM products and focus your choices. Even then, files like video have additional criteria that need to be considered like quality, resolution, performance, and compatibility. Some product support video, but might support high-quality ProRes playback.
How do you value your collection?
How do you place monetary value of your asset collection? Can you distill that to a value per asset? While there isn’t a magic calculator for determining this, it’s good to think about at least conceptually. One reason is that DAMs (good and bad) often come at a considerable upfront costs including the core software, setup, integrations, training, etc. Understanding how the size of your asset catalog and it’s potential growth will help you understand how one solution or the other will provide adequate scale and ultimately long-term sustainability.
Metadata requires flexibility
Flexibility is the key here, plain and simple. As I’ve already said, not every file is the same and how files are described is even more unique. Let’s look at two file types: Videos and Spreadsheets. While videos might require a meta-tag for director, spreadsheets would never. Moreover even within a single file type like video, it might need to be described with different tags and in different orders. Here is an example:
Video #1 = broadcast commercial
Director: John Doe
Agency: MyAgency
Editor: Jane Doe
Runtime: 0:30
Video #2 = digital billboard
Category: Out of Home:
Type: Digital signage
Placement: Outdoor
Agency: MyAgency
Two things of note: the first is that video #1 has a director, while video #2 does not and has it’s own specific tag needs. The second is that while both have “Agency”, it is less important based on it’s prioritized order. Sounds simple enough but not many DAMs solution require this kind of flexibility.
Where do you need reach?
Part of good DAM is not being left on a prison island. Thus, integrating with the greater media and workflow ecosystem is imperative. It’s one thing that capture and store, but make sure that you can push/pull assets from other places for easy research and reuse. In addition check to see whether the DAM solution has out-of-the-box connectivity to the applications most used in your most common workflows.
Who can do what?
While consolidation and accessibility are key, not everyone needs access to everything. In many cases some assets are more sensitive in nature, thus require strong security measures to be met and enforced.
Will your people use it?
While this might sound a bit odd, culture, as I have written, might be the most crucial part of selecting the right DAM. Many people looking to bring DAM into their organization don’t even realize they are using something already. Every company has a baked-in culture for organizing, searching, and trafficking, even if their version is an unmitigated free-for-all. Trust me when I say that preferences exist in your business, and if ignored, whatever you do is doomed before it gets off the ground.
A well-thought-out metadata structure can mean the difference between landing that big job and aimlessly searching for the right spots to send. Just like a book needs chapters, media files need metadata to help you find exactly what you need, when you need it.Here is a quick guide on how to get your files organized:
1. There is no such thing as too much data
Don’t be afraid to go overboard with categories and tags. Yes, it’s more work in the beginning, but in the long run, you are going to save yourself a lot of time and headache.Setting up a good metadata structure from the start ensures that all your files will be in the right place before you even start adding media. This helps prevent the frustrating task of editing and re-editing files over and over when you later realize that there aren’t enough data points to find what you are looking for, when you need it most.
2. Visualize how you would search for assets
Imagine a giant vault filled with all of your media. Then, think about all the different ways that you organize that media and ask yourself, how do you find exactly what you are looking for?Is it organized by director or year? Do you search by the agency that the job was for? Is it organized by genre? Do you identify media by specificities, like “Cannes 2015 winner” or even, “Talking dog on a jet ski?”How do you, as a media manager, keep tabs on all your work so that you are able to stay on top of things? How would you look for things in a pinch? Spend some time working through this exercise and make note of what people ask for when archives or reels are requested.
3. Map things out
After you have visualized your search process, create a document to organize this information:
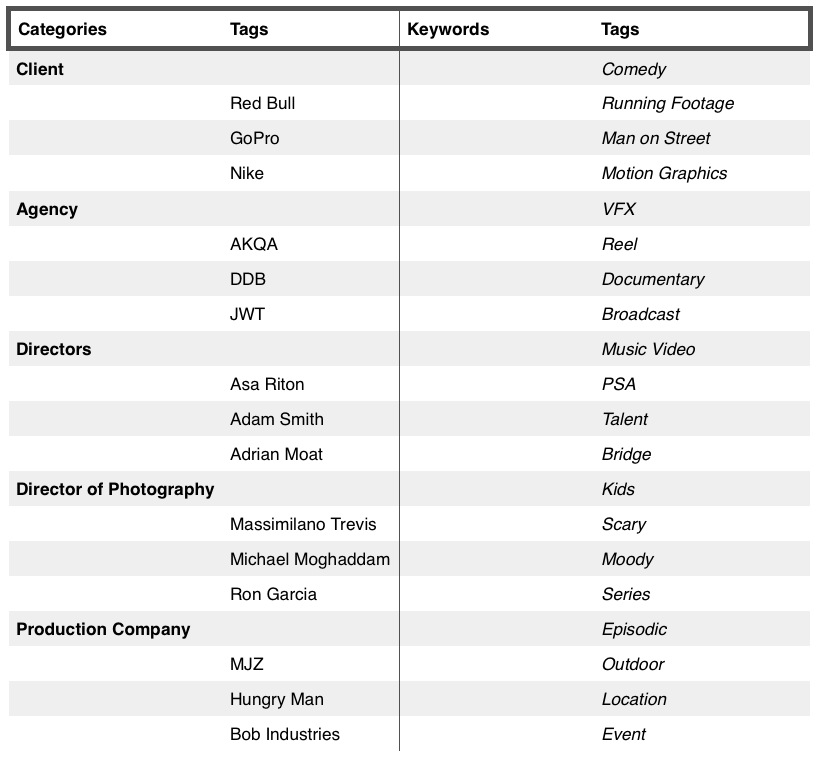
Create a spreadsheet and title the far left column, “category,” and label the column to its immediate right as “tags.”
Below the category column, write down all of the top level values that you thought of in tip no. 2. This would include categories such as director, editor, production company, year, genre, job code, and so on.
Under the tags column, start adding the unique values that correspond to the categories to the left. For example, tags for “director” could include Ang Lee, while tags for “genre” could include comedy.
Create a “Keyword” column for any data points that do not fit under the main categories that you defined. (More details in the next tip).
Once this data is structured, you can go into your system, and add the values ahead of time so that everything is in place when you start uploading your files.
4. Use keywords
Keywords are your friend. Think of categories to tags as a parent-to-child or one-to-many relationship. For every bit of identifying data that does not fit under a parent category, (e.g. Cannes Winner, CGI Water Shot, Best of 2015, etc.), you should create as a keyword. This is where you will want to also include the odd identifiers that help you find things when you need them (e.g. summer sales reel, job winner, do not use, or “for reference only”)You’ll be surprised by how often a single, critical asset is identified with a word or phrase that doesn’t fall under a traditional category definition. Keywords are your tool to keep track of these outlier pieces of metadata.
5. Audit when needed
Your data will change over time and chances are, you will think of new and better ways to organize things in your system. Don’t be afraid to try something different, revise or start over. A good metadata structure should make it easy to find and keep track of your work. The process is a journey. Have fun, and try and learn something new along the way!
Want to learn more tips about how to organize your media library? Contact Wiredrive support.
If you’re a freelancer in the creative industries, having an online portfolio is critical. Most designers, art directors, copywriters, and cinematographers — just a few job titles in the creative fields — maintain their own up-to-the-last-good-project site because they know it plays a huge part in getting more work.
But I’d argue everyone in our industry should have one — from the greenest production assistant all the way up to the A-list editor or commercial director who lets their editorial or production company website do the talking for them.
Here’s why: A website should show the work you’ve been part of creating.
That’s probably obvious. But people interested in hiring you also want to know what you’re like to work with, and your website is your best chance to let them know that — but in your own words.
“People interested in hiring you also want to know what you’re like to work with, and your website is your best chance to let them know that — but in your own words.”
Here’s an example of what I’m talking about.
My old employer Wieden+Kennedy had a screening series where accomplished filmmakers who straddled the line between the film and commercial worlds would come to Portland and give a sneak peek of their latest feature film to a roomful of the agency’s producers and creatives. The hope was that they’d get commercial work down the road based on that screening.
After Yann Damange screened his film ‘71, which won him a British Independent Film Award for Best Director in 2014, a creative director asked how he’d found such great kid actors. Simple, he replied, I go to boxing gyms. The kids are confident, and they’re used to taking direction, Damange explained.
A few weeks later, W+K sold a Nike football (the non-American kind) commercial that featured a cast of kid actors. They thought of Damange immediately and hired him specifically because of his answer earlier.
This is exactly the kind of outcome a production company roster-style website would never communicate, but a site created by a creative person could and should. Believe me — I reviewed hundreds upon hundreds of portfolio websites every year while I was a co-director of Wieden+Kennedy’s in-house ad school WK12.
So, I’m going to share some key pieces of advice for making a great portfolio site that’ll make clients and recruiters keep looking versus turning away.
1. Don’t overthink it
All too often I hear people talk about building their website like they’re building the pyramids, but unless you’re trying to get jobs making websites, don’t build one from scratch. Use any of the easy-to-use, off-the-shelf portfolio site products like Cargo Collective or Squarespace that have tons of well-designed templates to choose from.
I highly recommend a style that has project thumbnail images on the homepage, any one of which you can click on to see the full project. It’s easy on the eyes and the industry standard.
Pick your best projects, choose a homepage image, post a video or still assets of each project, and a write-up that explains it. Then finish it off with an About Me page and your social media links and there you go.
You should be able to go from no website to a website you can show to friends for feedback in a day.
2. Curate it
Don’t put everything you’ve ever done on your website.
When I was looking at WK12 applicants sites’, I’d look at the first, second, and fifth projects (just to see how deep their experience went). If I liked what I saw, I kept clicking. If I didn’t see anything compelling that made me think or laugh or lean in, I’d move on. If I was on the fence, I’d click on something near the bottom of the homepage that looked intriguing.
Most creative directors, potential clients, and recruiters similarly take a quick scan before deciding if a person is worth a closer look, so show the good stuff. You need at least six good projects but probably no more than fifteen. You can share more, especially if you’re so good you have, like, fans. But if you’re mostly using the site to get work, no one is looking at more than fifteen projects.
3. Make it personal
Freelancers tend to lead with their biggest, most corporate work because it makes them seem legit and hirable.
But here’s the thing: Most corporate work is pretty boring.
And very rarely are you truly able to showcase your voice and creative talents within the confines of a client’s project.
Share the stuff you made because you wanted to make it. The projects that show your true voice and talents. The “personal projects” that you’d show your parents or an old friend from high school are the same ones that are going to interest or excite anyone.
Sure, you need to include some paying work to show you get paid to do what you do. But the only client looking to hire a copywriter who showcases dull corporate blogs they’ve written is a client who wants their corporate blog to stay boring.
4. Tell the story of each project
Don’t just say you worked on a project, although being super clear about your role is important. Over the course of a few paragraphs, tell us the story of the project from your perspective. What did you learn? What was your A-ha! moment of inspiration? What particularly thorny problem did you think your way out of? Share a great anecdote or humblebrag about how wildly successful it was.
This is that chance I was talking about to give clients a peek into how you think and work so they feel more confident about hiring you.
If you cast kids out of boxing gyms because they’re confident and used to taking direction, tell us! If you were the production assistant and your primary contribution to a project was charging walkie talkies and going on coffee runs, be honest about that.
But also talk about the experience in a way that tells producers that you’d make a great production assistant to hire and groom into being a production coordinator on the fast track to producing.
5. Sharpen your About Me page
All too often people use the About Me section of their website to showcase how hilarious they are or to show off their third-person writing skills.
That’s okay but not at the expense of clarity. Be sure to tell people exactly what you do, what makes you great at it, and the kinds of projects you want to take on.
Anyone looking to hire you — even on a really big, important job — doesn’t have lots of time. The quicker you can communicate these things, the faster they can decide if you’re a potential fit for the job.
So there you go.
If you have already have a site, great. Make sure you’re not making any of the mistakes above.
If you don’t, and you’re still reading, go for it. If you start right now, I bet you can come up with something to share with friends, your parents, or that old college buddy by tomorrow afternoon.
New Mac, an award-winning, Australian-based video production company, uses Wiredrive to produce branded videos, training, and educational content in order to create meaningful connections with audiences. Helmed by founder and managing director James McPherson, New Mac is more than a production company—it’s a think tank for creativity; a resource that brands trust to tell their stories. We sat down with James to hear why they chose Wiredrive to produce high-quality video for corporate Australian brands.
What makes Wiredrive different than the tools you are currently using today?
Wiredrive is a tremendous resource for us when it comes to business development opportunities because we’re able to review, approve, and pitch work in one single platform. We have an entirely cloud-based workflow (except for offline editing work), and Wiredrive is the final piece of the puzzle for us to work in a single system. It’s very exciting when you find a tool you like and it’s easy to use.
What was previously lacking in your workflow that you are now able to achieve with Wiredrive?
We have never had the ability to archive our work before in a way that’s quick and simple. Our previous archive was a dreadful experience, and was a tedious task if you didn’t have all the right info. It is very easy for us to search and find things in Wiredrive Library thanks to the metadata, tags, and keywords we use to categorize our work. As a company that produces as much as 3,000 deliverables per year, it is extremely powerful and valuable for us to see all the work we’ve produced over the years.
“Wiredrive makes us extremely efficient in how we’re able to quickly respond to business opportunities, as well as how we present ourselves to those opportunities.”
How does Wiredrive perform with the current state of Internet bandwidth and speed in Australia?
Wiredrive’s speed has worked great for us; it’s efficient compared to other U.S. services we’ve used in the past—and that is critical. It’s important for our clients to have a great viewing experience so that’s why speed, performance, and upload functionality are the top three reasons why we chose Wiredrive over other tools we were evaluating.
How is Wiredrive going to help your sales team?
It’s a healthy platform that really simplifies communication between our sales team and clients. We’ve significantly cut down the turnaround time for creating and pitching reels. As a result, we’re now able to work faster and this is huge for us.
To learn more about New Mac, visit their site: www.newmac.co
We’ve all faced it – late night edit sessions, final cut-downs, revisions, revisions and even more revisions. The video spot is almost done, it’s uploaded to your online media-sharing software, and time to deliver a version to your various audiences so they can make decisions and provide feedback (post, VFX, review, approval).
You have the master ProRes file but you need to deliver in various formats to three or more distinct audiences. You need to send the master version to the editor so they can work with the source. You need to send a web-friendly version to the client so they can view it in a specific browser, and you also need to send a version to the producer who only views media on their phone. What to do? Time is of essence and you need to deliver the right version to each person to meet your deadline.
Playing a video on any device is imperative to collaborate effectively and save time
One solution can be to transcode in-house all audio and video files before you upload it for storage to make sure it plays back right on every OS and browser. That’s time-consuming for a couple of reasons.
First: Transcoding is more of an art than a science. Every video is different. Some have fast action scenes. Some have flat dialogue around a dinner table. Each video requires different specifications to make it look as good as possible and to ensure that the file will play on most browsers and devices.
Second: Transcoding is very computer processor intensive and can be complicated. It is possible to make multiple transcoded versions of a file using basic software and a Mac, but this will take time, processing power and available storage on your in-house and cloud systems. Even if you managed to do it, you would create dozens of files, using up precious processing power and memory space on your own system.
Third: Time. Over a week, transcode/upload activity can cost you hours if you don’t have a tool like Wiredrive to automatically transcode files for you so that your audience can view them– time you can’t afford to lose.
Selective transcoding and fast uploads with Wiredrive
Why spend extra time, processing power, and storage when it’s not needed. Wiredrive’s media sharing and production collaboration tool is specifically designed to make it faster and easier for you to share and collaborate with teams, clients and prospects. All you need to do is upload your audio or video files to Wiredrive in their original format – and get on with other creative, exciting work.
Our system scans every video and audio source file to check if it plays back smoothly. Nine out of ten files are generally fine. For files that won’t play in their original format, we create a transcoded version of the file. Our transcoding process is both faster and smoother as we use ‘selective transcoding’ – which means we only transcode the parts that need it. For example, if the video is fine but the audio needs to change, then the video stream remains untouched. This keeps the transcoded version as close to the original version as possible while enabling it to play in a browser without problems.
Let’s say you have a 1GB ProRes file that you want to share from your London office. Transcoding and uploading can take you from 50 minutes to a couple of hours. With Wiredrive you could have it transcoded and ready for playback in under six minutes. From LA, you need just four minutes. The Wiredrive system takes under a minute to transcode a 1GB ProRes file, and just 40 seconds for an H.264 file.
Compare this to how long it takes to transcode a file on your own. What’s more, the transcoding takes place on our processors and is stored on our servers – leaving your in-house systems available for more important tasks. Even very large, high-resolution files like ProRes, will play back with the highest possible resolution (even with high bitrates!).
We also keep your original files so that your team can easily share them, track them, and always download the source file that was uploaded, leading to a collaborative workflow. This is especially important when you are all working from different locations and timezones.
Postproduction is tricky business. With all of the codecs, software options and workflows available to us, it’s hard to know if we’re being as efficient as we can be and any solution that eliminates unproductive tedious tasks for your team is a good thing.
Remote production has become an attractive proposition, with multiple benefits. The challenge, though, is to provide sufficient connectivity to allow the production and post production teams access to content in a timely manner.
In this short blog piece, EditShare’s CTO, Stephen Tallamy, runs through some of his top tips for making remote editing more productive.
1 – Get Organized Remotely
In a remote editing set-up, the editing software is on your computer but the raw footage is on a server at a remote location. It might be the broadcaster or production company’s headquarters, in the cloud, or if you’re involved in fast turnaround editing it might still be at the location of the shoot.
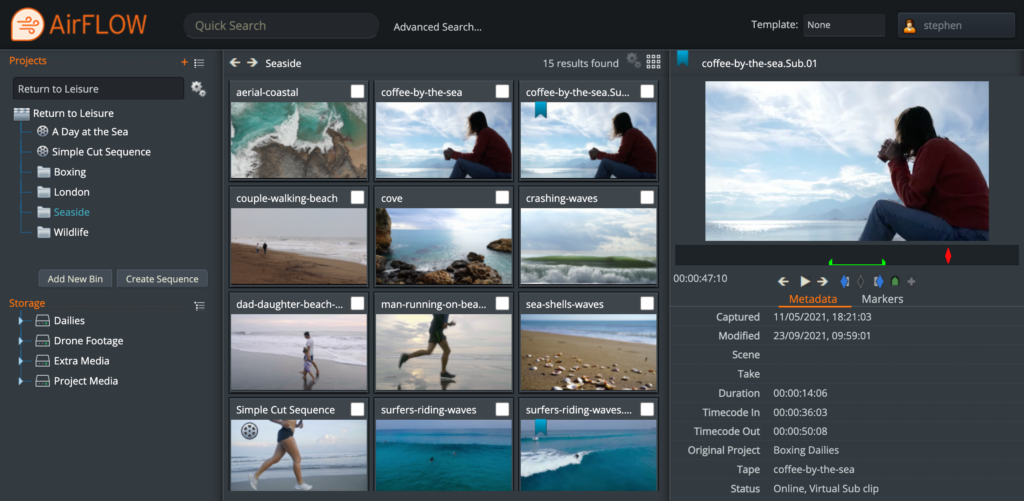
To minimize the download time, I recommend your first task is to organize the clips and decide what you need directly on the server. To make this easy you’ll ideally use a web-based tool to start building up your project structure. EditShare’s award-winning FLOW software has built-in web tools that allow you to easily drag and drop material into bins, create sub-clips and even create a rough timeline and cuts-only edit before you start downloading.
This will have two benefits. First, you get your material and can start working faster. Second, you have fewer clips to download to your computer, so you can be more productive. Especially if you already have a rough timeline mapped out.
Organize your footage using AirFLOW to save time in the edit.
2 – Embrace the Proxy
What are proxies? They are reduced resolution versions of clips, which make it easier for the editing software to run seamlessly on your computer. We all use them every single day, without even thinking about it. It’s what we generally look at when we are in the edit software – a scaled rendering of the original media.
Unless you’re working on the finest details of the image, you don’t need to worry about the full resolution versions.
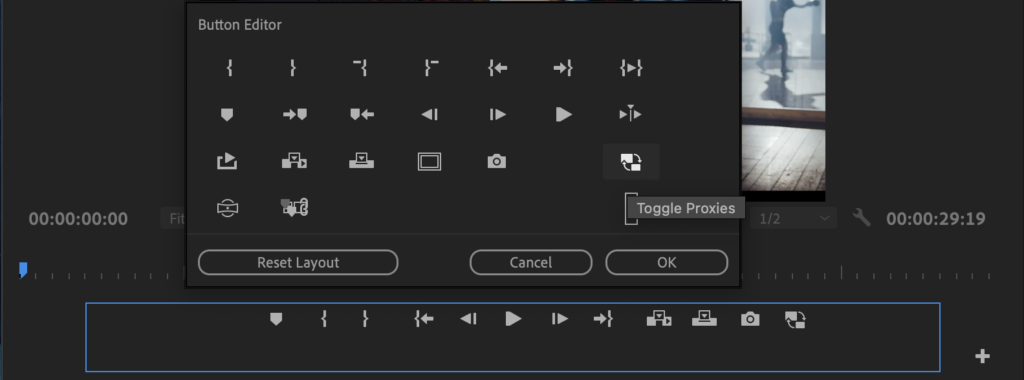
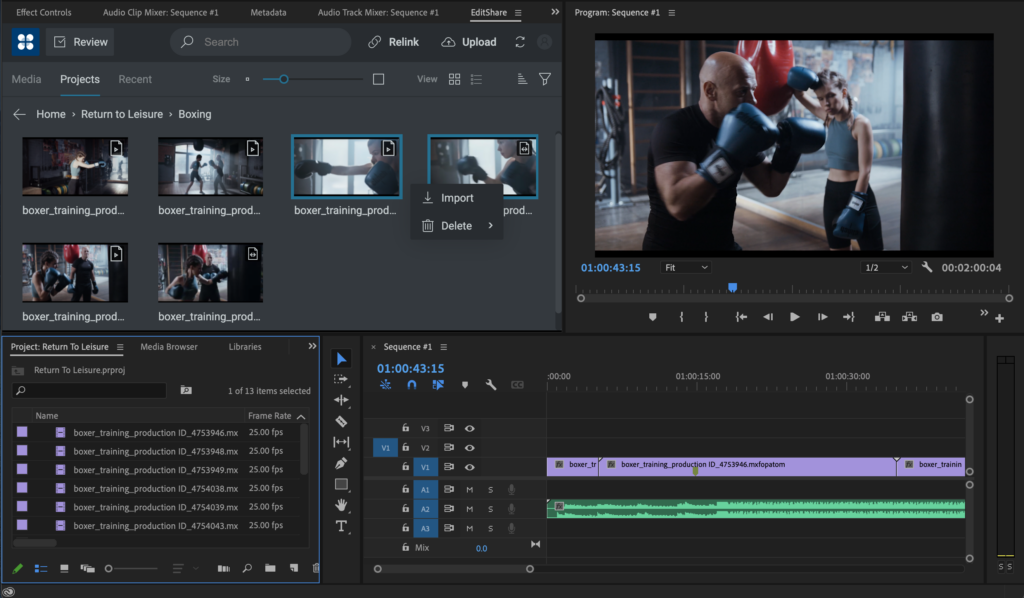
If you do have full resolution content available in your editor, then don’t forget that Premiere Pro allows you to toggle between looking at the proxy and the full resolution with a single click of the mouse. If the toggle proxy button is not there, below the source or the program monitors, then click on the + button to reveal it. Once you have the toggle control, you can switch instantly into full resolution to check a detail, then back to the proxy for smooth playback.
Add the Toggle Proxies button to your Button Editor to switch between proxies and original media.
3 – Centralize the Proxy Creation
This is the logical extension of tips 1 and 2. In standalone editing, you import the full resolution material and your software creates the proxies. This takes time and processing power.
But if you organize your material in advance on the server, you only need to download the proxies, saving even more bandwidth and download time.
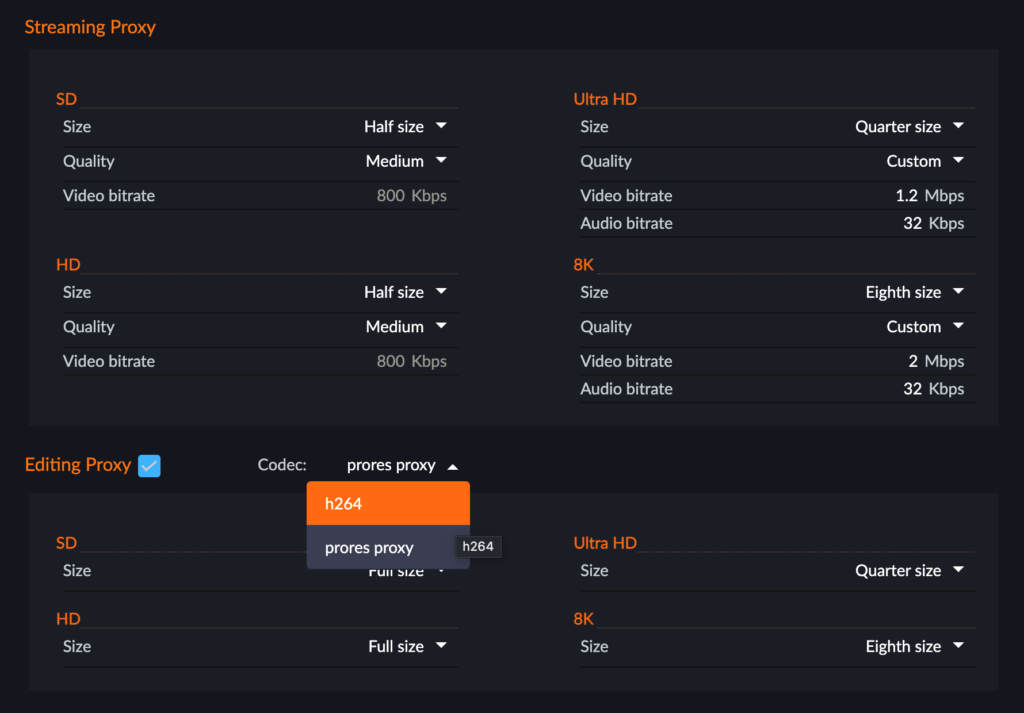
FLOW actually has two types of proxies. You can determine whether you want one or both, and set parameters, on a project by project basis.
The first is what we call the “streaming proxy”, which is an MPEG-4 file designed to be lightweight for internet delivery. It can start with a 4K or 8K file and still deliver a compact proxy.
The second is an “editing proxy”, which is in H.264 or ProRes, and supports multiple audio tracks, in a wrapper recommended by Adobe for seamless use of the proxy toggle feature. But while it is designed for maximum flexibility in editing, you can work perfectly well with streaming proxies if you have a simple audio layout in your original media.
Set your proxy format once and automatically create both streaming and edit proxies.
4 – Plug In To Adobe® Premiere® Pro
Working in a web tool can be great during the organization stage, when it gets down to the edit you really want all your focus on the job in hand. You want to stay inside your editing software.
One of the great benefits of using Premiere Pro is that Adobe actively encourages open interfaces, which in turn means that developers like EditShare can provide very tight integration. We’ve put a FLOW panel into Premiere Pro, so all the things I have talked about, like organization in advance and selecting what proxy to use, can be done within the familiar user interface.
The EditShare panel also allows you to send your work in progress, as a proxy, to a producer, who can make comments tagged to markers in the timeline. It’s a fast and seamless way to work towards approval.
Use the FLOW panel to select media, import markers, rough cuts and publish for review
Finally, that same panel gives you relinks to the original footage, should you need it, which leads naturally to…
5 – Finishing the Job
At the end of the project you need to conform it: finalize the edit with all its transitions and effects using the full resolution originals, and output to the final format.
If it’s a prestige project, the editor will want to check the final output. So, you relink to the original footage and download only the parts of the project you need for the edit.
But if speed is of the essence, then you upload the EDL to a remote renderer or Adobe Media Encoder hosted on the server. You upload a very lightweight file, and the heavyweight processing power of the server speeds the rendering. This is ideal, for example for sports highlights packages.
These are just a few thoughts on how remote editing can be smooth, seamless and productive. For a glimpse of how it works in practice, you can watch our short YouTube video at: https://www.youtube.com/watch?v=DahAtBLMZbg
The media and entertainment industries have long been popular targets for piracy and intellectual property theft. In today’s technology-centric environment, where video streaming and cloud sharing are essential parts of day-to-day life, securing video assets throughout production, post-production, and beyond has become more important than ever.
When content is leaked before it has reached its final, release-ready form, not only does the content owner lose out on revenue and future ROI, but your organization risks damage to its reputation from the release of a low-quality product and not prioritizing client security.
Why Watermark Tech is Important in the Media and Entertainment Industries
Video piracy and leaked content cost the entertainment industry billions of dollars every year. In fact, in some countries, pirated content accounts for almost half of all the video content being viewed in those regions.
To help prevent theft and leaks, post-production teams rely on a core group of security tools and cyber hygiene protocols, including security certifications, role-based provisioning, identity and access management, and digital watermarking.
Watermarking is a highly effective way to prevent the unauthorized release and distribution of video content and track who is actually viewing and sharing the content.
In addition to protecting and securing content during the post-production process, watermarking has the added benefit of increasing brand awareness with your centrally placed logo and business name on every video and link.
Why Choose MediaSilo’s SafeStream Watermark Tech for Post-Production
One of MediaSilo’s many enterprise-grade security features is SafeStream, a highly effective, tamper-resistant watermarking tool. SafeStream provides additional layers of protection against asset theft and misuse with two different types of watermarking tech:
1. Visible Watermarking
Visible watermarks are the most overt type of watermarking. These watermarks are placed clearly in a video to provide a traceable, visual deterrent intended to make potential bad actors rethink sharing confidential, proprietary content.
Visual watermarks can be customized to include the authorized viewer’s full name, email address, or custom text.
2. Forensic Watermarking
Forensic watermarks are digitally embedded into a video, so the unique characters that identify the video’s origin are invisible to the viewer. If a video is later leaked, forensic watermarks allow security teams to trace back the source of the leaked footage.
Used alone, forensic watermarks protect content while creating an uninterrupted user experience for viewers. However, many administrators choose to use forensic watermarking in conjunction with visual watermarks for a double layer of security.
Benefits of Securing Your Video Content with SafeStream
In addition to visible and forensic watermarks, SafeStream provides MediaSilo users with several other features and capabilities that make it easy to watermark video content for secure viewing and sharing throughout the post-production workflow:
SafeStream watermarking can be mandated at the project or admin level by enforcing an embedded watermark template across the organization.
The watermark template is set as a default by an administrator and cannot be turned off by users.
SafeStream provides the option to allow both administrator and project owner roles to manage watermarking or limit permissions to just admins to enforce full compliance.
Authorized users can apply default watermarking templates or create their own custom template using viewer names, emails, or custom text
Administrators can track who views watermarked videos at any time, which makes it easier to find the source of leaked assets and the unauthorized users who download them.
The MediaSilo cloud collaboration platform is designed to streamline and secure your video management workflow with one integrated solution. SafeStream watermark tech is just one way we achieve this.
Download MediaSilo’s Guide to Post-Production Workflows to learn more about how post-production is evolving in the era of remote work and how you can increase efficiency, productivity, and security no matter where your team is located.
Leaked and stolen content comes at a huge cost to the owners. By some estimates, the entertainment industry loses upward of $71 billion each year to media piracy. And with our increasing reliance on streaming media for both professional and personal use, there is no reason to think that the demand and subsequent financial impact will decrease anytime soon.
Unlike other types of theft, once a video asset is leaked, there is no real way to get that content back. Since it is almost impossible to stop others from copying, sharing, downloading, and distributing a pirated copy, the best plan of action is to prevent the leak in the first place.
So, from post-production to pre-screening, how do you secure your pre-release environment and prevent assets from being leaked?
After the last piece of footage is shot, a video still has a long way to go before it’s officially ready for distribution. Along the journey from post-production through pre-screening, there are a lot of potential leak points.
Fortunately, with the right technology, policies, and practices in place, your team can mitigate the risk of leaked assets.
1. Access Management
Poor password protocol, including weak, shared, and reused passwords, is a common vulnerability across every organization. In fact, a 2021 study from IBM and the Ponemon Institute found that compromised credentials were the leading cause of data breaches among study participants.
With so much at stake during post-production and pre-screening, it is essential for video management teams to enforce strong identity and access management policies.
To ensure assets are protected from theft and unauthorized viewing, the traditional username/password combo has to go. Instead, organizations need to implement secure access technology, such as multifactor authentication, single sign-on, and passwordless login.
Additionally, enforcing strategies such as controlling user privileges to limit who has access and lifecycle policies that regularly review access and permissions to prevent privilege creep will help prevent data loss and breaches.
2. Role-Based Permissions
Along the same lines as managing how users are granted access, role-based provisioning lets the administrator ensure only the right people have access to the right assets at the right time.
Throughout a project, different users need to have access to certain files and resources in order to do their jobs. However, not every user needs the same level of permissions, and they most likely won’t need the same level of permissions for the entirety of the project.
For example, the marketing team doesn’t need the same access to a video file as the sound editor needs, and the client doesn’t need permission to download and edit the original video file.
By assigning project-based permissions for standard and customized roles on an as-needed basis, the admin has more flexibility and control over what a user can do on a given project.
It’s also important to remember that role-based permissions are project-dependent. That is, a user’s role may be different on each project they are working on. While they may need almost unfettered access to change and share files for one project, they may simply need view-only permissions on another.
Paired with the access management policies above, role-based permissions can stop a hacker from penetrating too deeply into the system where the most valuable content and data are stored.
3. Leak-Tracing Technology
It’s always preferable to prevent a leak from occurring than to clean up after one, but humans make mistakes and, leaks happen.
Watermarking is an effective tool that can both help deter asset leaks and provide traceability back to who is viewing and sharing an asset. This capability helps secure and streamline workflows from post-production to pre-screening by ensuring reviewers have a current, authorized, and secure version of the asset available.
MediaSilo’s watermarking technology, SafeStream, creates multilayer protection against theft and unauthorized sharing with:
Visible Watermarks
As the name implies, visible watermarks are placed clearly within each frame of a video. These watermarks are intended to provide a traceable, visual deterrent against unauthorized sharing and public distribution of confidential, proprietary content.
Visual watermarks can be customized to include the authorized viewer’s full name, email address, or custom text or even used for branding purposes by including the company name or logo.
Forensic Watermarks
Forensic watermarks are digitally embedded into a video, so they are invisible to the viewer. Forensic watermarks contain unique characters that identify the video’s origin, so it is difficult for unauthorized users to pass the asset off as their own.
SafeStream is highly customizable, allowing admins to create watermarking standards for specific projects or for entire workspaces. SafeStream also streamlines and unifies your security efforts with shareable watermark templates for specific teams or user groups.
4. Security Certifications
One way that MediaSilo is keeping assets and workflows secure is by obtaining SOC 2 Type II certification. This high-level certification ensures that our infrastructure, software, personnel, procedures, and data have met rigorous third-party-verified standards for security, availability, processing integrity, confidentiality, and privacy.
In other words, we have official verification that our internal operations at MediaSilo are as secure as yours.
Download MediaSilo’s Guide to Post-Production Workflows to learn more about how post-production is evolving in the era of remote work and how you can increase efficiency, productivity, and security no matter where your team is located.
No matter which creative industry you are in, you likely often hear, “Send me your reel.”
Production companies, directors, creative agencies, post houses, and even marketing and brand teams are expected to have a demo reel to showcase their best work, much like an artist, model, or photographer has a portfolio.
But in different subsets of the creative industry, there can be different meanings or expectations for what the demo reel actually includes.
So what exactly is a reel, and what can you do if you don’t have one?
In this guide, we’ll walk you through the many names, types, and uses for reels as well as some best practices for how to make and share one with your clients and collaborators.
What is a reel and why do I need one?
Borrowing from the old way of storing film, a reel is an edited video highlighting the best examples of your work.
In creative industries such as film production, media, advertising, and post-production, a reel is a great way to demonstrate your vision or past work to a potential collaborator or client. For an experienced professional, a demo reel can be a great way to highlight the best of the best of your creative portfolio.
Taking inspiration from other creative industries, the concept of reels is beginning to make its way into B2B and B2C marketing and sales, with companies creating a reel of their products and services to give customers an overview of their brand identity and specific offerings. In these situations, this unique video could also be referred to as a highlight reel, promo reel, or brand video.
“No matter your specific use case or industry, think of a reel as a trailer for you and your work.”
No matter your specific use case or industry, think of a reel as a trailer for you and your work. Similar to movie trailers, you don’t need to tell your audience the whole story, but you do need to get them interested in seeing more.
What are some different use cases for reels?
While companies, brands, and creatives can have demo reels, the ultimate finished product can be quite different.
Production Company
Whether working in media and entertainment, advertising, or both, a strong demo reel is a must for any production company.
For a producer, brand, or agency looking to begin a new production, a company’s reel is the first place they will look to make their hiring choice. What these decision makers are looking for is a company that they feel will fit the right creative style and artistic tone for the project at hand.
A challenge for many production companies is how to show a wide range of styles and skills in a single reel. It is not uncommon for a company to produce multiple reels to show different skill sets—a commercial reel, a narrative reel, and a documentary reel, for example.
In any of these cases, be true to your strengths and what your company does better than anyone else.
Advertising Agency
For an advertising agency, the power of your reel comes from the power of your creativity.
What brands are really looking for when hiring an agency is a representation of emotions or ideas that are often hard to articulate quickly and clearly. They are also looking for individuality. Do your spots look the same as everything else they’ve seen so far? What sets you apart from the rest?
Similar to production companies, agencies also often have the issue of choosing which spots to include in their reel. But don’t be intimidated; editing a reel is just another opportunity to flex your creative muscles while showing off your distinct style.
Brand
You might not think of a brand having a “reel,” but with the broad reach of digital and online marketing campaigns, a video reel for your company can give you a competitive edge.
A brand reel allows a potential client or customer to immediately understand not only your company and your product(s) but also your values and vision. For those advertising directly to customers, brands can also choose different levels of focus, such as on a specific product or even a popular marketing campaign that your customers might recognize. For those with specific skills, such as animation or visual effects, reels can showcase the depth and breadth of your capabilities.
For a B2B brand reel, you might want to focus more on the story and identity of your company. In these cases, you want your demo reel to focus on answering questions such as:
What are the values you serve and the morals you represent?
Can you align yourself with one of your more recognizable users and tell the story of your success through their success?
However, a brand reel in these situations often requires more work, where new footage, voiceovers, or specific messaging is often needed in conjunction with clips from existing campaigns.
Commercial Director
For a commercial director, your reel is your calling card.
Whether you work directly with an agent, sales rep, or are a freelancer, you cannot book work with a new client, brand, or company without a reel that stands out. A director’s reel is an incredibly personal representation of your personality, vision, and work. It should show your skill, experience, creativity, and range all in one presentation.
As with other use cases, commercial directors can take different approaches with their demo reels. Some can choose to make a traditional “sizzle reel” made up of a variety of clips cut together with music, while others can create a compilation reel showing longer clips or entire end- to-end spots.
The approach you take depends on your audience and the type of commercial (i.e., automotive) that is your main focus.
Film Director
While there is a lot of overlap between commercial directors and film directors, a main distinction is the end goal of their reel. A commercial reel is all about sales, using creativity to sell a brand. For a film director, you have more flexibility to tell a story; capture a performance; and play with style, color, sound, and emotion.
Director of Photography
Of all of the examples we’ve discussed in this guide, a director of photography is the person who gets to have the most fun with their reel.
For a director of photography, their art is 100 percent visual, and there is no need to worry about the actor’s performance or the scene’s sound design. The main focus is capturing beautiful shots and jaw-dropping camera work. It is also a way to showcase an eye for composition, lighting, and layers of storytelling through exceptional camera work.
Actor
An actor’s demo reel is about creating a collection or montage of your best performances so directors can see your range and abilities.
That means you should work to keep things simple, using copies of the footage from your previous work and weaving them together to show your abilities, beginning with a high-impact scene to grab attention.
In this case, don’t worry about production quality or camera work. A great performance will shine through even if the shot doesn’t look very cinematic.
How do I share my reel?
Once you have created a reel that best represents you, your work, and your audience, your task is still not done. Your approach to sharing it can also reflect your specific tone and style.
It’s important to be thoughtful about how you choose to send your demo reel to show that you understand the best and most effective way for the viewer to engage with your content.
For example, you can host your reel on YouTube or Vimeo and send a link to anyone who requests it. While this is a simple and straightforward option, it does not allow you to tailor the viewer’s experience with your content or customize your presentation. At the same time, the content around your video can be distracting or deflect from the message you want to send about your brand and individual identity. Finally, if your reel contains sensitive or confidential content, these platforms offer limited security features.
On the other end of the spectrum, there are asset management and presentation platforms such as MediaSilo that give artists all the tools they need to organize, update, and beautifully display their reel on a secure and customized page.
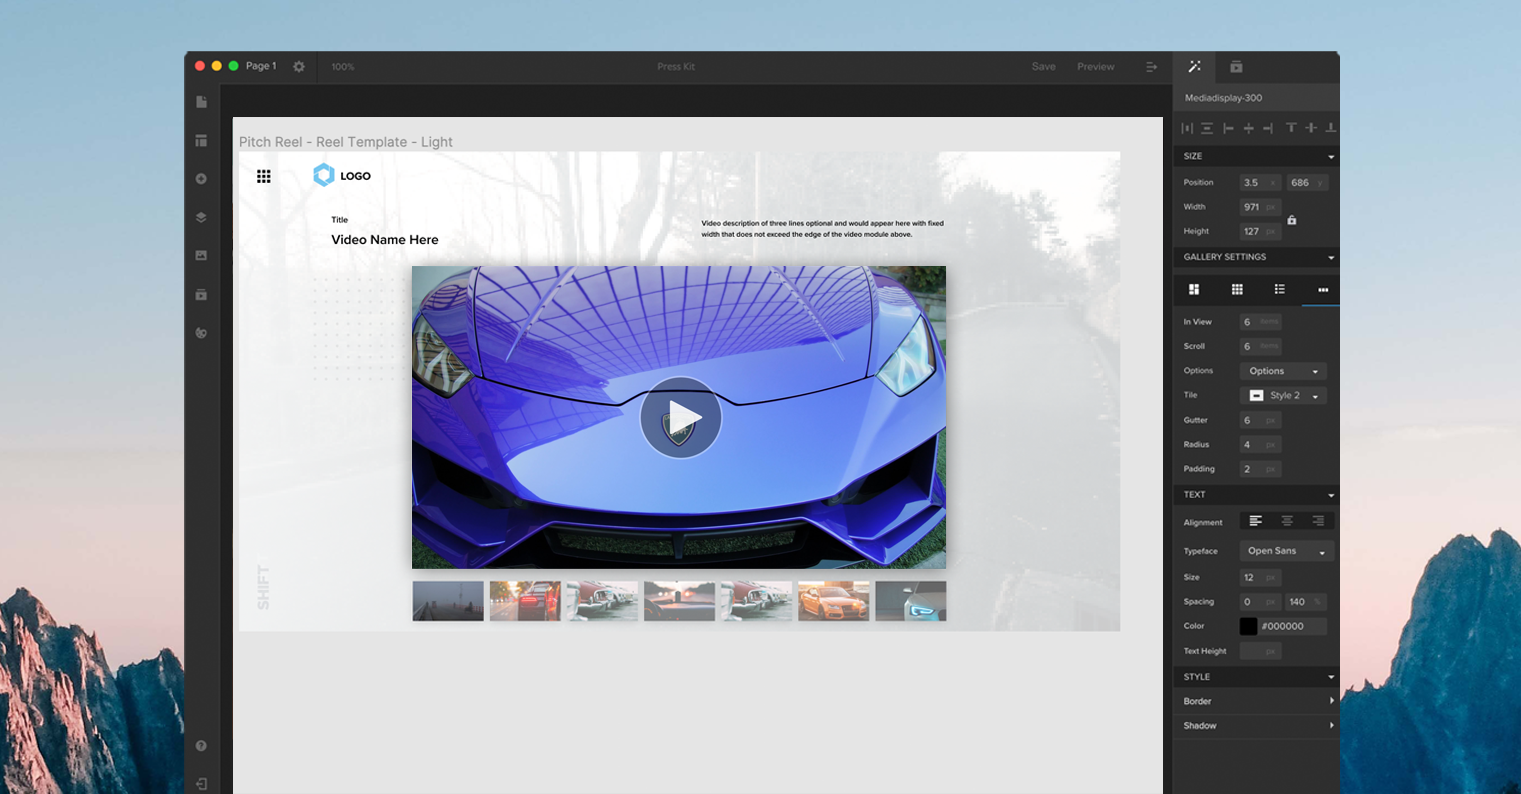
MediaSilo’s intuitive presentation tool, Spotlight, allows artists to easily build a custom landing page for their video and include additional links, information, and branding. There are also prebuilt reel templates so you can publish content in a few clicks. Or there’s the option to build something entirely from scratch that suits your specific needs.
You can also choose to share your demo reel with others while it is still in development and use MediaSilo to get time-coded feedback, comments, and on-screen annotation from your collaborators.
When your reel is completed, it can be launched on your Spotlight page and easily shared using a variety of secure and private or public viewing options. Once your reel is shared, MediaSilo’s comprehensive analytics dashboard lets you see exactly which videos are getting the most traction and who is engaging the most with your content.
When should you not to use a reel?
Although there are a lot of use cases for demo reels, they aren’t always the answer to your content-sharing needs.
For example, rather than sharing a reel, many creative professionals will choose to create and share an online portfolio that showcases their best work. Editors, in particular, may benefit from a portfolio over a reel because specific skills with timing, pacing, and tone are really best shown over a full scene, spot, or short film. Many directors, agencies, and brands also prefer a portfolio to show a wider scope of work.
In other cases, you can combine a reel with a portfolio, which can be a good compromise if you do not know the preferences of the audience, but you would still like to prioritize which specific pieces they see.
Whether you are sharing a reel, portfolio, or both you can easily make a branded presentation page for all of your work using Spotlight.
Bring it all together.
Reels represent a creative way of expressing ideas and are a powerful way to communicate an artistic vision.
There is no one-size-fits-all approach to making a reel that works for you, your business, and your audience, so take the time to try different options until you find the best way to showcase your work and talents.