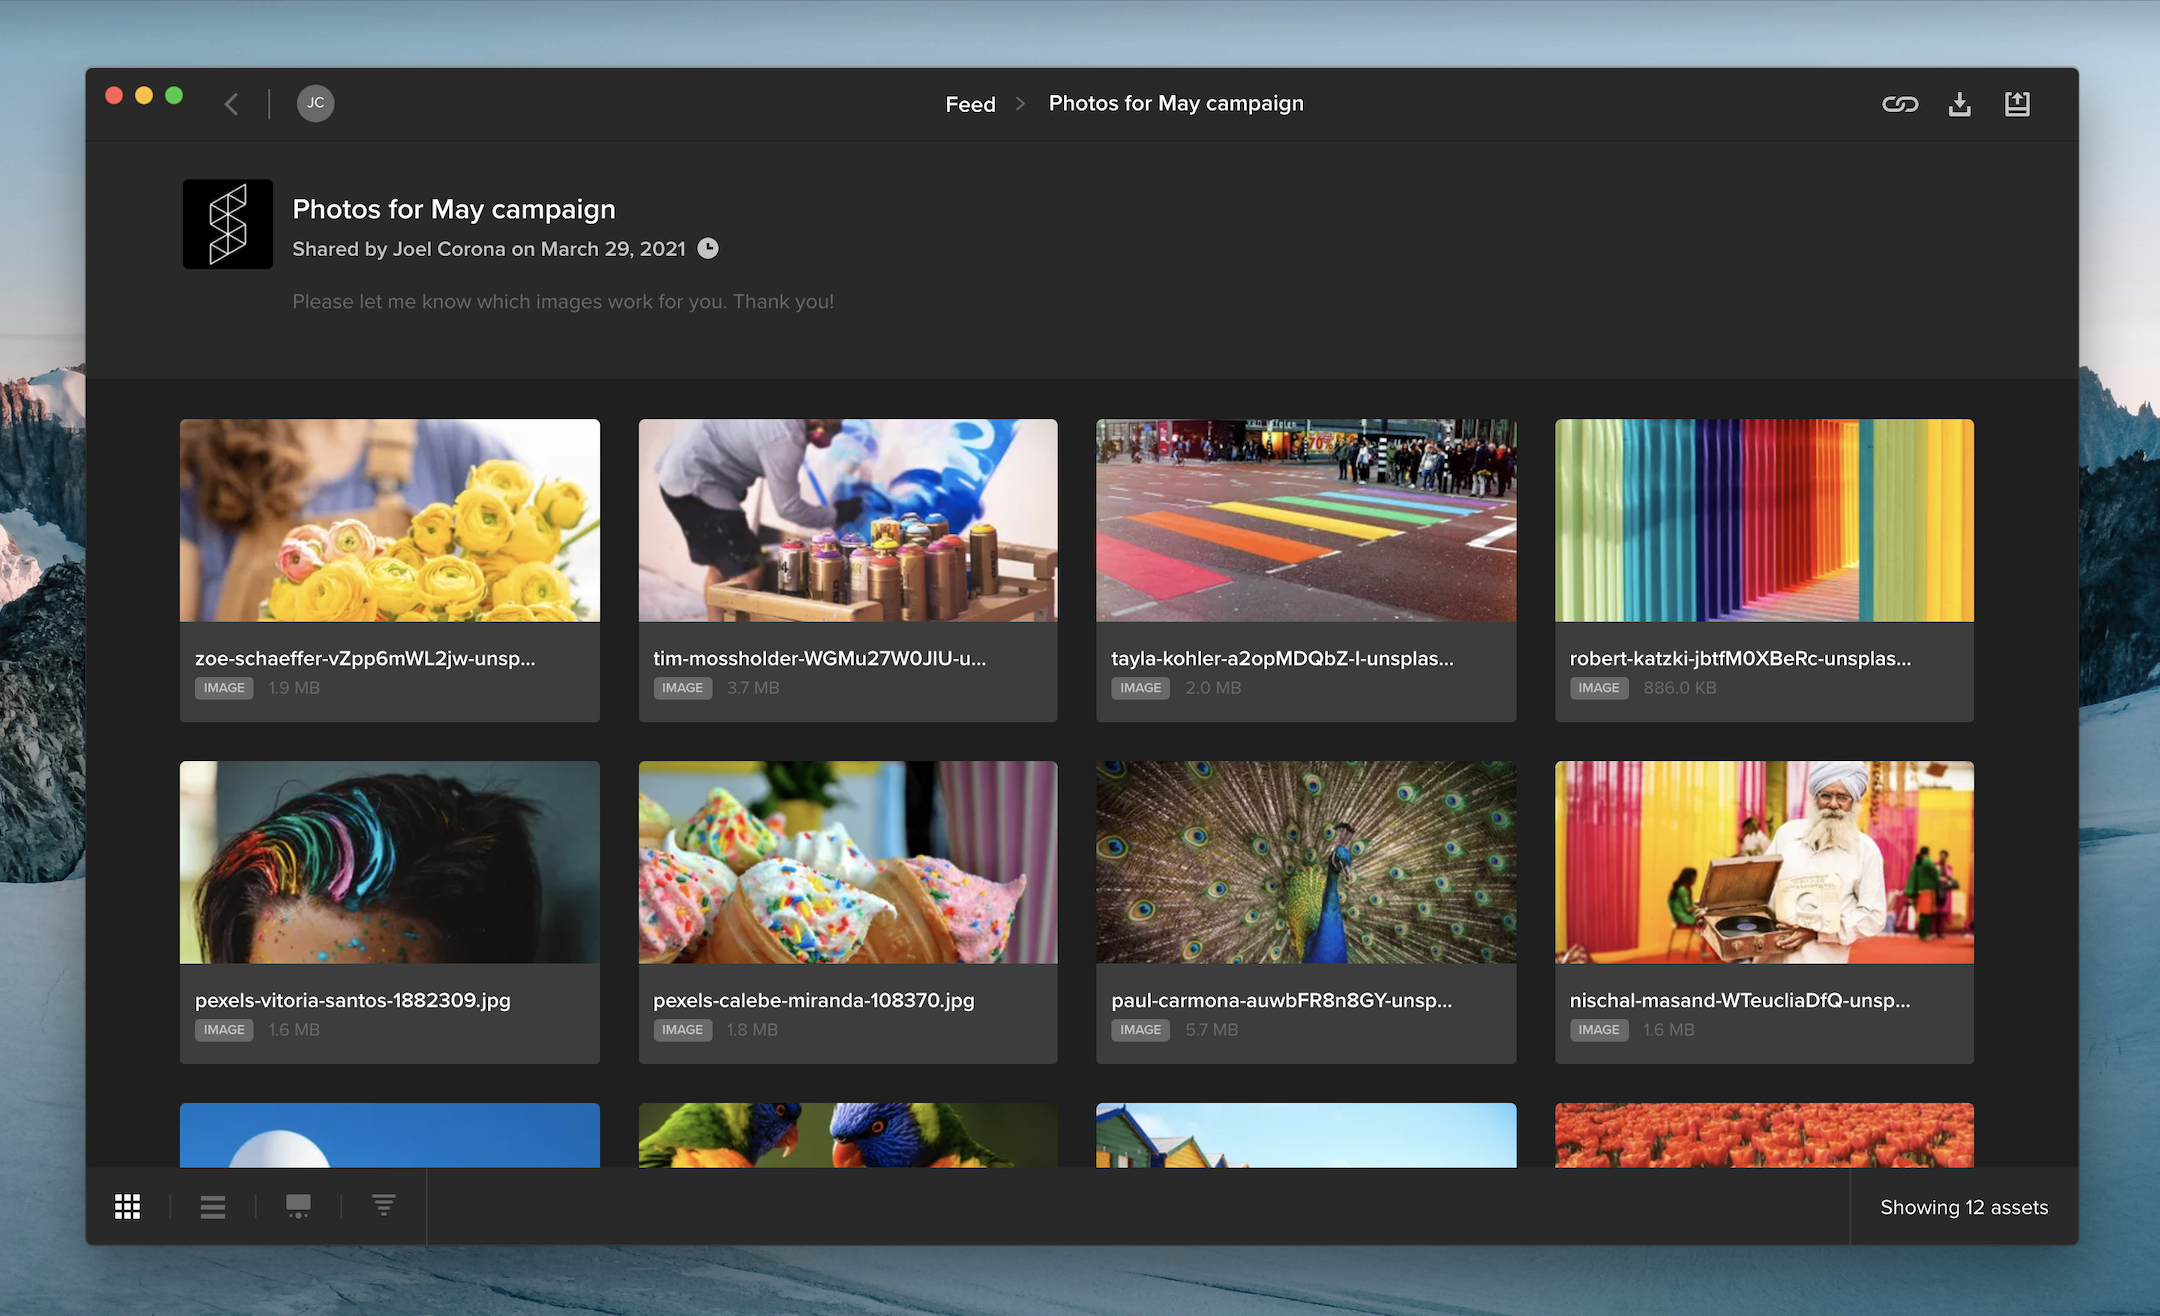
When you share multiple files in a review link, your audience can now access the files in a gallery that supports batch approval and downloading.
If you requested feedback on a review link, your audience can hover over an asset tile and click the thumbs-up icon to approve it. Viewers can also select multiple files and click the thumbs-up along the top of the page to approve multiple files at once.

When downloading is enabled on a review link, viewers can select one or more files and click the download button at the top of the page to download them. Clicking the download button without selecting any assets will download all of the files included in the review link.
In the bottom left corner of the screen, you can choose between gallery or list view, change the sort order, or open the review page with commenting and annotation tools for videos, images, and documents.


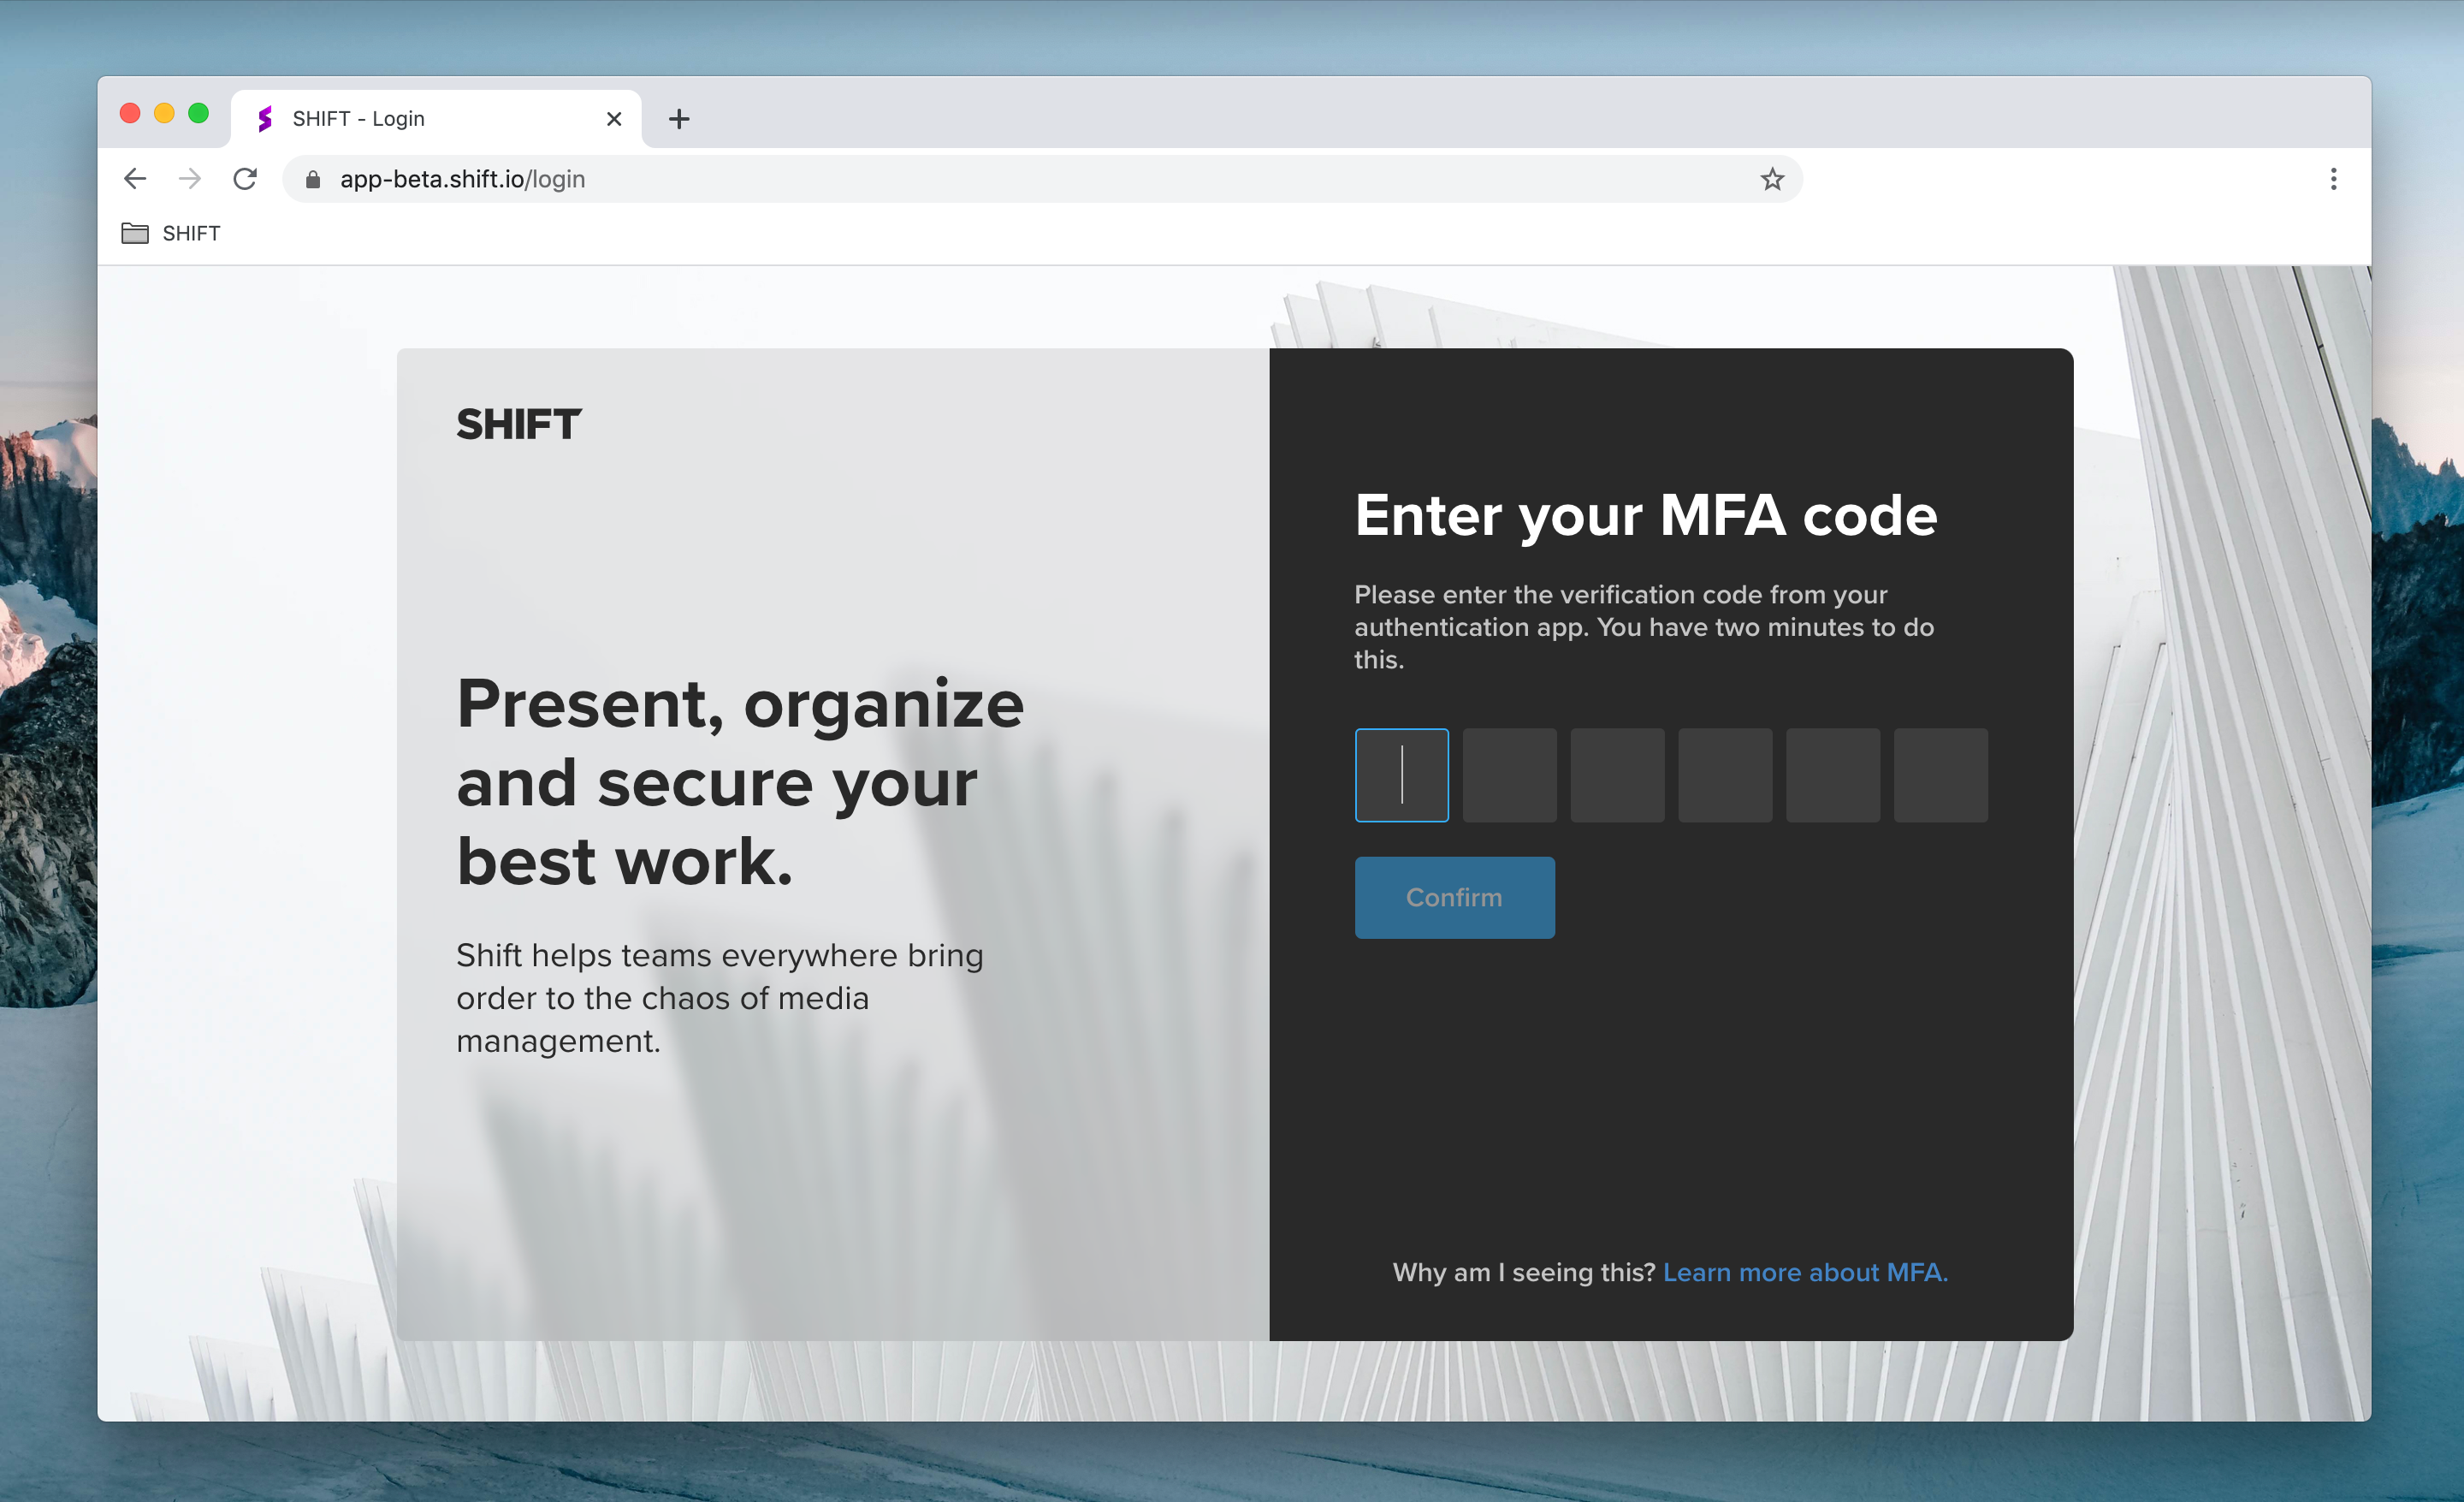
For added security, administrators can now require workspace users to log in using Multi-Factor Authentication (MFA).
To set up MFA, users link their Shift account to their phone or tablet by installing an authentication app, such as Authy or Google Authenticator. When they log into Shift, they will be prompted to enter a six-digit code provided by the authentication app.
As an administrator, you can enable MFA on your workspace by visiting the Security Settings tab in the Administration section.

Note: Shift uses the same MFA code as Screeners.com. If you already use MFA to access Screeners.com, Shift will use the same MFA code to log you in.

You now have more ways to log into your Shift account. Enter your email address to receive a login link in your inbox, or click any of the icons below the email field to log in with your Google, Slack, Apple or Microsoft account.
Additional login options are also available when you access a Review Link. To comment on a public review link, simply click “Add Comment” on the review page and log in to start leaving feedback.

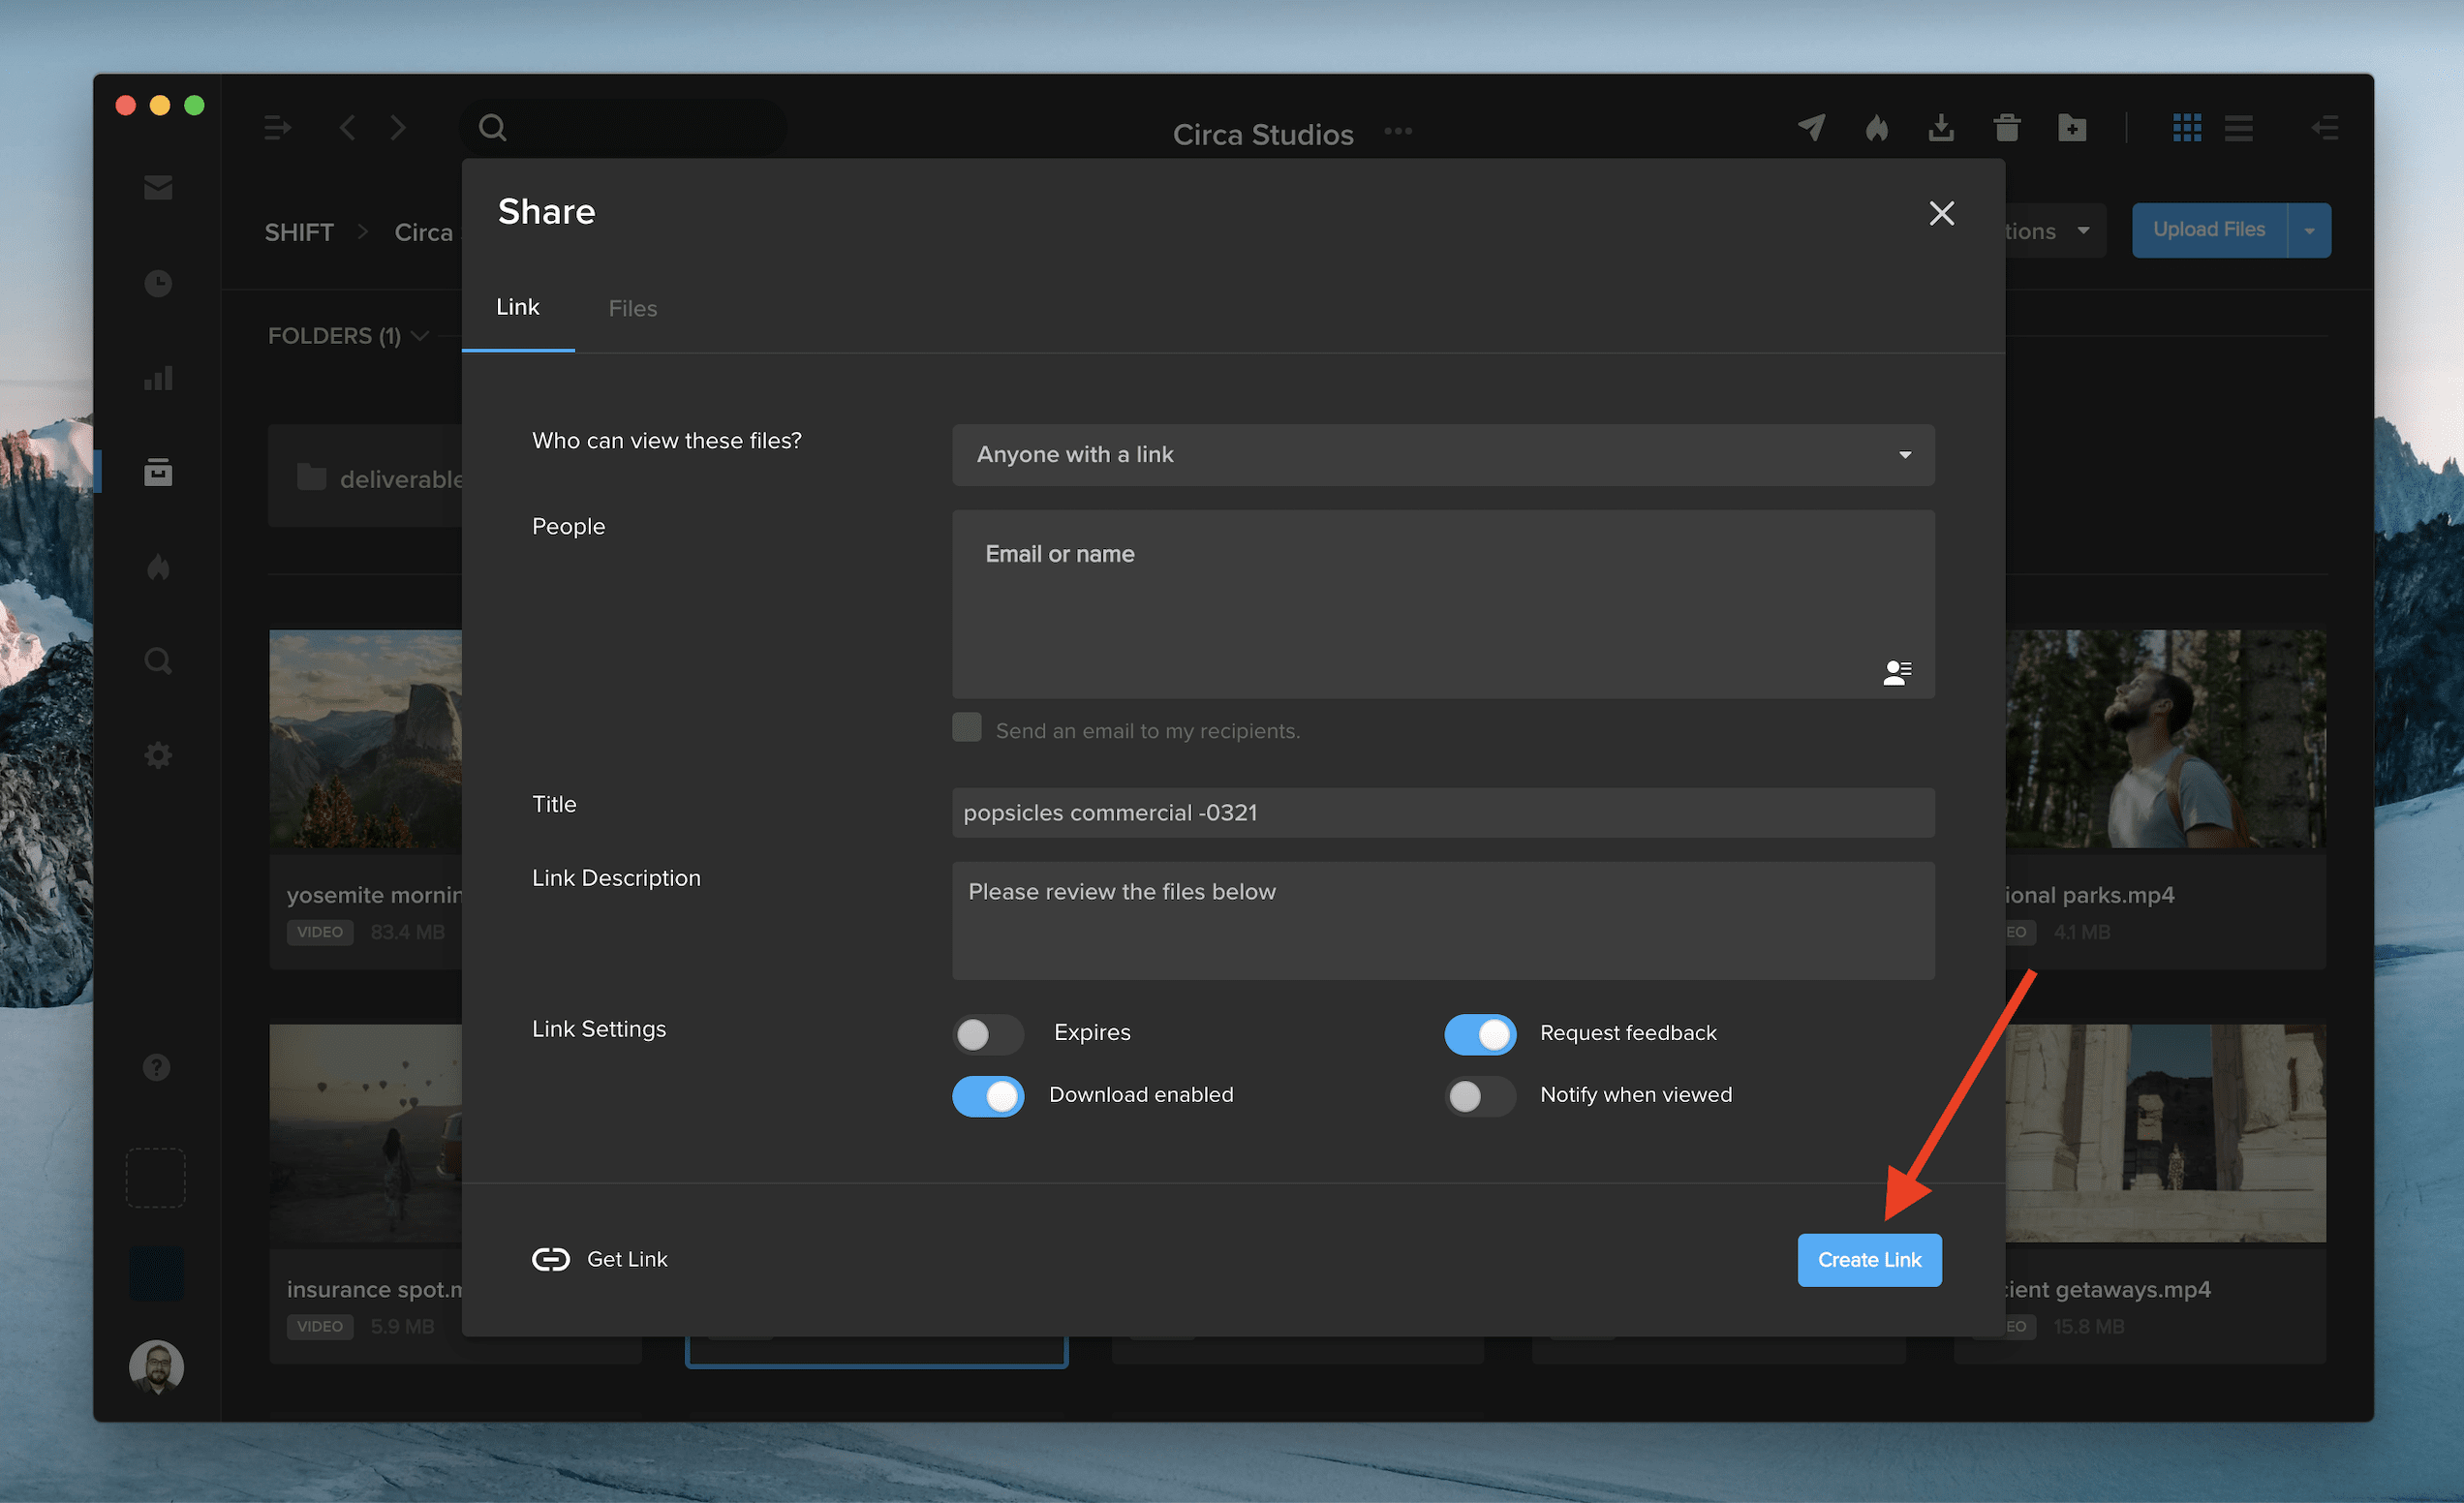
After you create a new Review Link or Spotlight Presentation link, the URL will automatically copy to your clipboard for instant sharing.
See the feature in action by right-clicking on a file in one of your projects, selecting “Share,” and picking either of the two options. Once you choose your link settings and click “Create Link,” the URL will be ready to paste elsewhere without any extra clicks.
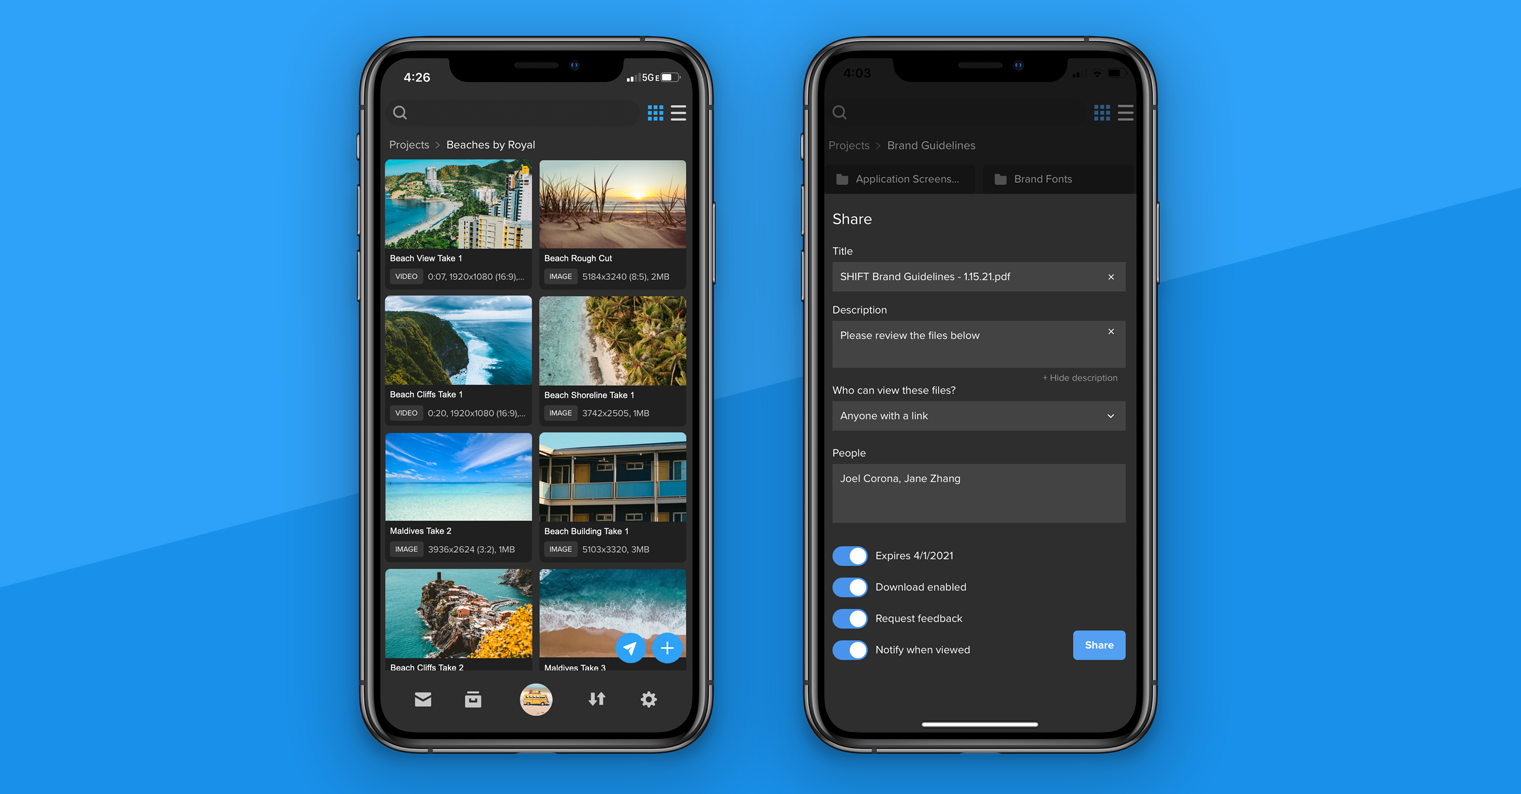
You can now share files directly from the SHIFT GO mobile app for iOS and Android devices.
- When you open a project or folder, tap the blue airplane icon in the bottom right corner.
- Select the assets you want to share. A blue checkmark appears on the assets you’ve selected.
- Once you’ve made your selection, tap the Share button again to view your review link settings. Enter your title and description, add your recipients, set an expiration date, and choose additional link settings.
- Tap Share when you are ready to send your review link.
To simply create a review link without entering recipients, leave the “People” section blank, and tap Share. Then, tap the Share Link button to send the review link using email, text, or other apps on your device.
To download SHIFT GO, navigate to get.shift.io/mobile on your mobile device.

You can now access Spotlight video tutorials to learn more about creating playlists, customizing your template, and building your own microsite.
When you’re in the Spotlight editor, click the Help icon in your left-side navigation. Here, you’ll find links to three new videos on key Spotlight workflows.
Underneath, you can click “Roadmap and Feedback” to see what the Spotlight team is working on or to submit product feedback. Select “Knowledge Base” to access support articles and “Support” to chat with the Support team.

When you upload a video to SHIFT, the asset tile now features a progress bar and processing information, so you can keep track of your file’s progress as it is being processed. If you upload a video to a SafeStream-protected project, you can also see when the watermark is being prepared.
Producing, distributing, and sharing media assets and works-in-progress is complex during the best of times. As we collectively find our footing in the “new normal,” intuitive, flexible, and secure media management tools have become a business imperative.
Many teams struggle to manage content across disparate tool sets with different solutions for asset management, approvals, presentations, and distribution. This disconnected approach to managing media assets is not only cumbersome and inefficient, but it’s also incredibly insecure.
MediaSilo understands these challenges well, so we developed a solution that enables your team to create a branded, seamless, and secure production process all in one place.
Spotlight is a digital experience builder that is connected to all of your projects and assets in MediaSilo, whether you’re pitching your latest reel to a client, seeking buy-in for a new advertising campaign, or updating stakeholders on a project, Spotlight makes it easy to integrate, share, collaborate, and customize the experience all while staying on brand.
Here are four key ways MediaSilo is using Spotlight to reimagine media management for the new era:
1. Code-Free Customized Templates
Your MediaSilo account comes enabled with a collection of professionally designed templates ready for use. Customizing these templates to support branding is simple in Spotlight. Add your logo, brand colors, and fonts into your chosen templates, and your team has instant access to a library of templates where they can plug in company assets and publish or present custom branded reels, dailies, or microsites in minutes.
If off-the-rack templates aren’t for you, Spotlight supports a design-your-own template option for fully customized assets that are easy to deploy—no coding required.

2. Static and Dynamic Playlists
In today’s fast-paced production environments, there is no room for downtime. So, Spotlight’s powerful editor lets you build a client reel, design a brand-new microsite, or create an attention-grabbing presentation in minutes.
Using shareable playlists, you can group assets together into a reusable collection that can be inserted into any Spotlight presentation.
Playlists come in two varieties, and the type you use depends on where you are in the production process:
- Dynamic playlists: Creating a playlist from a project or folder allows the playlist to be automatically updated in real time when files are added or removed in a project or folder. This means you won’t have to resend links to clients to ensure they have the most current assets.
- Static playlists: These playlists house collections of assets that won’t be changed. Spotlight doesn’t update static playlists in real time, so they are primarily used for sharing finished work with clients.

3. Seamless Connection Between MediaSilo and Spotlight
You can easily pull media straight from your projects in MediaSilointo your Spotlight designs without having to download files or upload images between systems. Simply drag and drop media into the Spotlight editor, reorder as needed, and you are ready to hit play.

4. Secure Sharing with SafeStream
Whether you’re concerned about cyberattacks, intellectual property theft, or both, securing your workspace and assets is crucial. MediaSilo enabled Spotlight with high levels of security using proprietary technology and access management policies.
For example, if you need to share protected content with only a select group of team members, Spotlight provides multiple security options, such as restricting the audience that can view the asset, adding password protection, and making the content available only in the Spotlight workspace.
When you’re ready to share your finished work with the world, SafeStream watermarking will instantly secure your videos. SafeStream prevents content theft and misuse through personalized visible and forensic watermarks containing user data that can easily be traced.

Spotlight provides a secure, intuitive, all-in-one space to present, organize, and secure digital assets in MediaSilo making it easy for producers to transform their content into stunning visual experiences.
To learn more or get started with Spotlight today, dive into our Spotlight knowledge center and sign up for a free trial of MediaSilo.
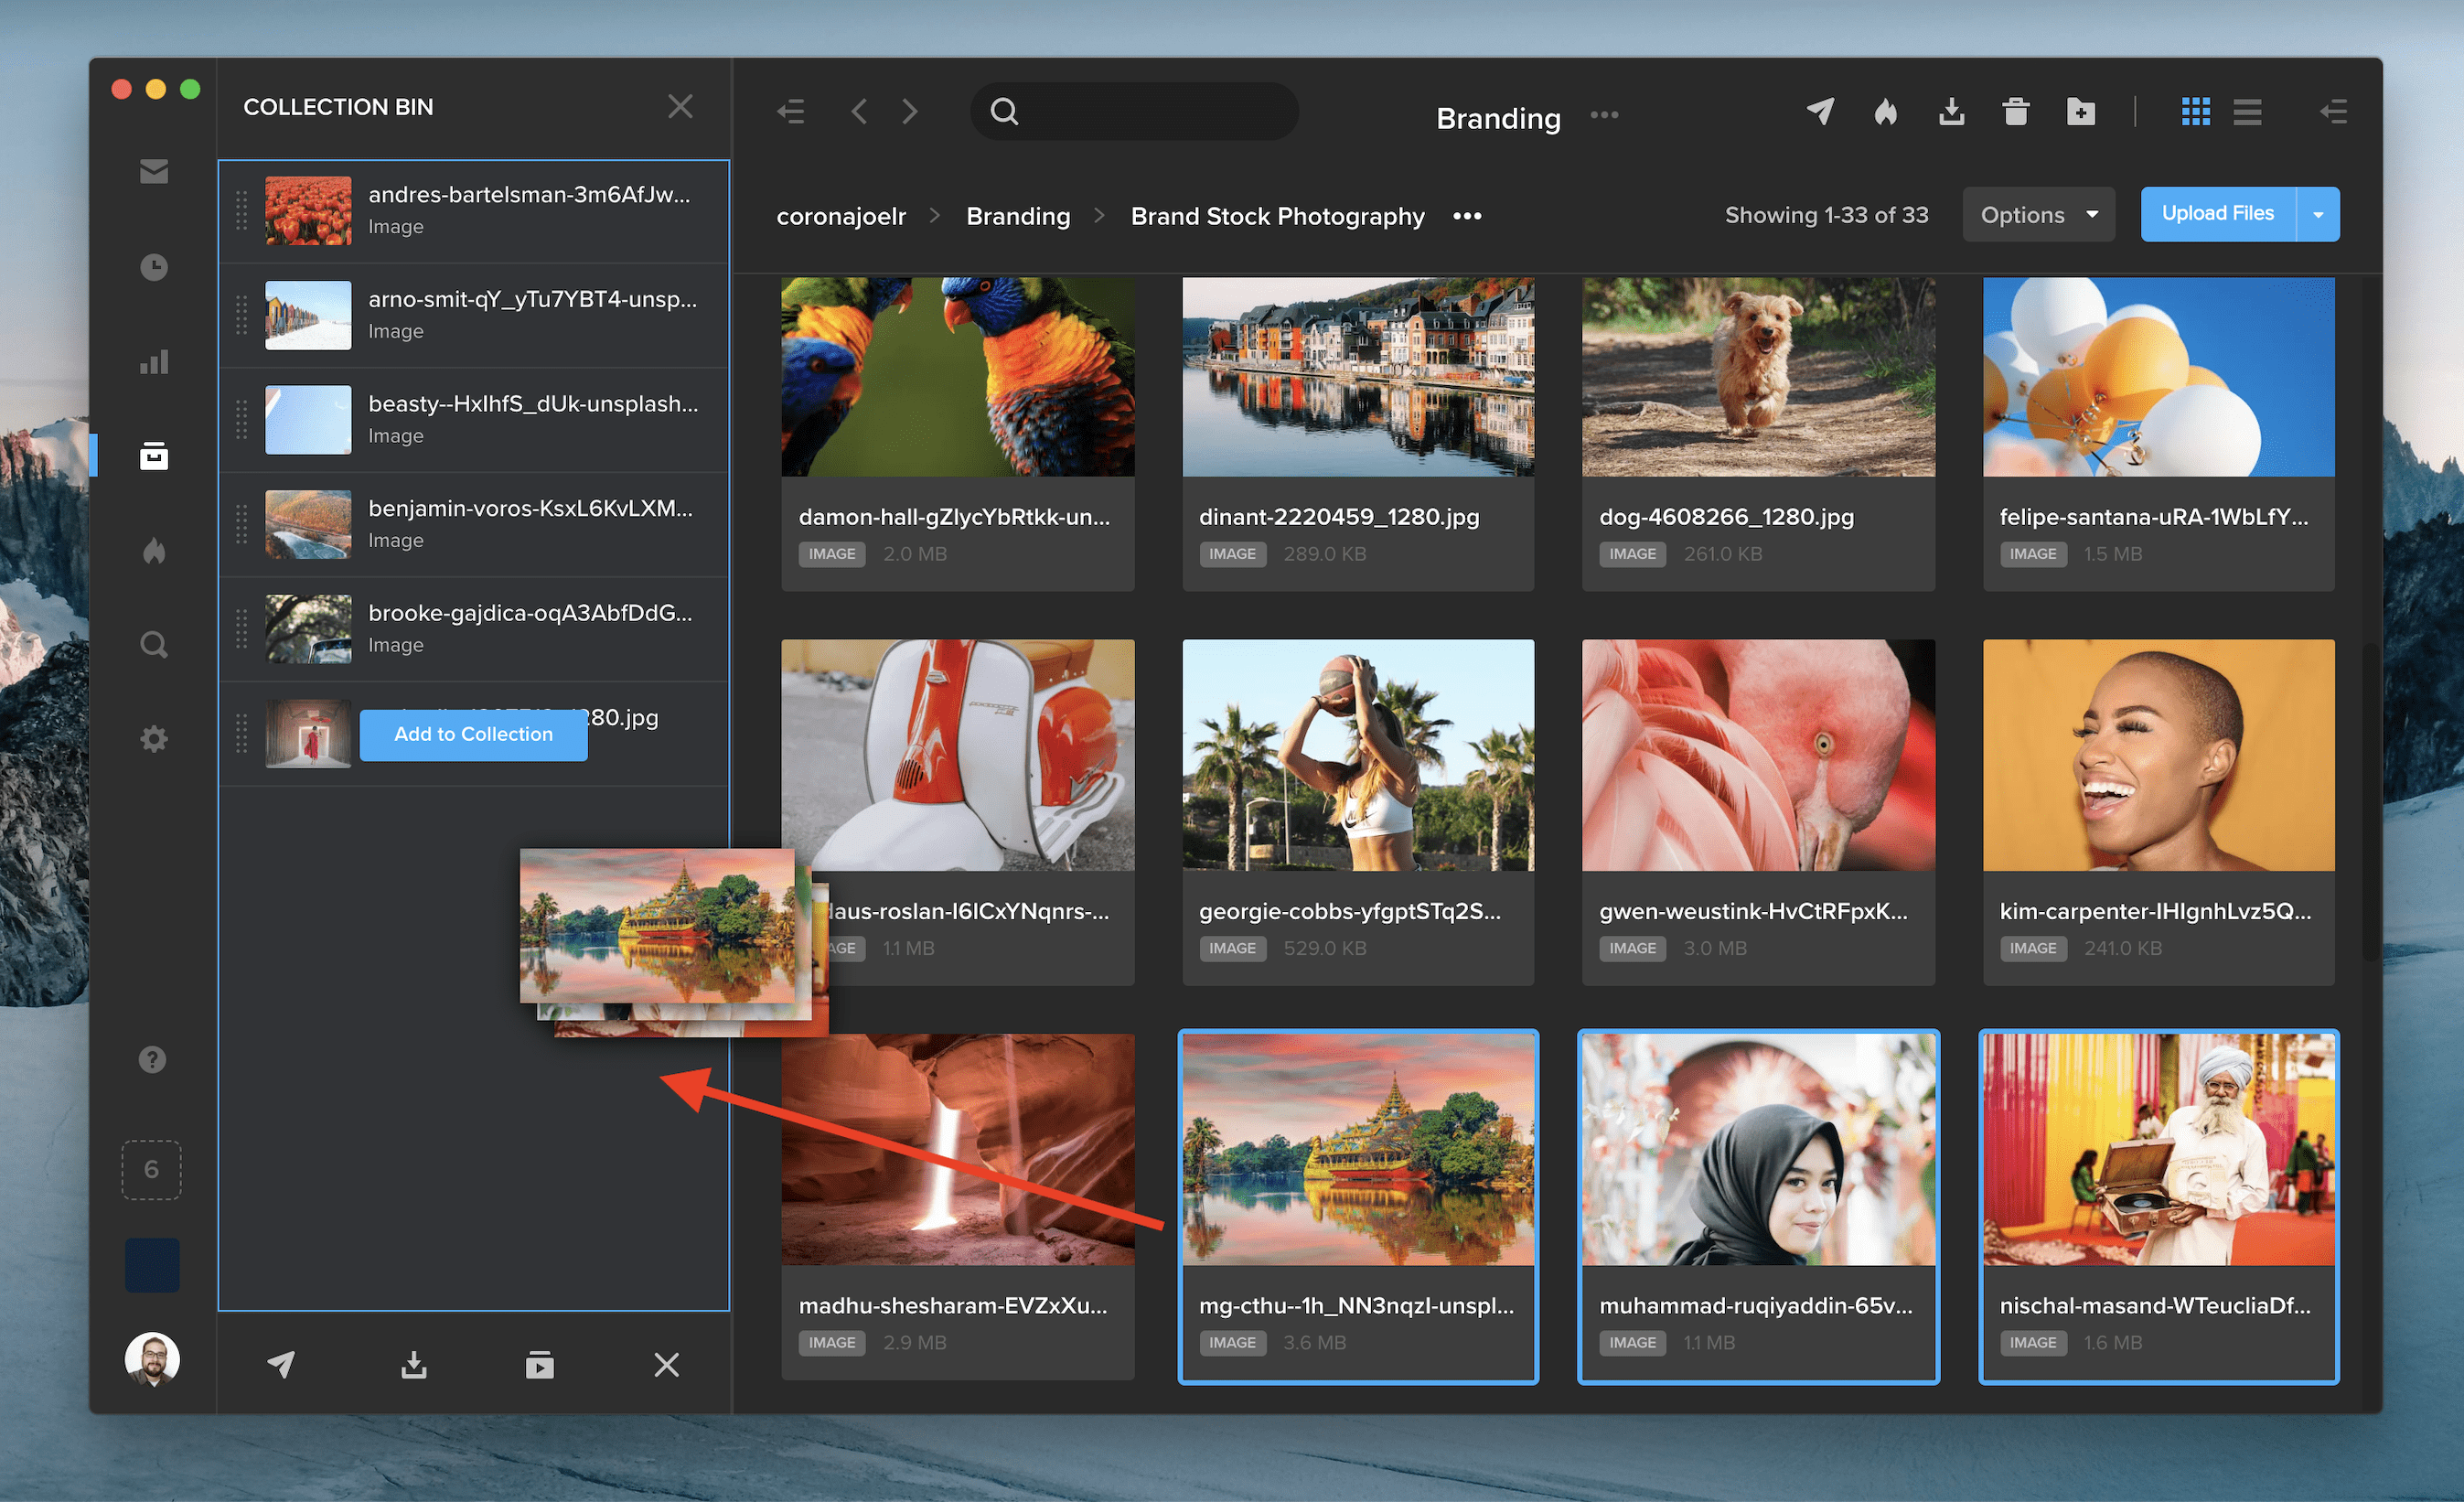
The collection bin lets you gather files from different projects, so you can easily share, download, or save them as a new playlist. You can add files to your collection bin in three ways:
- In the left-side navigation, click the empty box icon above your workspace logo to open the collection bin panel. Drag and drop your assets directly into the panel. The collection bin icon will update to display the number of assets currently in your bin, which can hold up to 250 assets.
- You can also drag and drop assets directly onto the collection bin icon in the left-side navigation.
- Right click on a file and select “Add to Bin.”
When you’re finished adding items to your bin, click the Share, Download, or Create Playlist button along the bottom of the collection bin panel. To bulk download assets, make sure you are using the SHIFT desktop app.
You can reorder items in your collection by clicking and dragging them. Hover over an asset and click the “X” button to remove an item from the bin. To clear your entire bin, click the “X” in the bottom right corner of the panel. Your bin is also cleared when you log out of SHIFT.

The actions you can perform in the collection bin are determined by your project-level permissions. If you do not have sharing permission on certain items in your collection bin, you’ll see an alert message in the panel and a red dot will indicate which assets you do not have permission to share.
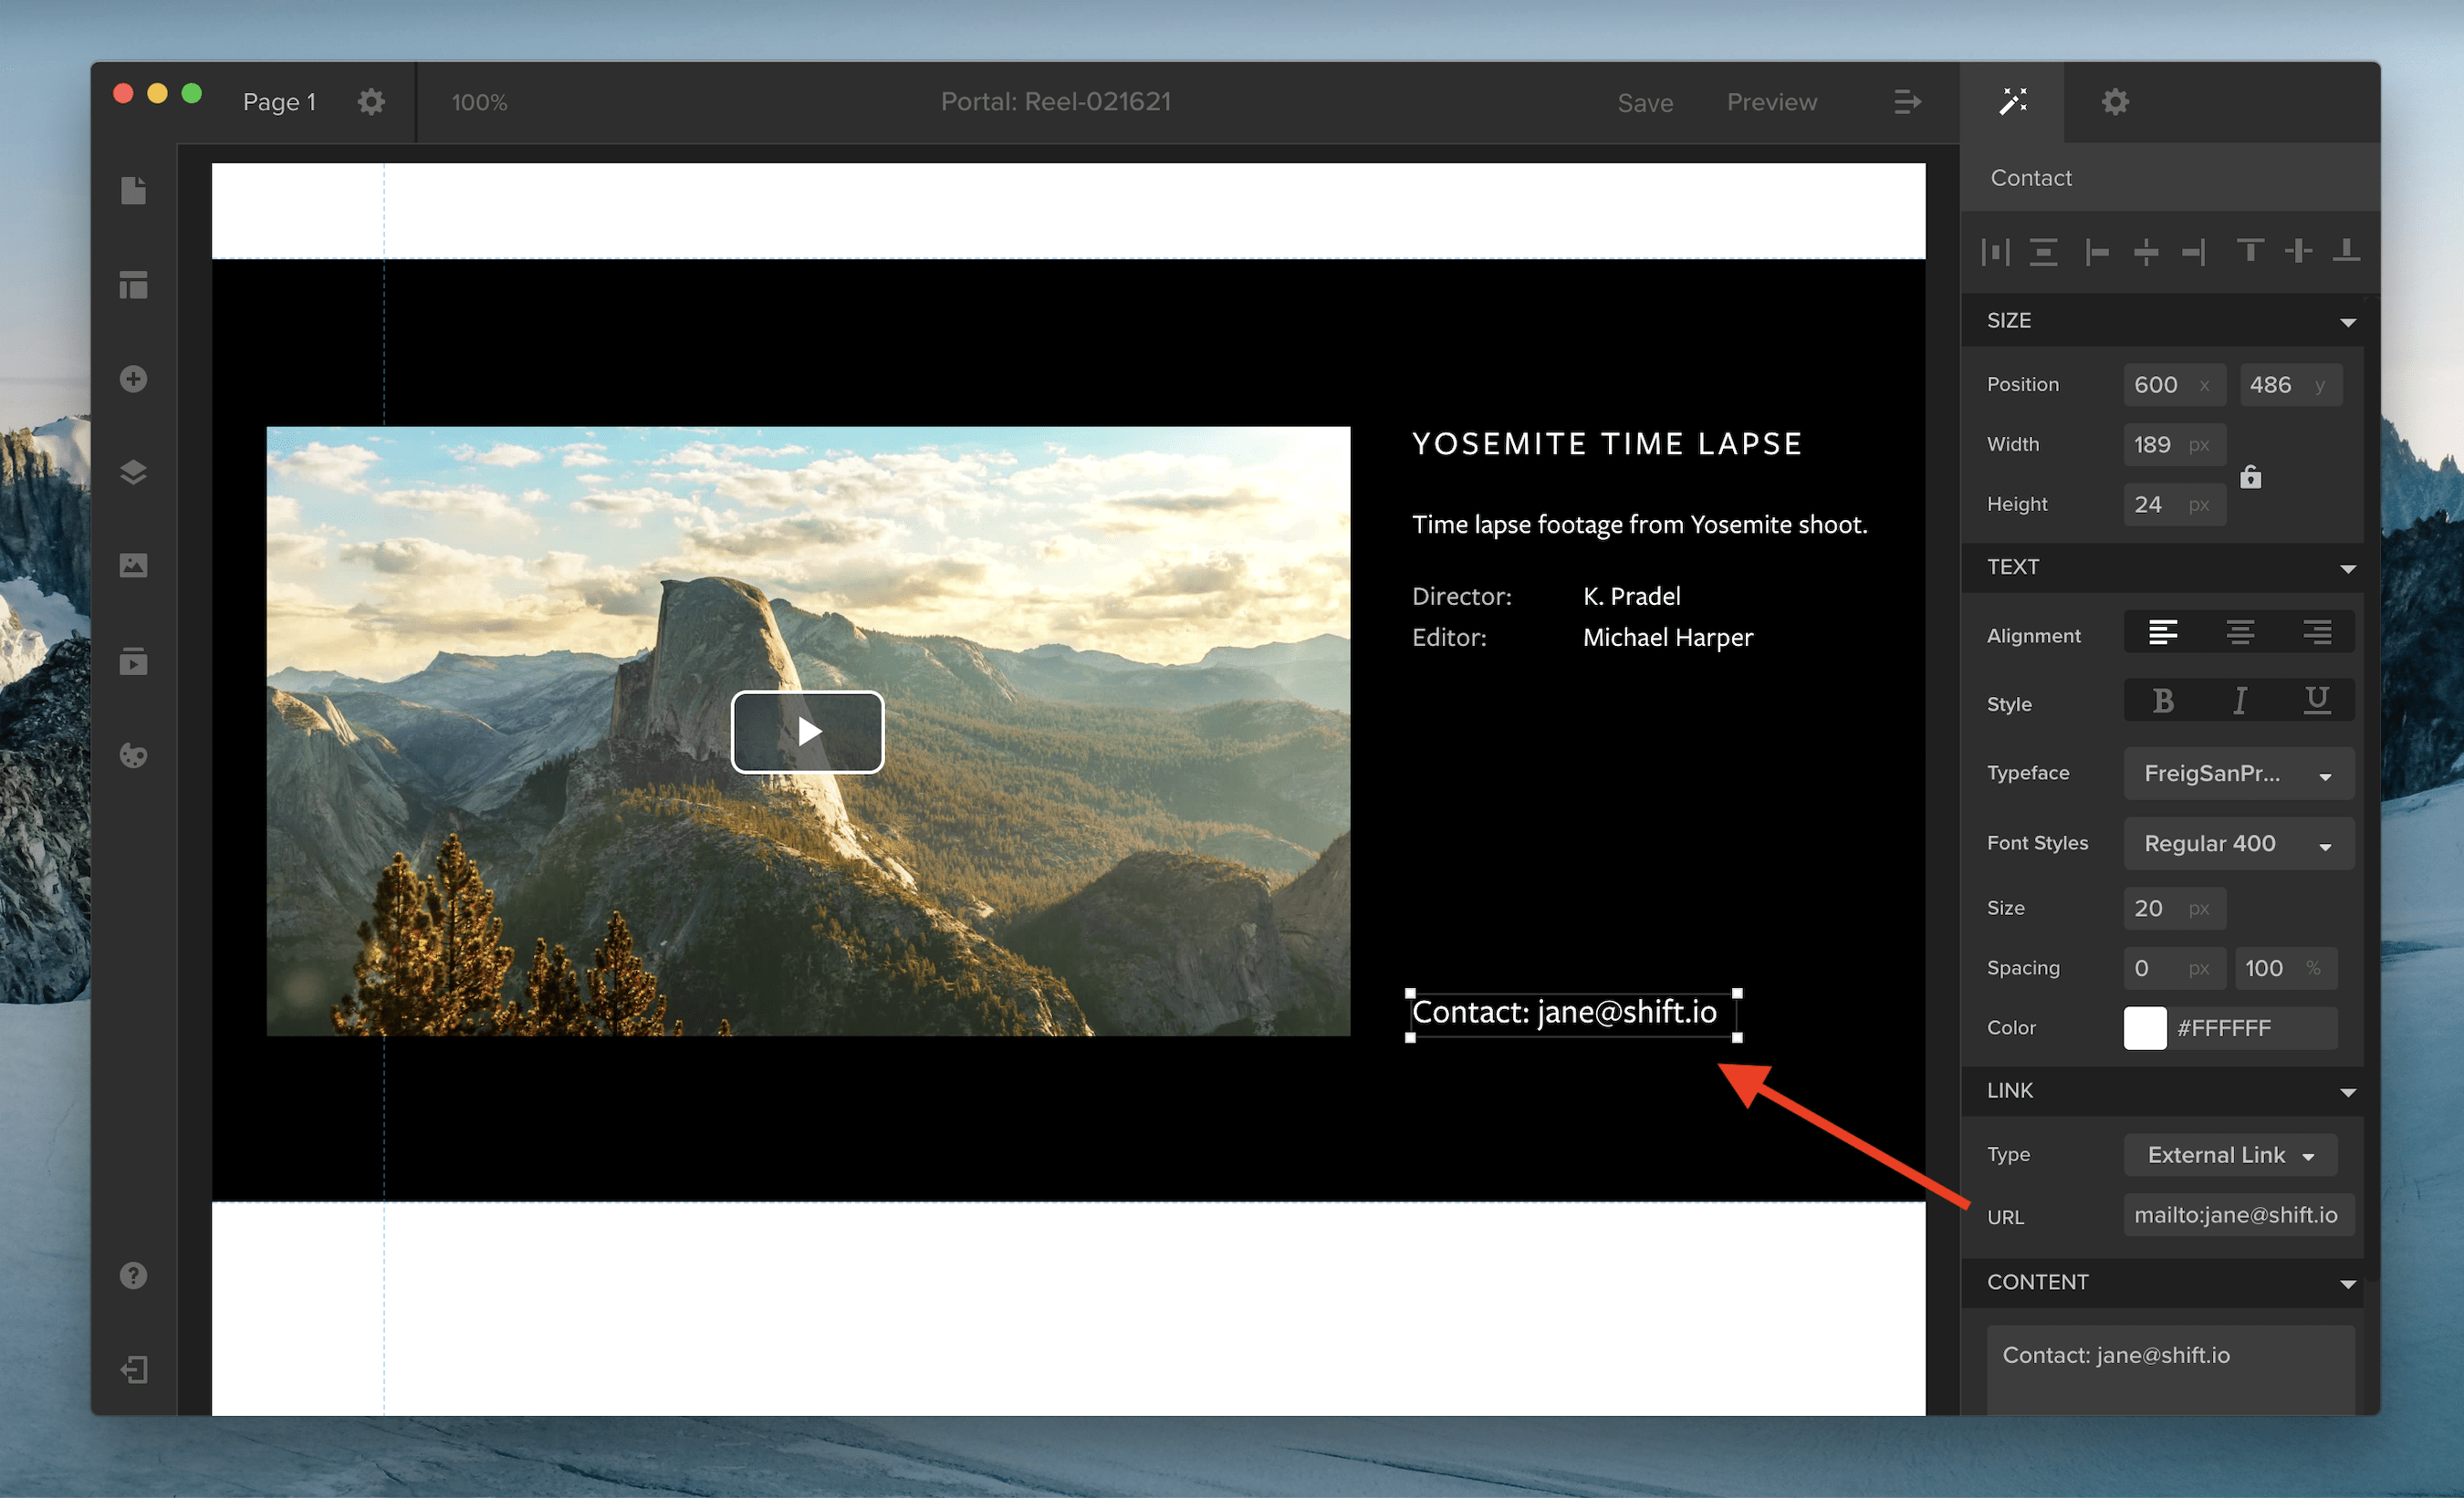
Spotlight now supports Mailto links that activate your default email client and open a new email window. To create a Mailto link, select a text element, and go to the Link section of the properties panel. Choose External Link as your link type. In the URL field, enter “mailto:” followed by the email address of your email recipient.

When you create and customize a new Spotlight, you may want to reuse the same template in future presentations. Now, you can save the template to your template library, so you can edit, clone, or reuse the template at any time. Just click Save along the top of the page, and select the Save as Template option.

