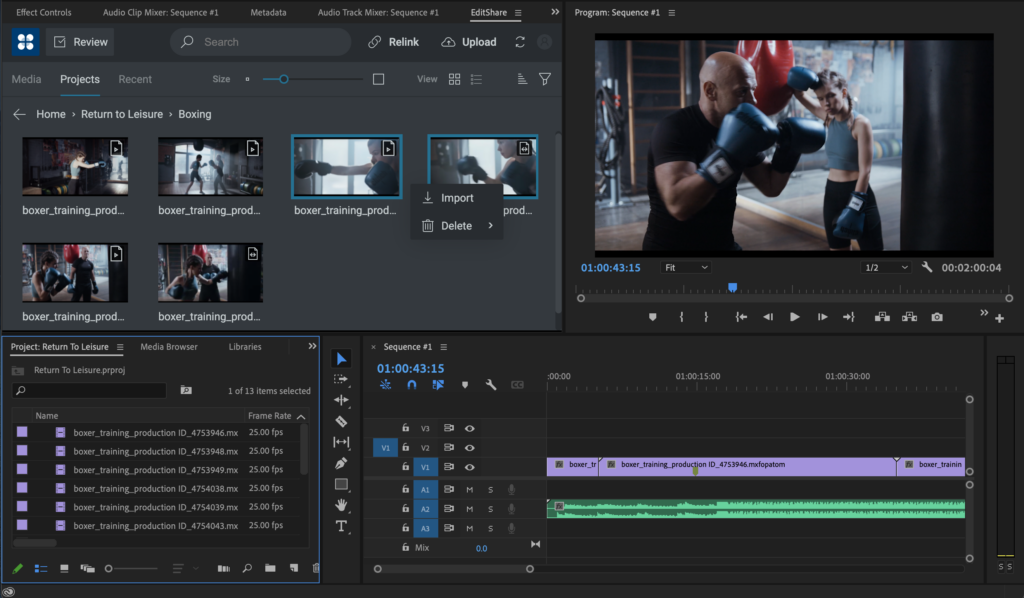
Whisper Extends EditShare to Build New Capabilities
Dynamic workflows designed by Tyrell will support major commissions
Boston, MA, June 12, 2024 – EditShare, the technology leader that enables storytellers to create and manage collaborative workflows at every stage from storyboard to screen, has implemented another EFS storage network at leading UK entertainment production company Whisper. The system was designed and implemented in conjunction with EditShare’s partner Tyrell.
Whisper is highly regarded for its sports, live and entertainment coverage, including some of the largest events globally. Having recently secured commissions for multiple new documentary series, it has added an extensive new storage network and access facilities.
Gareth Steven, Head of Post Production, Whisper
“We already have two EditShare storage nodes that we rely on, and which have proven extremely reliable over a number of years,” said Gareth Steven, head of post production at Whisper. “This new project calls for content to be created and managed over an extended period of time, with large production teams accessing and editing the content simultaneously. EditShare and Tyrell showed us that the scalability and workflow functionality metour requirements perfectly.”
The new installation sees three EditShare EFS-300 storage systems, each with 256 TB capacity, which are seen by users as a single namespace for simplicity and security in operation. The storage network is freely and continuously expandable to provide capacities exceeding a petabyte if required.
“Content security was also a key requirement for Whisper,” said Simon Wocka, account manager at Tyrell. “Media storage is like a bank vault: the assets it contains are priceless and must be protected above all else. Security is a core part of the EditShare architecture, providing the best protection at every stage without compromising operational ease and flexibility.
“EditShare also allows access directly within the key post tools that will be used on these shows,” he continued. “Artists using Adobe Premiere Pro or Blackmagic DaVinci can use EditShare integrations within their software environment, allowing them to access content directly. They don’t need to change workstations or learn new commands and structures – it removes barriers and makes workflows much simpler.”
Tara Montfort, co-founder and EVP Business Development at EditShare, added, “We are delighted to support Whisper’s new projects. Our scalable storage solutions and intuitive workflow tools are designed to meet the complex needs of production teams, ensuring they can collaborate seamlessly and focus on what they do best – creating compelling content.”
The new storage network was installed in February 2024 and is already supporting the latest documentary productions at Whisper.
EditShare is an Emmy Award-winning technology leader, supporting storytellers through collaborative media workflows across on-premise, cloud and hybrid architectures. The market-leading open software solutions and robust APIs improve workflow collaboration, third-party integrations and content sharing across the entire production chain. Designed specifically for media applications, the high performance line-up provides shared storage, archiving and backup, and intelligent media asset management.
Through a merger with Shift Media, EditShare now also integrates tools for content review and distribution, the creation of customised and branded pitch reels, and secure preview of high-value pre-release content.
About Tyrell
For 24 years Tyrell has been providing video, audio, graphics and storage solutions to the Irish and UK broadcast, post, production, corporate and education markets. In this time, we have become the leading provider of technology and service solutions both on-premise and in the cloud. Tyrell has an excellent understanding of the fast pace and unique pressures facing the media and entertainment industry; developing solutions for complex workflows. Allowing our clients to concentrate on the creative process and business development. From our two locations we offer a comprehensive range of professional services from consultancy to system design and integration, technical support and maintenance.
MediaSilo’s panels for Adobe Premiere Pro, After Effects and DaVinci Resolve Studio* make uploading a breeze
Sometimes, at the end of a long editing session, you just want to hit “export” and call it night. But everyone has experienced waiting for exports to complete, then initiating an upload to a review platform, and then waiting for that to complete. Then, you have to wait for the transcode to complete. Then, you have to ensure it plays right and the watermark is applied. Then, you have to send emails to producers and directors. Next, you wait for their comments.
The next day, editors try to figure out how to match the comments from emails back into their timelines. Then, you have to be careful because making changes affects the timecode, which throws off another set of comments where a reviewer typed in the timecode in a Slack message. And so on.
MediaSilo’s Panels for Premiere Pro, After Effects and DaVinci Resolve Studio solve this whole mess for editors. Let’s investigate the panels and see how they can save you time and grief.
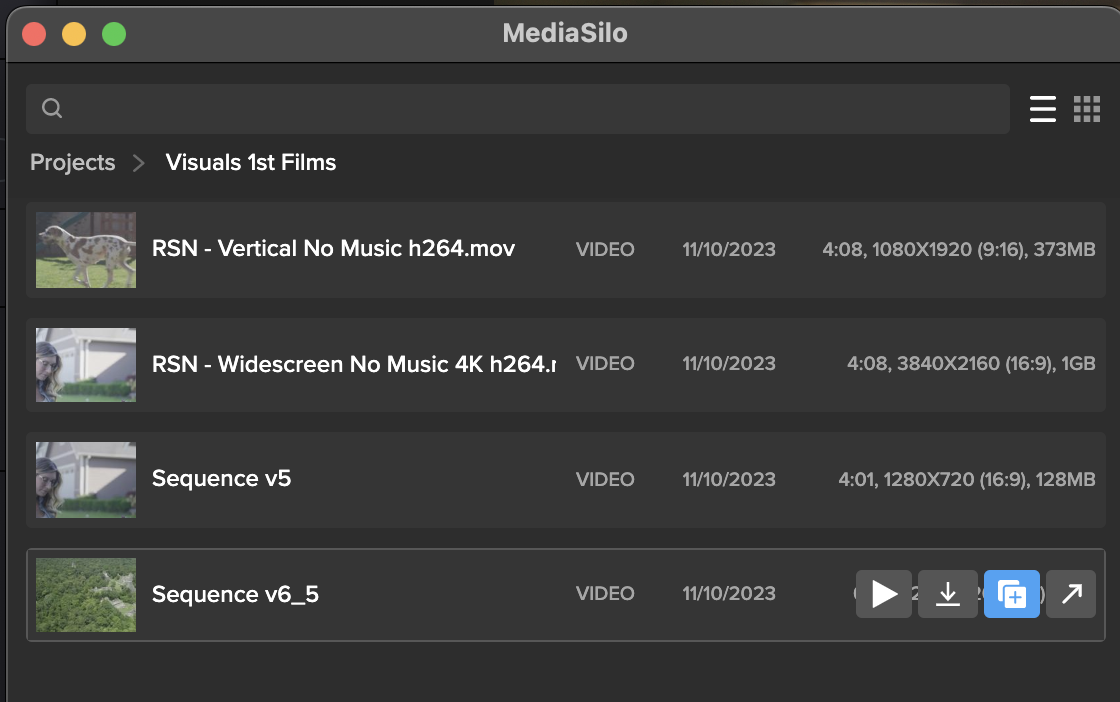
MediaSilo Panel for Premiere Pro and Resolve
The MediaSilo panel gives you access to assets in MediaSilo right within your NLE. It also allows you to export a timeline with a single click and have it uploaded into the right project folder on MediaSilo. You can choose your upload settings and identify the people who need to be notified. Once the team has made notes in MediaSilo’s review mode, you can immediately import those comments as markers into your sequence.
Those features streamline so many manual steps in the review and approval process. Basically, the MediaSilo panel gets you home in time for dinner.
DaVinci Resolve Studio
Once the panel is installed, Open DaVinci Resolve Studio and go to Workspace -> Workflow Integrations -> MediaSilo. A floating window appears with your projects. It uses a helper app called “Electron,” so don’t quit it. Your assets appear in the projects. When you float your mouse over each asset, you can preview (Resolve only), download, create a new version, or Open in MediaSilo.
Premiere Pro
Install the MediaSilo Panel from the Creative Cloud desktop app. Go to “Stock & Marketplace” and search for MediaSilo. Once the extension is installed in Premiere, open the Window menu > Extensions > MediaSilo.
After Effects
Install the MediaSilo Panel from the Creative Cloud desktop app. Go to “Stock & Marketplace” and search for MediaSilo. Once the extension is installed in After Effects, open the Window menu > Extensions > MediaSilo.
Downloading assets into your project
If you want to include one of your MediaSilo assets in your local project, just drag it into the media. If you prefer to download a proxy version, click the download icon and select “Proxy” from the drop-down menu. Proxies are smaller, lower-resolution versions of the original footage. They are handy when you are putting together a rough cut. And when your project is ready for color grading, you “conform” it to the original, high-resolution clips.
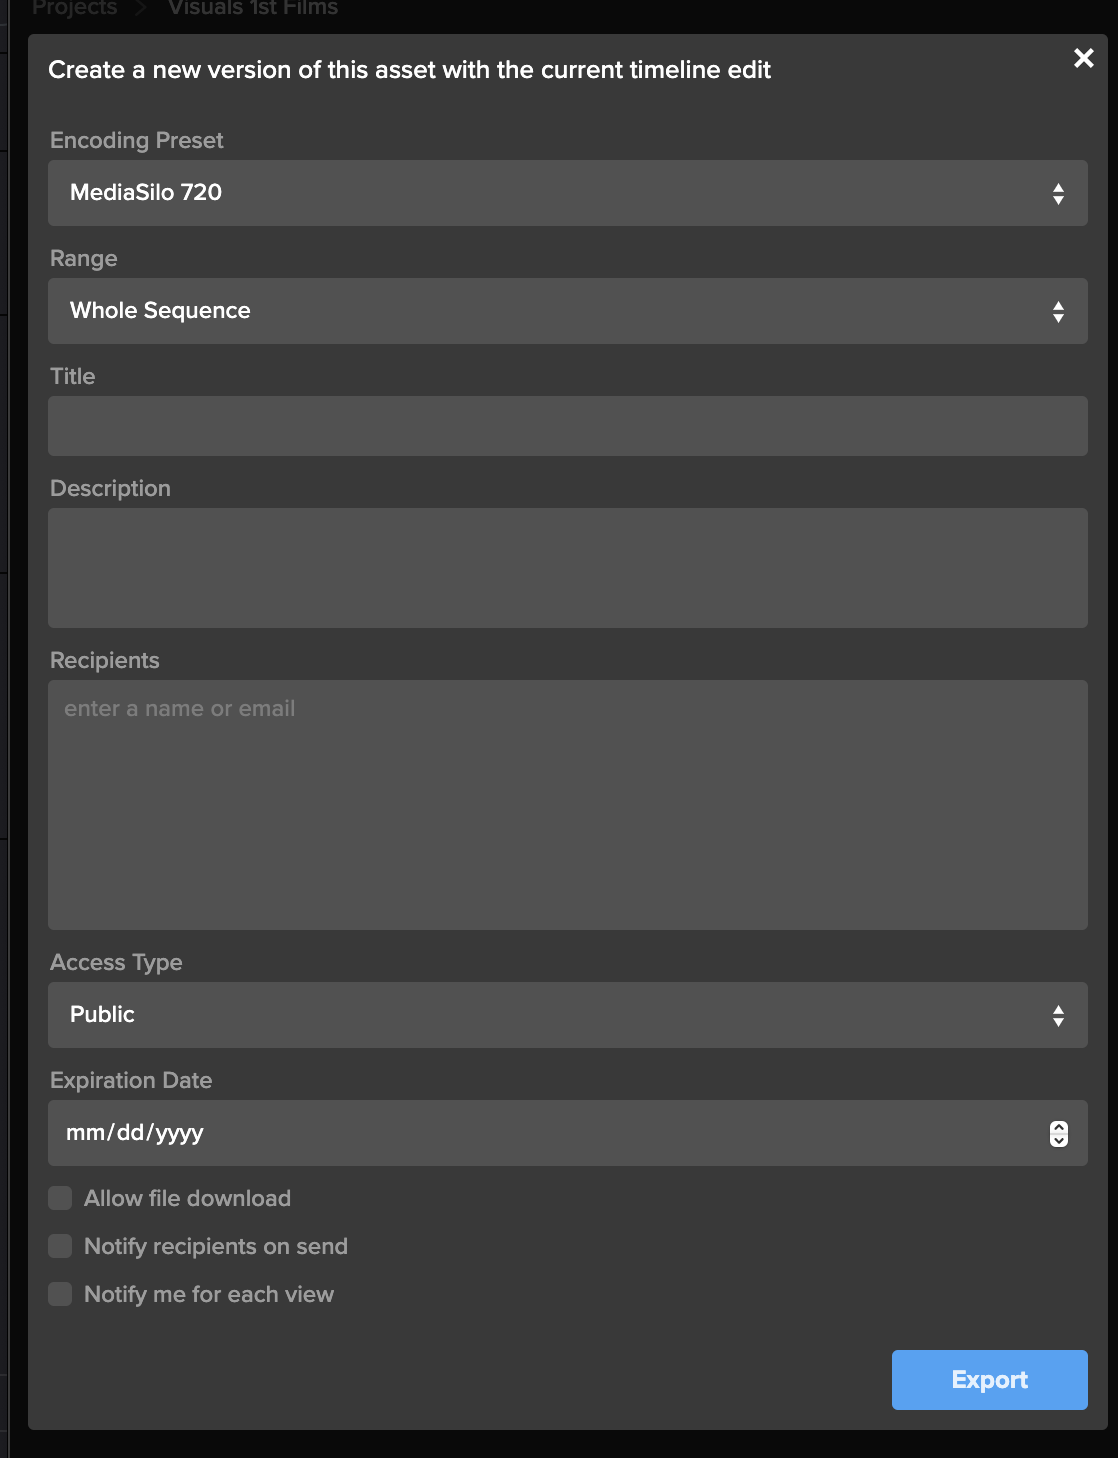
Exporting your timeline directly to MediaSilo is a breeze with the panel. Once you’ve completed your cut, click “Export Timeline” (Premiere says, “Export Sequence”) in the MediaSilo Panel. The “Export Sequence/Timeline” window opens up. You can choose your encoding preset based on your needs. Sometimes, you need the highest quality version to go up, and sometimes, you just need a lower-resolution version for quick approval. Choose the whole sequence or just from the In/Out points. You can specify a title and add a description that will appear in MediaSilo.
“Upload Location” is the next option. Start typing the project name, folder or asset with which this upload should be associated. This step is important because an editor may work on projects with different security levels.
The “Recipients” field saves you the hassle of waiting for an upload to complete before notifying reviewers. Enter the names of the individuals who need to receive a review link, and they will be notified once the asset is ready for viewing.
Create a new version of your timeline
Typically, when I’m ready to output a new version of an edit, I export it from the timeline. If the service I’m using for review and approval (non-MediaSilo) keeps track of versions, I usually just cross my fingers and hope it picks up on the new file coming in. Most of the time, I just append a “v2” or “v3,” and then manually identify it as a new version once the upload has completed. Then, I send a message to alert the reviewer.
The MediaSilo panel takes a different, more efficient approach. This feature is so simple that it took me a moment to understand how it works.
This process applies if you have already exported your timeline once and you need to export another version after some changes have been made. Select the clip in the panel and click on the button to share a new version.
This will bring up the export window. Rather than simply exporting the asset, all these options are designed to help you streamline creating a new version of the asset. This way, you can give the new version its own title, and MediaSilo will keep it associated with the initial version. This means the links that you have previously sent out will continue to work.
You can even change the access on the new version, and reviewers will be notified when it is ready. You’ll also receive a notification when they view it. This little box saves so many steps in the process of exporting compared to the process I outlined at the beginning of this section.
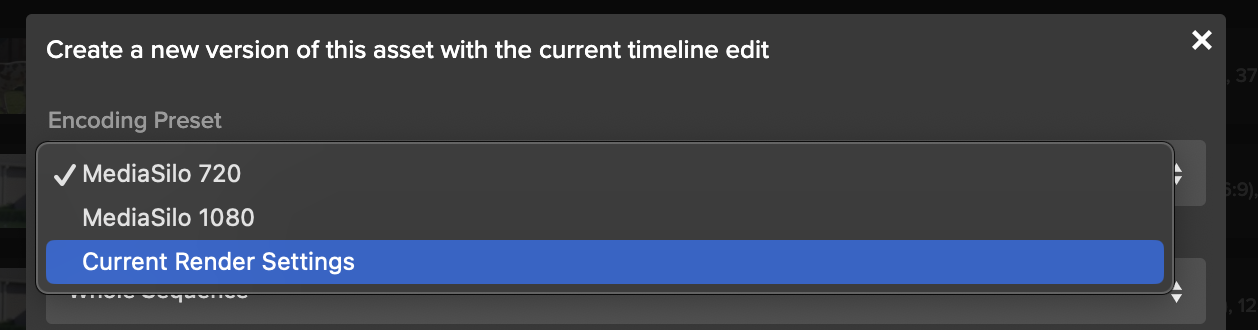
Encoding Presets
The encoding presets section allows you to choose the resolution for your upload. Sometimes, you need to get a change up quickly or share a low-quality version with a collaborator. So you can choose a lower-resolution setting. If you need to upload at a higher quality, choose your “current render settings.”
Watermarking and security
If you have watermarking turned on with your project, that will get automatically applied in MediaSilo. This is really helpful for editors because they don’t need to turn on and off a watermark within their NLE. In addition to the visible watermark, MediaSilo supports forensic watermarking with SafeStream. This technology ensures that any leaks can be traced back to their source.
MediaSilo also supports the ability to use your own custom email server for email notifications and 2-factor authentication — to ensure an even higher level of security.
Support articles
MediaSilo offers support articles for Resolve, Premiere and After Effects that show you how to install and use the panels in detail.
Conclusion
The MediaSilo panels in DaVinci Resolve Studio and Adobe Premiere Pro will save you time and energy. They help to make collaboration, review and approval a much more streamlined process.
*Note: The MediaSilo + DaVinci Resolve Studio integration is only available on the DaVinci Resolve Studio paid tier. You can find their pricing here.
London post house uses EditShare Universal Projects to move work through the facility
Boston, MA, August 1, 2023 – EditShare®, the technology leader that enables storytellers to create and manage collaborative media workflows, recently provided a large-scale storage network for Directors Cut Films, a leading London post house specializing in long-form content, with a particularly strong reputation in documentaries and entertainment. The new installation, which replaced a proprietary storage system, provides seamless transfer of projects between all the operational rooms.
Directors Cut, based in central London, currently houses 34 offline Avid suites, five online editing rooms which support Adobe® Premiere® Pro and DaVinci Resolve as well as full-featured Avid, three audio suites and a large grading theater with Baselight 2. With the increased demands of Dolby Vison® and Dolby Atmos®, when looking for a new storage network, it was vital that it should not only provide the capacity and bandwidth to support all these rooms, it had to provide the ability to move projects from stage to stage, and from software package to software package, seamlessly and transparently.
“EditShare showed us the ideas behind Universal Projects,” said Mark Manning, managing director of Directors Cut. “They demonstrated that they could move not just the material but everything involved in post, including bin structures, from room to room, machine to machine, including in and out of Avid, something no other 3rd party vendor can do.”
The EFS storage system itself provides more than a petabyte of usable storage. It consists of five nodes each of 256 terabytes, configured to provide the highest levels of resilience and eliminating any single point of failure. The resilience built in also includes duplicated metadata controllers and high speed, fiber ethernet switches. A sixth EditShare node is also included, in a high security environment, to provide external access for receipt of content from locations, for remote log-ins, and for delivery.
FLOW, the EditShare production asset management platform, is a vital part of the workflow structure. This is visible to clients, who use it to prepare material, monitor progress and review and approve cuts. FLOW provides open interconnectivity, allowing clients to tag and prepare content using standard tools like Excel, with FLOW managing those inputs and translating it into assembling the right content in the right format for each editor.
“The EditShare offer was precisely what we needed,” said Manning. “It gives us secure storage, the convenience of client-accessible asset management, plus the big bonus of streamlined workflows across all our rooms using Universal Projects. We would probably be counted as a lighthouse customer for Universal Projects – we have certainly contributed a lot of thought and direction during its development – and it has very powerful functionality, ahead of anything else we found out there.”
Said Bacho, CRO at EditShare added “We are really pleased with the success of the installation at Directors Cut, because it does exactly what we set out to achieve. Everyone in the creative team at Directors Cut is remarkably talented: we have given them a central architecture which automates all the tedious tasks around post, so they can just focus on the story.”
Directors Cut has acquired the complete system on a five year subscription. This includes all the necessary hardware from HPE, together with warranties covering the whole period, as well as all software updates. “Our experience is that some post houses still like the capex model; others – like Directors Cut – can see the financial benefits which a long-term deal brings.”
EditShare is a technology leader that enables collaborative media workflows on-premise, in the cloud, or in a hybrid configuration. With customer and partner success at the heart of EditShare’s core values, our open software solutions and robust APIs improve workflow collaboration and third-party integrations across the entire production chain, ensuring a world-class experience that is second to none. The high-performance software lineup includes media optimized shared storage management, archiving and backup, and media management, all supported with open APIs for extensible integration.
EditShare’s cloud-enabled remote editing and project management technology was recently recognized by the National Academy of Television Arts and Sciences (NATAS) with a prestigious 2021 Emmy® Award for Technology and Engineering.
Scalable storage and content management on premises, at remote locations and in the cloud
Boston, MA – May 26, 2023 – EditShare®, the technology leader that enables storytellers to create and manage collaborative media workflows, will show visitors to BroadcastAsia 2023 how its storage and workflow systems and solutions fit seamlessly into modern, practical workflows, growing as the user’s needs increase.
Central to the success of EditShare’s solutions is that it matches its powerful and resilient storage systems with software that provides all the production asset management and workflow controls needed by any media enterprise. The solutions can be implemented centrally, they can embrace remote locations, and they can use standardized cloud storage and processing, to meet the specific needs of each project. Users can start with a single storage appliance and grow seamlessly and without downtime to networks of many petabytes.
Putting creativity and productivity at the heart of the operation, EditShare provides direct support for all popular professional editing platforms, including Adobe, Avid and BlackMagic. EditShare FLOW software ensures material is formatted and packaged to appear as bins in the appropriate workstations, wherever they are, so the editor wastes no time in set-up and preparation. Where needed proxies are automatically generated, and Swift Sync provides file acceleration to move required material.
Content storage can be spread across multiple locations and the cloud, to suit the operational needs of the user. FLOW maps all the content in every location and ensures it is ready, whenever and wherever it is needed. That includes cloud editing, with the preferred software tool running in the EditShare environment in AWS.
“While technology is moving forward very rapidly, we know that our customers want to focus on producing great content to tight timescales,” said Sunil Mudholkar, VP Product Management at EditShare. “What we will be showing at BroadcastAsia demonstrates that we provide strong underlying automation and intelligence, allowing creatives to focus on the results. We look forward to meeting many of our users from the APAC region and showing them how we continue to develop the most productive and practical infrastructures, whatever the size of the business and however they want to work.”
Demonstrations of EditShare’s proven storage solutions and workflow software can be seen at BroadcastAsia 2023, on stand 6J2-08.
EditShare is a technology leader that enables collaborative media workflows on-premise, in the cloud, or in a hybrid configuration. With customer and partner success at the heart of EditShare’s core values, our open software solutions and robust APIs improve workflow collaboration and third-party integrations across the entire production chain, ensuring a world-class experience that is second to none. The high-performance software lineup includes media optimized shared storage management, archiving and backup, and media management, all supported with open APIs for extensible integration.
Like many of you, I’m taking a big breath following an exciting week in Vegas for this year’s National Association of Broadcasters (NAB) conference. As always, NAB provided a unique opportunity for us to connect with industry experts, showcase our latest products, get together as a globally-distributed team, and gather valuable feedback from our esteemed customers and partners. It was a great show – and we enjoyed seeing everyone who made the trip to our booth.
A few key themes seemed to dominate conversations during the show – this is what I noticed that kept coming up at NAB:
Collaborative Workflows: The importance of collaborative workflows in the media and entertainment industry has never been more evident. At NAB, we highlighted our latest innovations in collaborative workflows and shared storage solutions. Our new features, such as universal project sharing, enhanced metadata management, multi-site support and remote editing capabilities, were met with overwhelming positive feedback. We are proud to continue our commitment to providing cutting-edge collaborative tools that streamline media production workflows and foster creativity among teams. We continue to drive forward our strategy of creating amazing everywhere.
Hybrid Cloud-Based Solutions: As our CTO, Stephen Tallamy puts it, “everything seems destined for the cloud… eventually.” But the pace and sequencing of that move is different for every team. That’s still true here in 2023. While some teams are dipping their toes in the water, others are ready to take the plunge but aren’t quite ready to commit to moving all of their workflow to AWS just yet. As a provider of cloud-based solutions, we want to support customers who are ready to start their cloud journey while also acknowledging that the right first step looks different for every team.
At NAB, we showcased our latest advancements in hybrid cloud-based editing, media management, and storage solutions. Our hybrid cloud offerings give customers the flexibility, scalability, and cost-efficiency they need to meet the evolving demands of modern media production – sometimes that means a mix of on-prem and cloud, both in storage and media asset management. We’re excited about the possibilities that hybrid cloud-based technologies bring to the industry, and we’re committed to expanding our solutions to help customers stay ahead of the curve. If you’re thinking about a potential hybrid cloud strategy, we have more examples than ever about ‘what good looks like’ that we’d be happy to share.
We were also surprised by the number of those who have multiple EditShare deployments and are interested in connecting those workflows to create global efficiencies. This is an area where we are innovating and making investments, and we’re pleased that these investments were validated by the customers we spoke with. We’re going to continue investing here – check out our CTO, Stephen Tallamy, discussing our thinking on where hybrid is headed from the NAB floor here.
AI-Driven Media Management: Artificial intelligence (AI) has reached peak hype status, but it’s also transforming the way media assets are managed and monetized. At NAB, we demonstrated our latest AI-driven media management tools that leverage machine learning and automation to streamline media workflows, enhance search capabilities, and optimize media asset organization. Our customers were impressed with the increased efficiency and productivity that our AI-powered solutions bring to their operations.
While I was at NAB I also participated in the SET Future of Broadcast panel. Fernando Bittencort, former CTO of Globo moderated the panel. He kicked off the panel by reading the response he got when he asked ChatGPT “What is the future of Broadcast?”. We can debate the quality of ChatGPT’s answer to his question, but the fact that this is even possible should cause us to stop and recognize two things: (1) The world has changed, and (2) our industry is not exempt. The possibilities for what it can do – from search ability to documentation to customer support to how we test our products – the limit of how we apply AI and machine-learning technology to the problems media creators face. And I’ll leave it to smarter guys than me to talk about the limits and governance that should be placed on it.
The most encouraging part of NAB? Our industry is back. We had 120 channel partners in attendance from all around the world. We had more than double the product demos vs. 2022. Leads and opportunities coming out of the show were also up. Things are moving in the right direction.
As we reflect on this year’s NAB conference, we are energized by the opportunities and challenges that lie ahead. We remain committed to our mission of Creating Amazing Everywhere by empowering media professionals to create, collaborate on, and deliver exceptional content.
Thank you for your continued support of EditShare. We look forward to spending more time together in 2023.
Augments presence with customers & partners in the region and sponsors inaugural Manufacturer Awards
Boston, MA – May 04, 2023 – EditShare®, the technology leader that enables storytellers to create and manage collaborative media workflows, will showcase its latest productivity and creativity developments at CABSAT 2023 (stand S1-E20, Dubai World Trade Centre, 16 – 18 May). This will be the company’s largest presence at CABSAT to date. Underlining its commitment to the event and to the MENA region, EditShare is also supporting BroadcastProME’s inaugural Manufacturer Awards at the show as a silver sponsor.
The demonstrations will show what can be achieved with EditShare’s market leading EFS storage devices, available both as on premises servers and as cloud technology. The creativity and workflows are provided by FLOW, the software layer which provides asset management and system control.
The strong movement in production and post at the moment is towards decentralization: remote production; multi-site post; and hybrid on premises and cloud storage. The latest developments from EditShare reflect these changes, including FLEX for fast cloud implementations and Multisite, which provides the intelligence to ensure that media is available where it is needed, moving content from location to location, or from the center to a remote worker, to minimize downtime.
Also boosting productivity is direct support for all the popular professional edit packages: Adobe, Avid, BlackMagic and others. Material relevant to each project will appear as bins in the right workstations, wherever they are, eliminating set-up time and waiting for content transfers. Swift Sync from EditShare provides file acceleration to move material as quickly as possible, over any path.
“The Middle East is a really important, and very successful, region for EditShare, thanks in no small part to our dedicated Channel Partners” commented Said Bacho, CRO at EditShare. “We always ensure that we have a strong demonstration of our latest capabilities at CABSAT, and the conversations we have with the media community in the region are very important to us, guiding future developments.
“As the leading storage and asset management specialists, we know how important it is for the industry to maintain strong innovation in creative tools and the rest of the content chain,” he continued. “When CABSAT and Broadcast Pro ME magazine set up a Manufacturer Award program, we wanted to give it our full support, which is why we are the silver sponsor. I look forward to seeing the innovations which the awards will spotlight.”
Demonstrations of EditShare’s proven storage solutions and workflow software can be seen at CABSAT 2023, on stand S1-E20.
EditShare is a technology leader that enables collaborative media workflows on-premise, in the cloud, or in a hybrid configuration. With customer and partner success at the heart of EditShare’s core values, our open software solutions and robust APIs improve workflow collaboration and third-party integrations across the entire production chain, ensuring a world-class experience that is second to none. The high-performance software lineup includes media optimized shared storage management, archiving and backup, and media management, all supported with open APIs for extensible integration.
Continuing developments driven by user experiences
Boston, MA – April 25, 2023 – EditShare®, the technology leader that enables storytellers to create and manage collaborative media workflows, is bringing its latest productivity and creativity developments to the Media Production & Technology Show (stand D40, Olympia London, 10 – 11 May). All the new functionality is designed with user experiences in mind for even greater creative freedom and simpler workflows.
EditShare provides both powerful content storage devices and the management layer to control workflows and track assets. This allows media to be stored on premises, at multiple locations and in the cloud, ensuring that users can work the way that is most convenient for them.
FLOW is the asset and workflow management software, supplemented with FLEX for fast cloud implementations. New at MPTS this year is Swift Sync, which gives users a way to share media across different EFS storage systems, with FLOW multi-site software automating the tasks of generating proxies and ensuring content is available where it is needed.
A major boost for productivity and creativity is the ability to support all the popular professional edit packages – Adobe, Avid, BlackMagic and others – directly. Editors will see the material relevant to their project appear as bins in the edit software, eliminating set-up time and the wait for material to transfer. Thanks to EditShare’s unique Universal Projects cross-platform tools, edit assistants can create bins and even rough cuts without even knowing which edit software will be used to finish the job.
“The great value of an event like MPTS is the chance to show just how sophisticated and supportive our architecture really is,” said Said Bacho, CRO at EditShare. “We have time to talk through a user’s real requirements, and show how our software can be used to link EditShare storage nodes and deliver the workflows, securely and productively. Ultimately, our users just want to get on with creating their work, and our continuingly evolving software automates the underlying management and transfers to achieve just that.”
Demonstrations of EditShare’s proven storage solutions and workflow software can be seen at MPTS 2023, on stand D40.
EditShare is a technology leader that enables collaborative media workflows on-premise, in the cloud, or in a hybrid configuration. With customer and partner success at the heart of EditShare’s core values, our open software solutions and robust APIs improve workflow collaboration and third-party integrations across the entire production chain, ensuring a world-class experience that is second to none. The high-performance software lineup includes media optimized shared storage management, archiving and backup, and media management, all supported with open APIs for extensible integration.
After a few years sitting in front of a screen on seemingly endless Zoom calls, I’ve spent most of this year in airplanes, on the road, and in front of partners and clients. And after a few particularly busy weeks of travel, I finally took a moment to look back on our first in-person IBC show in three years.
Like any good trade show, this year’s IBC was exciting, eye-opening, exhausting, and a little indulgent all at the same time. We won’t talk about the lines at Schiphol trying to leave Amsterdam! After some reflection, I wanted to share a short summary of what I took away from IBC, in one word, one theme, and one feeling.
One Word: Optimism
The only thing that people on planet earth do more than consuming video is working and sleeping and people are watching more video than ever before, and that trend is creating big opportunities for our creative clients. However, if you look across the economic climate, there’s a lot of heaviness out there too. The specter of a potential recession, a rising interest rate environment, and armed conflicts around the world are creating a lot of concern, and the need for many in our industry to do more with less. Despite that turmoil, I saw example after example at IBC of technology solving problems that enable creators to bring compelling content to subscribers faster and more efficiently. I see a real opportunity for our industry to come together and partner across our environment to solve the hard problems that need solving. Business models are changing from perpetual to recurring models. The industry is moving towards the cloud. As an industry, we need more innovation, more automation, and more simplification. Maybe this is an unpopular opinion, but I’m also hoping to see a little less of vendors beating down on price and more examples of innovation that helps creators do what they’re really great at: Making more cool movies, TV, and content.
Maybe this is a stretch of the concept of optimism, but I can’t tell you how good it felt to connect with people I’ve only had a chance to meet with virtually, and how much I’m looking forward to doing more of it in 2023. More than once I found myself closing a conversation on the floor with a handshake and a “good to see you again”, only to realize (or, on a few occasions, to be politely reminded) that I had only ever met the person over Zoom. Some of these folks have been customers of EditShare for multiple years now, and we are having our first in person introductions. So many of us still have so much catching up to do.
Our week in Amsterdam reminded me how much I’m looking forward to more of those connections later this year. For those of you joining us at NAB New York, or our channel partner training programs in Watertown, Basingstoke, and Thailand, I look forward to seeing you in November!
One Theme: A more flexible approach to Cloud
Cloud has been a hot topic for our channel partners and customers for some time now. But this year’s conversation around Cloud is noticeably different when compared to a few years ago. The conversation has shifted from “should we move to the cloud” or “I’m never going to the cloud” or “I just don’t get the cloud” to “I’m in the cloud” or “I need to know you can take me to the cloud when I’m ready” or “I don’t believe in the cloud, but… convince me because I might be wrong”.
At our last in-person IBC show in 2019, I remember a lot of “in or out” cloud conversations. Our industry was conceptualizing the cloud at that time as a full commitment, “either-or” proposition. You either kept everything local, or you moved it all into the cloud. There was no middle ground. That’s not the case anymore. Even the language people use to talk about the cloud is changing. The stuff we labeled “cloud” before is now much more likely to be referred to as “hybrid workflows.”
That’s a small shift, but almost everyone on our team noticed it. As we debriefed the show and discussed the changing perspectives on the cloud, the word that kept coming up was “flexibility.” Creative teams have different appetites, different needs, and are starting from different places as they consider how to equip their people. Some of our best conversations at IBC centered on how creators can make the “right first move to the cloud”, and helping our customers diagnose where they are and what they’re ready for in their cloud journey. My biggest takeaway? There’s no one right answer. Teams can and should take a flexible approach. But flexible approaches can also be daunting – there are so many options to consider. Having a framework to lean on sure seems to help. We have some good thinking to share here. Our CTO, Stephen Tallamy, will also be sharing some of his evolving point of view on a more flexible journey to the cloud in an upcoming IBC recap, and I encourage you to keep an eye out for that in a few weeks.
One Feeling: Pride
I walked out of IBC feeling proud. Proud of what our product can do, proud of what we’ve accomplished this year, but most of all, proud of the people on our team.
I won’t lie. I like to win. After being awarded a technical Emmy this spring, EditShare took home a Best of Show award for our Universal Projects approach at IBC. The team was elated. Being recognized for innovating in a room full of innovators is the kind of recognition you hope for in this industry. It’s validation for all the work we’ve done to translate what we hear from our customers into how our products work and what we choose to build next. It felt great.
But like I said, our win isn’t what I’m most proud of. What makes me most proud is simply how our team showed up. Every company out there talks about culture. But anybody who visited the EditShare booth got to experience ours and feel just how special our team is. They got to see firsthand how EditShare’s core values make this not only a great place to work, but also how they inform our product decisions and corporate strategy, and how they help us simplify storytelling for hundreds of clients around the world. We dig deep. We are all around athletes. We have deep customer empathy. We are humble. We win together. We’re EditShare. We are excited and optimistic about today and the future.
We’re looking forward to seeing many of you as we continue the [tradeshow tour] in Q4 and into 2023. In the meantime, don’t hesitate to drop us a line if there’s anything we can do – or if you’d like to hear more of what’s standing out for us so far this year.
Hope to see you soon.
While it is definitely a hot topic at the moment, at EditShare we have been helping users create and operate successful cloud solutions for many years.
Those early adopters, and the many who have followed, tend to be organizations who are reasonably cloud-savvy. They are comfortable using EditShare FLEX Cloud Edit software, alongside tools like the Adobe® Creative Cloud suite and Teradici for remote desktop control.
To make the best use of the cloud for post-production, you have to be able to manage the processes and optimize post-production storage. The much-lauded advantage of the cloud is that you only pay for the computing power you use, so you have to be able to rapidly spin up instances as you need them, and equally quickly release them when you are finished.
Some organizations will have the detailed cloud knowledge to be able to implement their own management layer. For teams without this knowledge, we now offer FLEX Cloud Edit+. Essentially, Edit+ takes over the detail of the cloud management so you don’t have to get into its depths.
FLEX Cloud Edit has been around for a number of years, and gives post facilities the ability to edit in the cloud using their preferred software, including Adobe, Apple, Avid, Autodesk, DaVinci and more. What FLEX Cloud Edit+ adds is workstation management capabilities, and integrated file transfer acceleration.
As we are talking to customers, one of the biggest areas of concern about cloud migration is how to get the material up and down from cloud video storage. When you are dealing with the very large files of professional video, it is natural to see transfers as a potential major bottleneck.
To solve this, we have partnered with Data Expedition, a specialist in accelerated communication. Its product CloudDat can push data transfers up to 5 gigabits a second on a single instance, and instances can be stacked when exceptionally high performance is required. The EditShare integration allows for direct upload to FLEX storage for online use or to Amazon S3 for archive or to use with EditShare’s Seamless Proxy Editing feature.
This file acceleration is bundled into a turnkey system and it works out of the box. It also fits into the cloud philosophy in that you pay for it only while you use it: the license is by connected time.
The second major challenge is management of the cloud workstation environment to reduce costs and overheads for management. FLEX Cloud Edit+ integrates the HP Teradici Cloud Access Manager (CAM) to handle the management layer.
As an administrator of the system, the Cloud Access Manager allows you to allocate users to workstations, giving the flexibility to choose from allocating one user to one workstation, through to allowing all users access to a pool of workstations (or any combination between). From the end user perspective, they simply use the standard PC over IP client to connect to the CAM. Once authenticated, the user will be shown the list of workstations they have access to, which workstations are in use and the ability to remotely start a workstation if it is powered off. Not only does this simplify the user experience, it provides significant cost savings – you are only charged for the workstation whilst it is powered on.
FLEX Cloud Edit+ has built-in Active Directory management to support single log-in credentials for all users and functions, which can be used stand-alone or connected to existing Active Directories.
In summary, EditShare has worked with two other industry leaders, HP Teradici and Data Expedition, to build an integrated solution to cloud editing for users who do not want to get into the details of AWS administration. It is a seamless, turnkey experience: a fast on-ramp to the cloud for those businesses who would rather focus on their core creative skills.
There is no right or wrong way to post produce a project: there is no right or wrong software package for each part of the process. How you choose to complete the work is down to a number of factors, not least individual preferences.
Except that for most organizations, they are locked into a specific toolset because that is the only way they can move projects around and work collaboratively. Everyone using the same suite of software applications may limit the operators, but it means projects can be (reasonably) seamlessly exchanged.
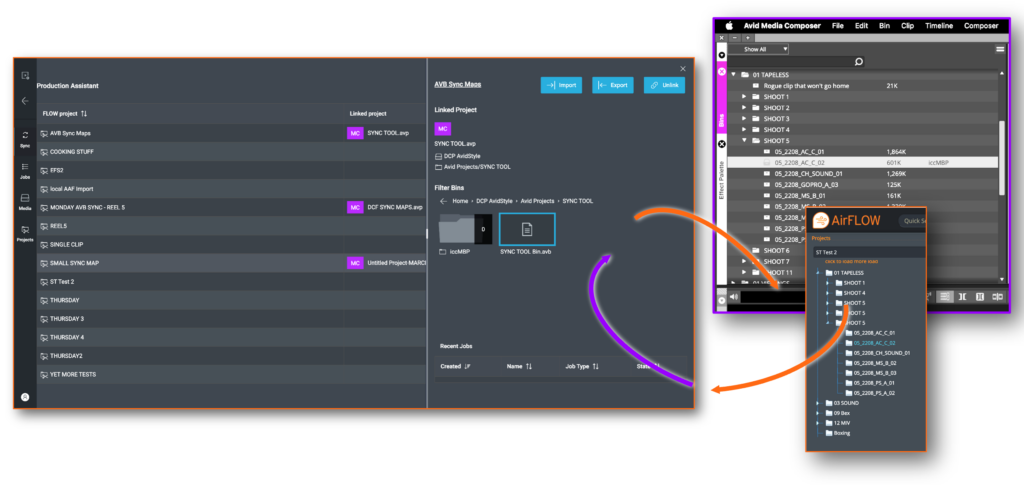
At EditShare we wanted to take a fresh approach to this. Our users told us that it would be great to have more flexibility. This is why we created Universal Projects, which allows you to move between platforms as easily as possible.
The idea is that you can start a project in any tool – including EditShare FLOW to set up bins and even rough cuts – and work in any other.
In the real world it may be unlikely that a single project will be worked on by multiple editors each using different NLEs, so you might ask why we have devoted our development efforts to this. But there are real-world use cases.
Imagine, for instance, working on an episodic series at an Avid post house. During the edit, the production company or broadcaster needs to start on the marketing campaign, and the in-house trailer editor prefers Premiere Pro. Having to go back to the raw footage and start the search for clips from scratch is clearly not an economic option. Being able to look into the programme edit, browse bins for each episode, and with key moments tagged by the producer, saves days of effort and leads to a much better result. When the pressure is always on to deliver things faster, this is a big benefit.
The idea of being able to share projects between platforms is sound. What does it mean in practice? Inevitably, there are differences between platforms.
FLOW is the EditShare media management platform. In 2021 we introduced FLOW Panels – plug-ins – for Adobe® Premiere® Pro and for DaVinci Resolve, which were very well received. The Panels provide a means of accessing FLOW media management from within the familiar editor user interface.
FLOW panel connected directly into the Adobe® Premiere® Pro UI
More importantly, it is a simple means to swap bin structures, content, and all the metadata around the edit. Where it can, this is all maintained completely automatically. So you can create a project structure in advance in FLOW and have it pop up ready when you log in to your editor. If you add bins or sub-divide timelines or make any other structural changes, these are immediately reflected back into FLOW, and are available to any other user who logs in.
Avid Media Composer takes a slightly different approach and lacks the simple hooks for tight, cross-platform integration. But it would not be a very valuable cross-platform integration if it did not include Avid. So we have now brought Media Composer under the Universal Projects umbrella.
We think we are pioneering the universal projects concept. We are certainly the first to be able to integrate Avid technology and workflows into cross-platform collaborations.
Our implementation respects Media Composer’s way of working, like locking bins when a user has logged into a project. To allow it to be always available to other collaborative users, we implemented a routine that automatically generates a copy of the structure which is then reconciled again when the original user logs out or publishes.
This works in conjunction with the Avid Attic, so projects are backed up both here and in FLOW, ensuring each user can always access the history of a project as well as the latest version.
In effect, EditShare FLOW appears as another user in the Media Composer environment. It becomes a very powerful edit assistant, either manually through other portals into FLOW or automatically.
Sync between FLOW and Media Composer respecting bin locking
The original Universal Projects links are already available; the complete system including Media Composer integration is currently in advanced beta trials with a number of organizations from boutique post houses to major national broadcasters.
Whatever the application, it gives you an overview of every project and a means of planning and optimizing workflows. As a side benefit, it also helps engineers plan for future expansion, showing where the bottlenecks are in projects, and facilitating data-lead decisions about where to optimize workflows.
Ultimately, it is part of the new metadata revolution, whereby a strong, common, resilient set of information is used to drive complex workflows and automated processes from the camera to the screen.
Want to find out more? See it in action at IBC, book a meeting or a demo here, or request a follow-up