MediaSilo Panel for DaVinci Resolve Studio and Adobe® Premiere® Pro
Reuben Evans, Blade Ronner Media
MediaSilo’s panels for Adobe Premiere Pro and DaVinci Resolve make uploading a breeze
Sometimes, at the end of a long editing session, you just want to hit “export” and call it night. But everyone has experienced waiting for exports to complete, then initiating an upload to a review platform, and then waiting for that to complete. Then, you have to wait for the transcode to complete. Then, you have to ensure it plays right and the watermark is applied. Then, you have to send emails to producers and directors. Next, you wait for their comments.
The next day, editors try to figure out how to match the comments from emails back into their timelines. Then, you have to be careful because making changes affects the timecode, which throws off another set of comments where a reviewer typed in the timecode in a Slack message. And so on.
MediaSilo’s Panels for Premiere Pro and DaVinci Resolve solve this whole mess for editors. Let’s investigate the panels and see how they can save you time and grief.
MediaSilo Panel for Premiere Pro and Resolve
The MediaSilo panel gives you access to assets in MediaSilo right within your NLE. It also allows you to export a timeline with a single click and have it uploaded into the right project folder on MediaSilo. You can choose your upload settings and identify the people who need to be notified. Once the team has made notes in MediaSilo’s review mode, you can immediately import those comments as markers into your sequence.
Those features streamline so many manual steps in the review and approval process. Basically, the MediaSilo panel gets you home in time for dinner.
DaVinci Resolve
Once the panel is installed, Open DaVinci Resolve and go to Workspace -> Workflow Integrations -> MediaSilo. A floating window appears with your projects. It uses a helper app called “Electron,” so don’t quit it. Your assets appear in the projects. When you float your mouse over each asset, you can preview (Resolve only), download, create a new version, or Open in MediaSilo.
Premiere Pro
Install the MediaSilo Panel from the Creative Cloud desktop app. Go to “Stock & Marketplace” and search for MediaSilo. Once the extension is installed in Premiere, open the Window menu > Extensions > MediaSilo.
Downloading assets into your project
If you want to include one of your MediaSilo assets in your local project, just drag it into the media. If you prefer to download a proxy version, click the download icon and select “Proxy” from the drop-down menu. Proxies are smaller, lower-resolution versions of the original footage. They are handy when you are putting together a rough cut. And when your project is ready for color grading, you “conform” it to the original, high-resolution clips.
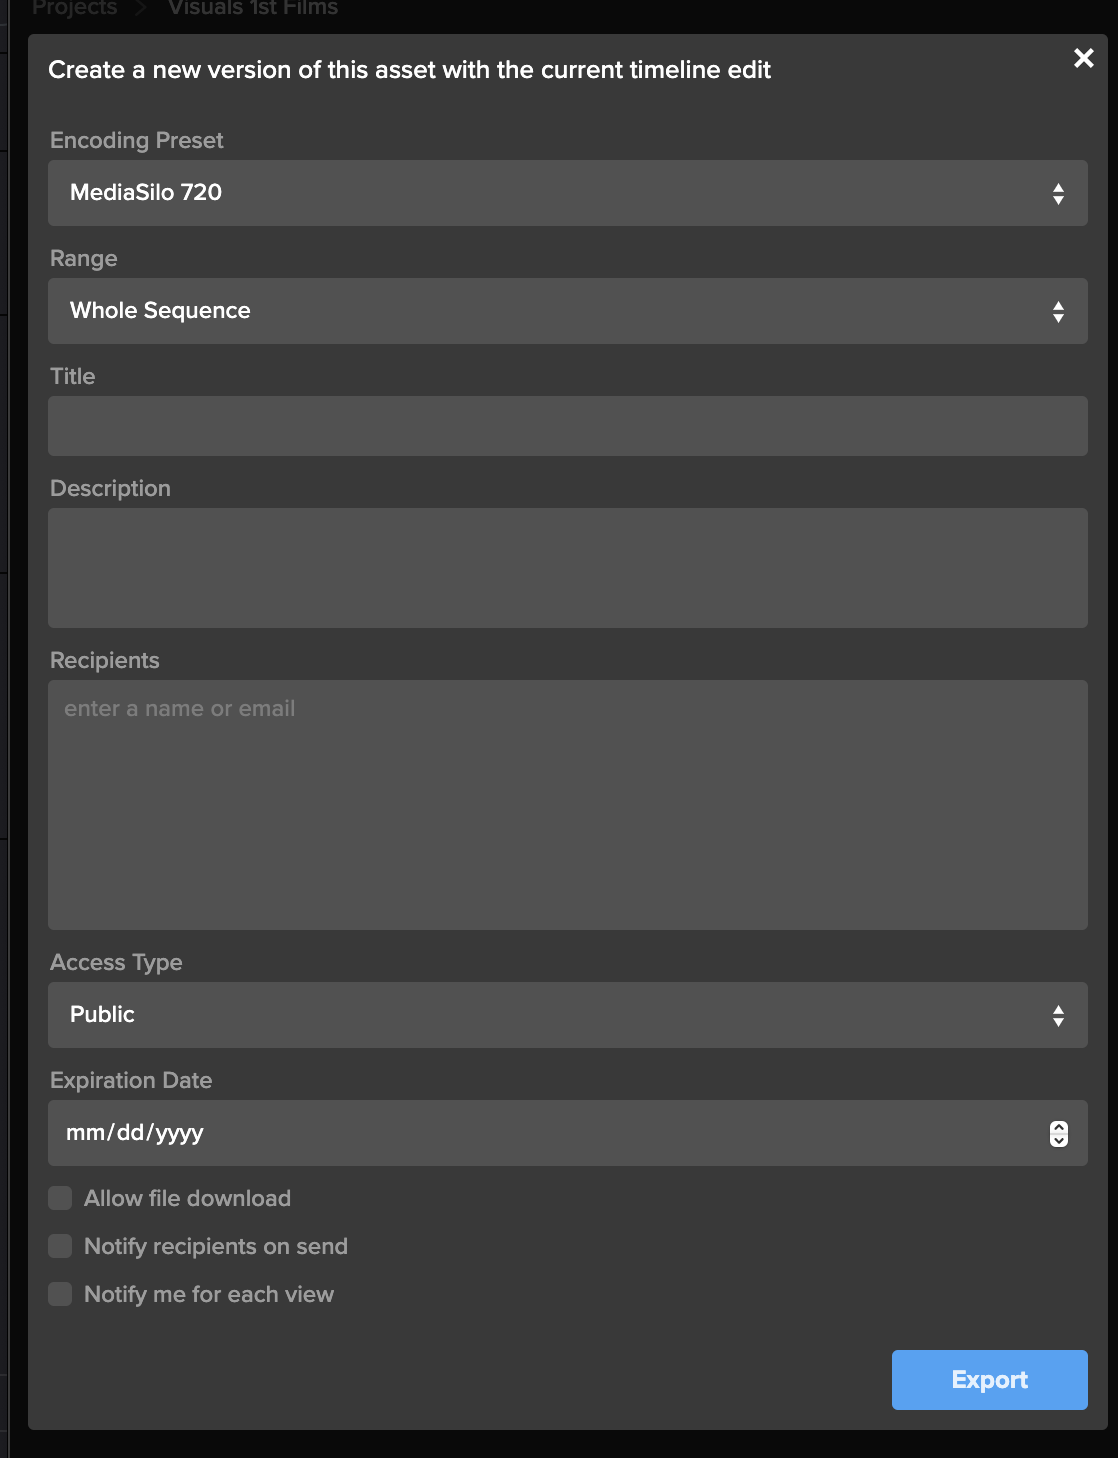
Exporting your timeline directly to MediaSilo is a breeze with the panel. Once you’ve completed your cut, click “Export Timeline” (Premiere says, “Export Sequence”) in the MediaSilo Panel. The “Export Sequence/Timeline” window opens up. You can choose your encoding preset based on your needs. Sometimes, you need the highest quality version to go up, and sometimes, you just need a lower-resolution version for quick approval. Choose the whole sequence or just from the In/Out points. You can specify a title and add a description that will appear in MediaSilo.
“Upload Location” is the next option. Start typing the project name, folder or asset with which this upload should be associated. This step is important because an editor may work on projects with different security levels.
The “Recipients” field saves you the hassle of waiting for an upload to complete before notifying reviewers. Enter the names of the individuals who need to receive a review link, and they will be notified once the asset is ready for viewing.
Create a new version of your timeline
Typically, when I’m ready to output a new version of an edit, I export it from the timeline. If the service I’m using for review and approval (non-MediaSilo) keeps track of versions, I usually just cross my fingers and hope it picks up on the new file coming in. Most of the time, I just append a “v2” or “v3,” and then manually identify it as a new version once the upload has completed. Then, I send a message to alert the reviewer.
The MediaSilo panel takes a different, more efficient approach. This feature is so simple that it took me a moment to understand how it works.
This process applies if you have already exported your timeline once and you need to export another version after some changes have been made. Select the clip in the panel and click on the button to share a new version.
This will bring up the export window. Rather than simply exporting the asset, all these options are designed to help you streamline creating a new version of the asset. This way, you can give the new version its own title, and MediaSilo will keep it associated with the initial version. This means the links that you have previously sent out will continue to work.
You can even change the access on the new version, and reviewers will be notified when it is ready. You’ll also receive a notification when they view it. This little box saves so many steps in the process of exporting compared to the process I outlined at the beginning of this section.
Encoding Presets
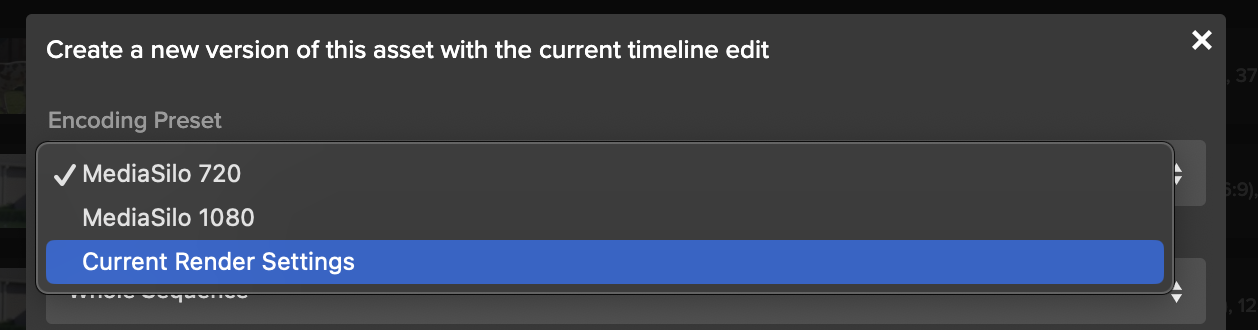
The encoding presets section allows you to choose the resolution for your upload. Sometimes, you need to get a change up quickly or share a low-quality version with a collaborator. So you can choose a lower-resolution setting. If you need to upload at a higher quality, choose your “current render settings.”
Watermarking and security
If you have watermarking turned on with your project, that will get automatically applied in MediaSilo. This is really helpful for editors because they don’t need to turn on and off a watermark within their NLE. In addition to the visible watermark, MediaSilo supports forensic watermarking with SafeStream. This technology ensures that any leaks can be traced back to their source.
MediaSilo also supports the ability to use your own custom email server for email notifications and 2-factor authentication — to ensure an even higher level of security.
Support articles
MediaSilo offers support articles for Resolve and Premiere that show you how to install and use the panels in detail.
Conclusion
The MediaSilo panels in DaVinci Resolve and Adobe Premiere Pro will save you time and energy. They help to make collaboration, review and approval a much more streamlined process.
When you send large video files, you can encounter all sorts of challenges. When your team is collaborating on a video project, you often have to send multiple versions, track review and approval comments, and make sure everything is secure. However, video collaboration workflows are more demanding than your typical cloud-based file-sharing workflows. This can be even more challenging when the creative team and the IT team propose different solutions for sharing video files.
Here are 10 of the top ways to share large video files and their pros and cons. I’ll also share things I wish IT knew about the unique demands of video review and approval processes. So, let’s dig in to find out which solution is best for your video collaboration workflow.
WeTransfer
WeTransfer’s simple interface makes it easy to share files up to 2GB. To upload larger files, you’ll need to upgrade to Pro or Premium.
WeTransfer uses a web browser interface for uploading. With some browsers, like Safari, you can run into an issue where the browser will time out before your large upload is complete. This isn’t the case when apps feature an app that installs on your local machine.
While WeTransfer Pro does a great job of sharing your final exports in the delivery phase of your project, it lacks review and approval features, so it might not be the right tool for collaborating during the post-production phase.
The other major drawback is that WeTransfer does not recover well from an interrupted file transfer. You’ll need to re-initiate if your transfer is interrupted (maybe due to a bad WiFi connection). If your upload is a large file, this can mean a significant amount of lost time, and you still won’t know if it will complete on a second go-around.
Dropbox
Dropbox is well known for its ability to sync files between the cloud and your various devices. But since DropBox Business Plus caps file sizes at 250GB, it runs into similar constraints as WeTransfer Pro. DropBox does feature “Replay,” which allows for commenting on videos, but it is not available on the least expensive plan. Additionally, the replay feature is limited to 10 file uploads on their top plan.
While Dropbox offers reliable syncing, it can be confusing when working with two different organizations. It tends to demand that both parties upgrade. That makes it confusing when you are trying to figure out who is hosting which files. A common question that arises is, “If I delete this file on my computer, will it vanish from yours?”
Post-production professionals need to know that they can deliver files without confusing mismatched subscription tiers between vendors. So, if you find yourself dealing with multiple projects and multiple clients, getting everyone to collaborate through Dropbox is a tall order.
Box
Box enjoys a solid reputation for handling lots of smaller files well. Their lowest tier caps file sizes at 250MB. (The highest tier caps out at 150GB per file). This gives you an idea of where their emphasis lies. There are no review or commenting features associated with videos.
Box is a great example of the difference between typical workflows that IT supports vs. media workflows. While an IT team may be accustomed to supporting petabytes of small files, this is different from workflows that have a smaller overall footprint, but the individual files are larger.
Google Drive
Google knows how to sync and send large files. Google Drive is inexpensive and reliable. Google offers a web interface and a downloadable app that syncs locally. The downloadable app is more reliable than the web interface for large transfers.
However, by many accounts, Google Drive is slower than Dropbox. My personal experience is that Google will eventually get your file uploaded. But sometimes, you can run into a frustrating scenario where interrupted syncs hang. This causes Google to stall out until Google Drives figures out that a file has been moved or renamed. This can put a halt to your other uploads.
Google also changed how sharing works between paying and free users.
If everyone within an organization is on a paid tier, then file sharing works well. But if you are sharing between organizations, Google will basically push both sides to upgrade. It is frustrating because you cannot know whether the person on the other side of the share has a paid account. I just ran into this a couple of weeks ago. I had a paid version, and the other team had free accounts (but I didn’t know this). The other team had to get their CEO to join the shared folder to accept my shared folder because he had a paid account.
Post-production pros need to know that the delivery of their assets is friction-free. You don’t want your client hit with promotional “nag-ware” when you are trying to deliver your final assets.
OneDrive
Microsoft enjoys a solid reputation with IT teams for good reason. Their products cater to the needs of corporate users. Microsoft places an emphasis on security and integration with Windows.
However, OneDrive is not oriented toward post-production. It lacks features oriented toward video review and approval and version tracking. This makes it a good solution for sharing graphics and project files, but it isn’t great for managing video projects.
Vimeo
Vimeo has been the champion for preserving video quality for films delivered to the web. Vimeo is a great tool for the distribution of assets online, where video quality trumps workflow efficiency. It works well for embedding your finished project on your website. In the past few years, Vimeo has also been adding collaboration, AI, and live-streaming features.
However, in my personal experience, I have found uploading to Vimeo painfully slow. Transcoding also seems to take longer than other services. It will be interesting to see if Vimeo’s performance can keep pace with their aspirations.
Resilio
Resilio uses P2P technology to facilitate the syncing of large files between multiple collaborators. This is a powerful technology, but it does require the app to be installed on the computers of both the sender and the recipient. This means Resilio is a nice solution for frequent collaborators. However, it’s really a no-go for client work where somebody just wants to click a link, quickly compare versions, and leave some comments.
Frame.io
Adobe’s frame.io platform is a popular solution for review and approval. It features integration into popular NLEs, and tools for managing versions. Adobe is working to incorporate AI features into frame.io as well.
However, my experiences with frame.io over the past year have been challenging. They’ve acknowledged these challenges and reported that they are working on an overhauled version of their software.
Infrastructure solutions: Aspera, Signant, and EditShare EFS
IBM Aspera and Signant Media Shuttle are robust solutions that integrate your team’s IT infrastructure. They’re often used by broadcasters to move large files. However, many teams are finding challenges with these solutions. And they are expensive.
EditShare EFS has built-in file acceleration for large transfers from one EFS system to another. This can be particularly advantageous to customers who have multiple facilities and the transfer software is included in the standard EFS license – no additional costs are involved.
MediaSilo
MediaSilo delivers a platform designed specifically to tackle the challenges of video collaboration. It integrates right into Adobe Premiere Pro and DaVinci Resolve. This allows editors to save huge amounts of time when exporting, uploading, and versioning.
MediaSilo allows users to upload through the browser or the desktop app. MediaSilo’s robust uploader gives you real-time feedback on the speed and progress of your uploads. If you’re connection is interrupted, MediaSilo does a great job of completing the transfer when you are reconnected. It is also easy to cancel an upload and clear the queue. This avoids the hangs and syncing issues that other solutions run into.
The SafeStream technology ensures that assets can be forensically tracked to individual users, and watermarks deter IP theft.
MediaSilo’s review and approval tools allow for easy commenting and versioning. This helps everyone on the team to know if specific notes have been addressed. It is easy to send your collaborators a MediaSilo link, and they don’t have to worry about having an account, what tier they are on, or sync settings. MediaSilo’s strength is wrapping powerful features in a simple interface. If you need to send a collaborator a video file for review, it doesn’t get easier than MediaSilo.
Conclusion
Moving around massive video files is a challenge without the right tool. Sometimes, you just need to send someone a file, but other times, you need to gather notes, compare versions, and intelligently group assets. Video files present challenges that are different from syncing a bunch of documents. Tools like MediaSilo, and EditShare EFS can smooth out your workflow and simplify remote collaboration.